Konica Minolta Kodak i1405 Setup Guide
Konica Minolta Kodak i1405 Manual
 |
View all Konica Minolta Kodak i1405 manuals
Add to My Manuals
Save this manual to your list of manuals |
Konica Minolta Kodak i1405 manual content summary:
- Konica Minolta Kodak i1405 | Setup Guide - Page 1
- Konica Minolta Kodak i1405 | Setup Guide - Page 2
Kodak i1400 Series Scanners provide the ability to process scanned images to improve their quality by using image processing features. Image processing refers to features of the scanner on the image). The information in this guide provides procedures for using the ISIS Driver as well as descriptions - Konica Minolta Kodak i1405 | Setup Guide - Page 3
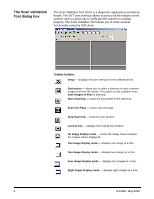
and the Kodak Scanner i14XX Scanner as the Driver. The Scan Validation Tool dialog box will be displayed. NOTE: For a description of the icons on the Scan Validation Tool dialog box, see the section entitled, "Scan Validation Tool dialog box" at the end of this guide - Konica Minolta Kodak i1405 | Setup Guide - Page 4
and is provided with the scanner by Kodak. Many scanning applications support ISIS drivers and this driver can be used to interface with them. The ISIS Driver is the part of the capture system which links the scanner to your scanning application. This guide provides descriptions of the options - Konica Minolta Kodak i1405 | Setup Guide - Page 5
) is a diagnostic application provided by Kodak. The SVT user interface allows access to all the features of the scanner and is a good way to verify that the scanner is working properly. The Scan Validation Tool allows you to verify scanner functionality using the ISIS driver. Toolbar buttons Setup - Konica Minolta Kodak i1405 | Setup Guide - Page 6
and white image settings on one side and transfer them to the other. For example, if you highlight and set up Front Image #1, you can use the Copy button to duplicate those settings for Back Image #1. OK ⎯ saves the values set on all tabs. Cancel ⎯ closes the window without saving any - Konica Minolta Kodak i1405 | Setup Guide - Page 7
image where you can define individual image processing values. Options include: Front Image #1, Front Image #2, Back Image #1 and Back Image #2. The Kodak Scanner drivers allow you to control the camera settings independently. Some settings apply only to black and white images, others apply to color - Konica Minolta Kodak i1405 | Setup Guide - Page 8
A-61661 May 2010 Toggle Patch - indicates you want to tell the scanner, via a toggle patch document, if the document is color/grayscale or black and white. You can select: • Off: no patches will be used. • Same Side: only the side which recognizes the patch sheet will toggle. • Both Sides: a patch - Konica Minolta Kodak i1405 | Setup Guide - Page 9
For Kodak i1440 Scanners only: • Photo: the scanner will locate the photograph on the document and return an image that contains just the photograph. If the scanner finds more than one photograph on a document, one image is still returned. The entire document is used to locate the photograph. • - Konica Minolta Kodak i1405 | Setup Guide - Page 10
: Page Orientation - allows you to select the way you place your documents in the scanner, Top edge first, Bottom edge first, Left edge first or Right edge first. When using the Kodak i1400 Series Scanners, select Top edge first. Image Orientation • Automatic: if you select Automatic, the Page - Konica Minolta Kodak i1405 | Setup Guide - Page 11
Combine front and back images - typically, for a document, one image is created for the front side and another image is created for the back side. Turn this option on if you want one image that contains both the front side and back side of the document. The selections are: Front on Top: front side - Konica Minolta Kodak i1405 | Setup Guide - Page 12
scan areas defined for all camera selections are independent. A-61661 May 2010 Page Size ⎯ the default paper size is set when a scanner is selected. You can choose a different paper size using the drop-down list. NOTE: Page Size and Page Layout selections also appear on the Layout tab. If you make - Konica Minolta Kodak i1405 | Setup Guide - Page 13
this option on may result in a slower scanning speed. • Halftone Removal ⎯ enhances images containing dot matrix text and/or images with shaded or colored backgrounds using halftone screens and effectively eliminates noise caused by the halftone screen. 12 A-61661 May 2010 - Konica Minolta Kodak i1405 | Setup Guide - Page 14
which produces the largest image size. Streak Filter - allows you to configure the scanner to filter vertical streaks from your images. Streaks are lines which may appear on an image and are not part of the original document. Streaks may be caused by contaminants on your documents (e.g. dirt - Konica Minolta Kodak i1405 | Setup Guide - Page 15
options are only available if your scanner is equipped with the Kodak i1400 Series A3 Flatbed Accessory. • ADF: if you are scanning documents from the input tray. • Flatbed: if you are scanning documents using the flatbed. • ADF/Flatbed: when selected, the scanner will detect if the document(s) to - Konica Minolta Kodak i1405 | Setup Guide - Page 16
as a multi-fed document. - High: the most aggressive setting. This is a good setting to use if all documents are similar in thickness to 20-lb. Bond paper. • Action - select an option of how you want to the scanner to perform if it detects a multi-fed document. - Beep and Continue: if selected, the - Konica Minolta Kodak i1405 | Setup Guide - Page 17
. Color Content • Off: this is the default. • Low: documents require only a small amount of color to be saved as color or grayscale images. Used for capturing documents that are primarily black text with small logos, or contain small amounts of highlighted text or small colorful photos. • Medium - Konica Minolta Kodak i1405 | Setup Guide - Page 18
If none of these options provide the desired result, select Custom option to manually adjust Color Amount and/or Color Threshold. Color Amount: the amount of color dialog box as these are the settings you will be required to use in your application. NOTES: • These settings were calculated based on - Konica Minolta Kodak i1405 | Setup Guide - Page 19
. • Adjust these settings by dragging the slider bar to the left or right, entering a value in the text box or using the up/down arrows. Background Smoothing - using this option for documents or forms with a background color will help produce images with a more uniform background color. • Background - Konica Minolta Kodak i1405 | Setup Guide - Page 20
, or you can select a value in the Top, Left, Right and/or Bottom area(s) from each side of the scanned image to be filled. When using this option, be careful not to enter a value too large as it could fill in image data that you want to keep. A-61661 May 2010 - Konica Minolta Kodak i1405 | Setup Guide - Page 21
tab" earlier in this chapter for descriptions. The Dropout tab is used to eliminate a form's background so that only the entered data is images, these settings effect the grayscale version of the document which the scanner analyzes to produce that electronic image. Form Data is Color ⎯ allows - Konica Minolta Kodak i1405 | Setup Guide - Page 22
be given to the scanning application (i.e., after all other settings have been applied). Learn Content - allows the scanner to determine the content amount based on the documents to be scanned. Click Learn to use this function. NOTE: Learn mode cannot be applied to both the front and back sides - Konica Minolta Kodak i1405 | Setup Guide - Page 23
Printer operates at full scanner speed. The printer printer/enhanced printer. Format Template - the format template is used to build the print string. The print string is is printed before the document is scanned, therefore, it is part of the image. The maximum amount of characters for each print - Konica Minolta Kodak i1405 | Setup Guide - Page 24
string, you can enter one of the following options: • Initial Value: this value is used to assign the document count for the next document entering the transport and is incremented sequentially by the scanner unless another document count is received from the host. This value is returned in the - Konica Minolta Kodak i1405 | Setup Guide - Page 25
to a file by clicking the Save icon, or copy the information to the clipboard which can then be pasted into a document. Displays information about your scanner and driver. 24 A-61661 May 2010 - Konica Minolta Kodak i1405 | Setup Guide - Page 26
-
 1
1 -
 2
2 -
 3
3 -
 4
4 -
 5
5 -
 6
6 -
 7
7 -
8
-
9
-
10
-
11
-
12
-
13
-
14
-
15
-
16
-
17
-
18
-
19
-
20
-
21
-
22
-
23
-
24
-
25
-
26
 |
 |
