Konica Minolta MS6000 MK II Twain Driver and Overlay Manager Software Installa
Konica Minolta MS6000 MK II Manual
 |
View all Konica Minolta MS6000 MK II manuals
Add to My Manuals
Save this manual to your list of manuals |
Konica Minolta MS6000 MK II manual content summary:
- Konica Minolta MS6000 MK II | Twain Driver and Overlay Manager Software Installa - Page 1
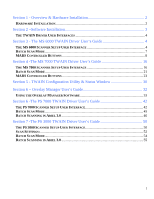
Installation and User's Guide For Konica Minolta Business Solutions' TWAIN Driver V.5.0.1.7b & Overlay Manager Software September 10, 2004 - Konica Minolta MS6000 MK II | Twain Driver and Overlay Manager Software Installa - Page 2
4 THE MS 6000 SCANNER SETUP USER INTERFACE 4 BATCH SCAN MODE...7 MARS CONTROLLER BUTTONS 8 Section 4 -The MS 7000 TWAIN Driver User's Guide 16 THE MS 7000 SCANNER SETUP USER INTERFACE 16 BATCH SCAN MODE...21 MARS CONTROLLER BUTTONS 23 Section 5 - TWAIN Configuration Utility & Status Window 30 - Konica Minolta MS6000 MK II | Twain Driver and Overlay Manager Software Installa - Page 3
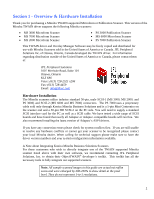
Publication Scanner. This version of the Minolta TWAIN driver supports the following Minolta scanners: • MS 3000 Microform Scanner • MS 7000 Microform Scanner • MS 2000 Microform Scanner • PS 3000 Publication Scanner • MS 6000 Microform Scanner • PS 7000 Publication Scanner This TWAIN driver and - Konica Minolta MS6000 MK II | Twain Driver and Overlay Manager Software Installa - Page 4
any of the supported Minolta scanners attached to your system. It will then install the needed drivers (data sources) associated with those scanners. Once the configuration utility has completed its scan and installs, it will launch a status window showing all the connected Minolta hardware and all - Konica Minolta MS6000 MK II | Twain Driver and Overlay Manager Software Installa - Page 5
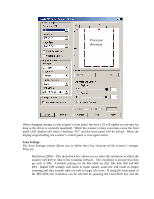
as Adobe Acrobat®, Photoshop®, etc.) are instructed to acquire an image they will launch the MS 6000 Scanner Setup Window. This is your User Interface (UI) for communicating to the TWAIN driver. It allows you to configure the MS 6000 as necessary prior to scanning. Please keep in mind that many of - Konica Minolta MS6000 MK II | Twain Driver and Overlay Manager Software Installa - Page 6
(DPI) - This drop-down box allows you to select the resolution at which the scanner will deliver data to the scanning software. The resolution is measured in dots per inch or DPI. Available settings for the MS 6000 are 200, 300, 400, 600 and 800 DPI. Higher DPI settings will result in better - Konica Minolta MS6000 MK II | Twain Driver and Overlay Manager Software Installa - Page 7
Scan Area captured by the MS 6000. The driver supports a wide range of standard U.S. and European sizes. The scan area selected will be reflected in the Preview Window a result all pixels will be either black or white. The scanner will threshold the image and perform a dithering algorithm (see the - Konica Minolta MS6000 MK II | Twain Driver and Overlay Manager Software Installa - Page 8
Minolta Scanners can be tricky. In order to perform batch scanning with the MS 7000 make sure to: 1) Have Document/Scan selected in the Ariel software scanning window. 2) Click the More button in the Ariel scanning window and then make sure to have batch scanning selected in the Minolta TWAIN driver - Konica Minolta MS6000 MK II | Twain Driver and Overlay Manager Software Installa - Page 9
of measurement between inches and centimeters. The Window - The preview window itself represents the entire 12" x 12" scan area of the MS 6000. Within the preview window will be an outlined rectangle. This outline represents the actual area that the scanner is currently set to capture. This outline - Konica Minolta MS6000 MK II | Twain Driver and Overlay Manager Software Installa - Page 10
users can enter a desired frame number in this window and hit the set key. The MARS controller will then move move the blipped film to the entered frame number. ? - Clicking this button will open a message window mode set, this setting will cause the scanned images to be affected as follows: Black - Konica Minolta MS6000 MK II | Twain Driver and Overlay Manager Software Installa - Page 11
the scanner to compare light areas to dark areas and make an intelligent guess based on image composition as to which polarity film is loaded. Using the Film Type button on the front panel of the MS 6000 can also change this setting. Image Filter - offers advanced algorithms for processing scanned - Konica Minolta MS6000 MK II | Twain Driver and Overlay Manager Software Installa - Page 12
for enhancing text or line art legibility. Auto Frame Elimination - When scanning an area larger than that needed for the current image, you may wish to crop off the unnecessary border. Checking this box will cause the scanner - Konica Minolta MS6000 MK II | Twain Driver and Overlay Manager Software Installa - Page 13
Will apply a sharpening algorithm. This will tend to make tonal areas appear grainy while text will become crisper and better defined. Fine is photo not selected Fine Mode 2 - Selecting this setting will cause the scanned images to be affected as follows: Black & White - Will cause the image - Konica Minolta MS6000 MK II | Twain Driver and Overlay Manager Software Installa - Page 14
7000 supports an automatic lamp shut-off feature. This drop down No Masking or Frame Elimination Auto Masking Auto Frame Elimination box allows you to activate this feature as well as define the time interval of non-usage needed before the scanner will turn the lamp off. Initialize scan settings - Konica Minolta MS6000 MK II | Twain Driver and Overlay Manager Software Installa - Page 15
of controls allows users to change the composition of the scanned image as detailed below. Please note that when using the slider bars you may notice some slight lag or resistance -- this is normal and is due to the bi-directional communication between the driver and scanner. Automatic Brightness - Konica Minolta MS6000 MK II | Twain Driver and Overlay Manager Software Installa - Page 16
interact with the Driver User Interface to accomplish important tasks or launch support windows. Here is a detailed description of what these buttons do: Scan - Clicking the Scan button will cause the MS 6000 to initiate a scan using the currently selected configuration. Scans can also be initiated - Konica Minolta MS6000 MK II | Twain Driver and Overlay Manager Software Installa - Page 17
such as Adobe Acrobat®, Photoshop®, etc.) is instructed to acquire an image, it will launch the MS 7000 Scanner Setup Window. This is your User Interface (UI) for communicating to the TWAIN driver. It allows you to configure the MS 7000 as you like prior to scanning. Please keep in mind that many of - Konica Minolta MS6000 MK II | Twain Driver and Overlay Manager Software Installa - Page 18
you to define four key elements of the scanner's settings. They are as follows: Scan Mode - Because the MS 7000 has a large 12" x 17" scan area, it is capable of actually capturing two 8 ½" x 11" side-by-side images with one scan. The Scan Mode setting allows users to choose whether to have the - Konica Minolta MS6000 MK II | Twain Driver and Overlay Manager Software Installa - Page 19
be the same. Thus any size adjustments to one scan area will be copied in the other. When in Dual Scan Mode you cannot set the custom scan area by using the Manual Masking LED lights on the Scanner's Front panel (see the Preview Window below for more information). Stack L/R Letter - This setting is - Konica Minolta MS6000 MK II | Twain Driver and Overlay Manager Software Installa - Page 20
Scan Area captured by the MS 7000. The driver supports a wide range of standard U.S. and European sizes. If desired, you can also select the custom setting and define a unique scan area. The scan area selected will be reflected in the Preview Window or white. The scanner will threshold the image - Konica Minolta MS6000 MK II | Twain Driver and Overlay Manager Software Installa - Page 21
from the front panel to define any custom scan area (minimum of 4" per side). The resultant defined area will be transferred to the driver and displayed in the preview window. Scan Left / Scan Right Buttons - When the MS 7000 is set to scan in Dual Scan Mode these two buttons will become enabled and - Konica Minolta MS6000 MK II | Twain Driver and Overlay Manager Software Installa - Page 22
and enhance photographic areas, but will typically blur textual images. This setting can be more useful when scanning tonal images at lower resolutions. Photo Mode Non-Photo Mode Batch Scan Mode The Batch Scan Mode might arguably be the most useful feature of the Minolta TWAIN driver. With most - Konica Minolta MS6000 MK II | Twain Driver and Overlay Manager Software Installa - Page 23
Minolta Scanners can be tricky. In order to perform batch scanning with the MS 7000 make sure to: 4) Have Document/Scan selected in the Ariel software scanning window. 5) Click the More button in the Ariel scanning window and then make sure to have batch scanning selected in the Minolta TWAIN driver - Konica Minolta MS6000 MK II | Twain Driver and Overlay Manager Software Installa - Page 24
allow users to interface with a connected MARS 4 or MARS Mini-2 controller to control the movement and searching of blipped film. The controls within the TWAIN driver only offer minimal support for film movement and searching. There is no support in the TWAIN driver for automated batch scanning of - Konica Minolta MS6000 MK II | Twain Driver and Overlay Manager Software Installa - Page 25
MS 7000 can also change this setting. Auto Frame Elimination - When scanning an area larger than that needed for the current image, you may wish to crop off the unnecessary border. Checking this box will cause the scanner is not supported when scanning in Dual Scan Mode. - Konica Minolta MS6000 MK II | Twain Driver and Overlay Manager Software Installa - Page 26
Photo-Mode None Fine Mode 2 - Selecting this setting will cause the scanned images to be affected as follows: Black & White - Will cause 2 None Image Filter - offers advanced algorithms for processing scanned images. Depending on the image type selected the image filter has the following options - Konica Minolta MS6000 MK II | Twain Driver and Overlay Manager Software Installa - Page 27
of this feature is that based on a prescan the MS 7000 will either set the scan area to 8 ½" x 11" or 11" x 17" for the next scan only. This feature is unavailable when scanning in Dual or Stacking modes. Auto Lamp OFF - The MS 7000 supports an automatic lamp shut-off feature. This drop down box - Konica Minolta MS6000 MK II | Twain Driver and Overlay Manager Software Installa - Page 28
of controls allows users to change the composition of the scanned image as detailed below. Please note that when using the slider bars you may notice some slight lag or resistance -- this is normal and is due to the bi-directional communication between the driver and scanner . Automatic Brightness - Konica Minolta MS6000 MK II | Twain Driver and Overlay Manager Software Installa - Page 29
the Preview Window. The user now has a choice of three potential scan buttons. The Scan All button will cause the MS 7000 to scan both the left and right half of the total scan area and return two separate images to the application. Note: If the scanning software being used does not support the - Konica Minolta MS6000 MK II | Twain Driver and Overlay Manager Software Installa - Page 30
an image has been placed in the preview window just drag and drop or resize the scan area to match the given portion of the preview image you wish to capture. Cancel - Use the Cancel button to close out the driver window without initiating any scans. Help - Clicking the Help button will launch the - Konica Minolta MS6000 MK II | Twain Driver and Overlay Manager Software Installa - Page 31
of it as a Windows Explorer for your Minolta SCSI devices and TWAIN data sources). A detected Minolta scanner that is correctly connected to the PC on Host Adapter 2. A red X means that the associated hardware is not connected or detected. Detected SCSI Adapters An MS 6000 connected on Adapter - Konica Minolta MS6000 MK II | Twain Driver and Overlay Manager Software Installa - Page 32
- Pressing this button will cause the Scanner Settings Window to launch. The Scanner Settings Window will look exactly the same as the Driver's User Interface with the exception being that the Scan button is replaced with an OK button. The Scanner Settings Window can be used to set the default - Konica Minolta MS6000 MK II | Twain Driver and Overlay Manager Software Installa - Page 33
the functionality of the driver should you experience problems running the driver in other scanning applications. Section 6 - Overlay Manager User's Guide The Overlay Manager software included with the Minolta TWAIN driver is intended for use only when using the MS 6000 or MS 7000 in conjunction - Konica Minolta MS6000 MK II | Twain Driver and Overlay Manager Software Installa - Page 34
MS 6000 and MS 7000 can annotate an overlay with changing information such as page number, date and time from print to print. In order to do so, the scanners in detail below with further instructions for using dynamic overlays. The and running in the Status Area of the Windows Task Bar. The Task - Konica Minolta MS6000 MK II | Twain Driver and Overlay Manager Software Installa - Page 35
Minolta Overlay Manager section. Simply select it and the monitor icon should appear in the Task Bar The purpose of the Monitor is to watch the selected MS-series scanner scanner. The print button should not be active at this time. The scanner will be considered busy and unavailable while any scans - Konica Minolta MS6000 MK II | Twain Driver and Overlay Manager Software Installa - Page 36
that will become the overlay. Restart: Causes the Overlay Monitor to restart. This can be useful to reinitialize or resend the overlay data to the scanner in static mode or to cause the monitor to activate in dynamic mode. Exit: Causes the Monitor to close. Help: Launches a single-page help file - Konica Minolta MS6000 MK II | Twain Driver and Overlay Manager Software Installa - Page 37
icon and selecting Editor.. or by selecting Programs>Minolta Overlay Manager>Overlay Editor from the Windows Start Menu. Once the Image Editor is launched, fixed, you can stretch the width or height so long as the total area remains constant. The width or height of the overlay cannot be larger than - Konica Minolta MS6000 MK II | Twain Driver and Overlay Manager Software Installa - Page 38
resolution on your scanner (see the MS 6000/7000 Operator's guide for instructions on changing output window. Now let's enter the following text, "This print made on a Minolta scanner". Click OK and the text window will disappear and you'll see an outlined text message on the overlay design area - Konica Minolta MS6000 MK II | Twain Driver and Overlay Manager Software Installa - Page 39
.bmp file you should see a black and white version of the Minolta globe in your editor window. Drag it to the center and place it there. Please note green scanner activates the Overlay monitor so that dynamic data can be updated during each print on the selected scanner. If the green scanner icon - Konica Minolta MS6000 MK II | Twain Driver and Overlay Manager Software Installa - Page 40
scanner is currently connected. This is useful for temporarily disabling overlays in . This window displays important version information regarding the Overlay Image Editor module. The Configuration Editor The Overlay Configuration Editor is where users can select the overlay to use as well as the - Konica Minolta MS6000 MK II | Twain Driver and Overlay Manager Software Installa - Page 41
for each will be stored separately. Important Note: If the wrong scanner is selected (i.e. MS 6000 when using an MS 7000 or vice-versa), the orientations and locations of the overlay will be shown incorrectly in the preview window. Selected overlay - This text box shows the current path and file - Konica Minolta MS6000 MK II | Twain Driver and Overlay Manager Software Installa - Page 42
to rotation. Note: the MS 7000 and MS 6000 use different position designations so make sure you have the correct scanner selected prior to assigning an mode. Thus, only static text and bitmaps will be displayed. Preview Window - The preview window is used to give you an idea of what output will look - Konica Minolta MS6000 MK II | Twain Driver and Overlay Manager Software Installa - Page 43
and place in the Task Manager each time Windows is launched. Section 6 -The PS 7000 TWAIN Driver User's Guide The PS 7000 is Konica Minolta's latest and greatest in Publication Scanner. It compares to nothing like it out on the market for book scanning. Its main feature is that it allows you - Konica Minolta MS6000 MK II | Twain Driver and Overlay Manager Software Installa - Page 44
Window Scan Settings The Scan Settings section allows you to define four key elements of the scanner's settings. They are as follows: Scan Mode - Because the PS 7000 has a large 17" x 23" scan area, it is capable of actually capturing two 11" x 17" pages side-by-side images with one scan. The Scan - Konica Minolta MS6000 MK II | Twain Driver and Overlay Manager Software Installa - Page 45
which the scanner will deliver data to the scanning software. Scan Area captured by the PS 7000. The driver supports a wide range of standard U.S. sizes. If desired, you can also select the custom setting and define a unique scan area. The scan area selected will be reflected in the Preview Window - Konica Minolta MS6000 MK II | Twain Driver and Overlay Manager Software Installa - Page 46
pixels will be either black or white. The scanner will threshold the image and will apply a Minolta TWAIN driver. With most application software the TWAIN driver UI is launched when an Import or Scan command is given. Typically the driver will then close after a scan is completed. When the Batch Scan - Konica Minolta MS6000 MK II | Twain Driver and Overlay Manager Software Installa - Page 47
) areas around the border of an image and convert these pixels to match the image's background. Finger Masking setting will require frame masking be enabled. Finger Masking will remove the finger image from the scan area. Centering setting will require frame masking be enabled. The Preview Window - Konica Minolta MS6000 MK II | Twain Driver and Overlay Manager Software Installa - Page 48
box or the front panel of the PS 7000 itself. Once a paper size is selected it will be represented in the preview window. Users wishing to have more control over the scan area can either resize the box or click-and-drag a new rectangle. To resize the box first hover the mouse over an - Konica Minolta MS6000 MK II | Twain Driver and Overlay Manager Software Installa - Page 49
of 22 Contrast Highlight - The contrast settings extend from 0 to 15. Changing these settings will cause the scanned image to either increase or decrease the range between dark and light areas. A low contrast setting will result in each pixel being set to a value closer to the median (gray - Konica Minolta MS6000 MK II | Twain Driver and Overlay Manager Software Installa - Page 50
the Preview Window. The user now has a choice of three potential scan buttons. The Scan All button will cause the PS 7000 to scan both the left and right half of the total scan area and return two separate images to the application. Note: If the scanning software being used does not support the - Konica Minolta MS6000 MK II | Twain Driver and Overlay Manager Software Installa - Page 51
(such as Adobe Acrobat , Photoshop , etc.) is instructed to acquire an image, it will launch the PS 3000 Scanner Setup Window. This is your User Interface (UI) for communicating to the TWAIN driver. It allows you to configure the PS 3000 as you like prior to scanning. Please note that the PS 3000 - Konica Minolta MS6000 MK II | Twain Driver and Overlay Manager Software Installa - Page 52
- Konica Minolta MS6000 MK II | Twain Driver and Overlay Manager Software Installa - Page 53
drop-down box allows you to select the actual Scan Area captured by the PS 3000. The driver supports a wide range of standard U.S. and European sizes. The scan area selected will be reflected in the Preview Window via a dashed box. When in single scan mode any selected size will be centered in the - Konica Minolta MS6000 MK II | Twain Driver and Overlay Manager Software Installa - Page 54
problems, this feature has been disabled in the current version of the driver. We hope to offer some Front Panel support in a future version of the driver. Automatic Mask Mode - This setting will try to auto detect black (or darkly shaded) areas the Warning Settings Window. This Window allows you to - Konica Minolta MS6000 MK II | Twain Driver and Overlay Manager Software Installa - Page 55
of a more serious hardware problems. Batch Scan Mode - The Batch Scan Mode might arguably be the most useful feature of the Minolta TWAIN driver. With most application software the TWAIN driver UI is launched when an Import or Scan command is given. Typically the driver will then close after - Konica Minolta MS6000 MK II | Twain Driver and Overlay Manager Software Installa - Page 56
3.0 adds support for TWAIN scanning. Because Ariel is designed for Automatic Document Feeders (ADFs) batch scanning with the Minolta Scanners can be tricky. In order to perform batch scanning with the PS 3000 make sure to: 1) Have Auto Scan Mode check box selected in the Ariel Scan window. 2) Click - Konica Minolta MS6000 MK II | Twain Driver and Overlay Manager Software Installa - Page 57
inches and centimeters. The Window - The preview window itself represents the entire 11"x17" scan area of the PS 3000. Within the preview window will be an outlined rectangle (or two rectangles in dual scan mode). This outline represents the actual area that the scanner is currently set to capture - Konica Minolta MS6000 MK II | Twain Driver and Overlay Manager Software Installa - Page 58
the Preview Window. The user now has a choice of three potential scan buttons. The Scan All button will cause the PS 3000 to scan both the left and right half of the total scan area and return two separate images to the application. Note: If the scanning software being used does not support the - Konica Minolta MS6000 MK II | Twain Driver and Overlay Manager Software Installa - Page 59
an image has been placed in the preview window just drag and drop or resize the scan area to match the given portion of the preview image you wish to capture. Cancel - Use the Cancel button to close out the driver window without initiating any scans. Help - Clicking the Help button will launch the
-
 1
1 -
 2
2 -
 3
3 -
 4
4 -
 5
5 -
 6
6 -
 7
7 -
8
-
9
-
10
-
11
-
12
-
13
-
14
-
15
-
16
-
17
-
18
-
19
-
20
-
21
-
22
-
23
-
24
-
25
-
26
-
27
-
28
-
29
-
30
-
31
-
32
-
33
-
34
-
35
-
36
-
37
-
38
-
39
-
40
-
41
-
42
-
43
-
44
-
45
-
46
-
47
-
48
-
49
-
50
-
51
-
52
-
53
-
54
-
55
-
56
-
57
-
58
-
59
 |
 |

Installation and User’s Guide
For
Konica Minolta Business Solutions’
TWAIN Driver V.5.0.1.7b &
Overlay Manager Software
September 10, 2004