Konica Minolta bizhub 20 bizhub 20 Quick Guide
Konica Minolta bizhub 20 Manual
 |
View all Konica Minolta bizhub 20 manuals
Add to My Manuals
Save this manual to your list of manuals |
Konica Minolta bizhub 20 manual content summary:
- Konica Minolta bizhub 20 | bizhub 20 Quick Guide - Page 1
this Quick Guide for the correct setup and installation. IMPORTANT DO NOT connect the interface cable yet. 1 Unpack the machine and check the components AC Power Cord Telephone Line Cord Safety Information Guide Quick Guide Control Panel Drum Unit Assembly (including Standard Toner Cartridge - Konica Minolta bizhub 20 | bizhub 20 Quick Guide - Page 2
operation works with other features. User's Guide Indicates reference to the User's Guide, Software User's Guide or Network Software User's Guide User's Guide. Network User's Guide CCAAUUTTIOINON When you move the machine, grasp the side handholds that are under the scanner. DO NOT carry the - Konica Minolta bizhub 20 | bizhub 20 Quick Guide - Page 3
2 Install the drum unit and toner cartridge assembly IMPORTANT DO NOT connect the interface cable yet. d Gently shake it from side to side several times to distribute the toner evenly inside the assembly. a Remove the protective tape and film covering the scanner glass. b Press the front cover - Konica Minolta bizhub 20 | bizhub 20 Quick Guide - Page 4
firmly in the slots. IMPORTANT Make sure the paper guides touch the sides of the paper so it will feed correctly. e Put the paper tray firmly back in the machine. Make sure that it is completely inserted into the machine. f Unfold the support flap a to prevent paper from sliding off the face - Konica Minolta bizhub 20 | bizhub 20 Quick Guide - Page 5
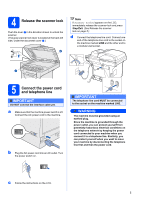
b.) 2 Note If Scanner Locked appears on the LCD, immediately release the scanner lock and press Stop/Exit. (See Release the scanner lock on page 5.) the machine marked LINE. WARNING The machine must be grounded using an earthed plug. Since the machine is grounded through instructions on the LCD. 5 - Konica Minolta bizhub 20 | bizhub 20 Quick Guide - Page 6
Connecting an external TAD (telephone answering device) in Chapter 7 of the User's Guide. 6 Choose a Receive Mode There are four possible receive modes: Fax Only, Fax/Tel, Manual and External TAD. Do you want to use the telephone features of your machine (if available) or an external telephone - Konica Minolta bizhub 20 | bizhub 20 Quick Guide - Page 7
each fax you send. a Press Menu. b Press 0. c Press 2. d Enter the last two digits of the year on the dial pad, 25 Enter & OK Key (e.g. Enter 2, 5.) g Enter the time in 24-hour format on the dial pad, and then press OK. 02.Date&Time 25/03/2009 Time:15:25 Enter & OK Key (e.g. Enter 1 5, 2 5 for 3:25 - Konica Minolta bizhub 20 | bizhub 20 Quick Guide - Page 8
in the User's Guide. g Press Stop/Exit. Note If you make a mistake and want to start again, press Stop/Exit and go back to step a. (USA only) The Telephone Consumer Protection Act of 1991 makes it unlawful for any person to use a computer or electronic device to send any message via a telephone fax - Konica Minolta bizhub 20 | bizhub 20 Quick Guide - Page 9
KONICA MINOLTA machine is equipped with a Transmission Verification Report that can be used as confirmation that you sent a fax. This report lists the name or fax use the Fax Transmission Report feature see Chapter 11 Printing Reports in the User's Guide send and receive faxes, default setting is "!". When - Konica Minolta bizhub 20 | bizhub 20 Quick Guide - Page 10
13 Automatic Daylight Savings Time You can set the machine to change automatically for daylight savings time. It will reset itself forward one hour in the Spring and backward one hour in the Autumn. a Press Menu. b Press 1. c Press 4. d Press or to choose On (or Off). - Konica Minolta bizhub 20 | bizhub 20 Quick Guide - Page 11
your connection type For USB Interface Users Windows®, go to page 12 Macintosh®, go to page 15 For Parallel interface cable Windows®, go to page 17 For Wired Network Windows®, go to page 20 Macintosh®, go to page 24 For Windows Server® 2003/ 2008, see the Network User's Guide on the CD/DVD-ROM - Konica Minolta bizhub 20 | bizhub 20 Quick Guide - Page 12
operating system. • The supplied CD/DVD-ROM includes ScanSoft™ PaperPort™ 11SE. This software supports Windows® 2000 (SP4 or greater), XP (SP2 or greater), XP Professional x64 Edition, Windows Vista® and Windows® 7. Update to the latest Windows® Service Pack before installing Multi-Function Suite - Konica Minolta bizhub 20 | bizhub 20 Quick Guide - Page 13
want to install the PS driver (BR-Script Driver), choose Custom Install and then follow the on-screen instructions. When the Select Features screen appears, check PS Printer Driver, and then continue following the on-screen instructions. h If you do not want to monitor the machine status and error - Konica Minolta bizhub 20 | bizhub 20 Quick Guide - Page 14
your computer. After restarting the computer, you must be logged on with Administrator rights. Note If an error message appears during the software installation, run the Installation Diagnostics located in Start/All Programs/KONICA MINOLTA/bizhub 20. Finish The installation is now complete. 14 - Konica Minolta bizhub 20 | bizhub 20 Quick Guide - Page 15
-click Start Here OSX to install. Please wait, it will take a few seconds for the software to install. After the installation, click Restart to finish installing the software. Note Please see the Software User's Guide on the CD/DVD-ROM if you want to install the PS driver. (BR-Script Driver) 15 - Konica Minolta bizhub 20 | bizhub 20 Quick Guide - Page 16
search for the KONICA MINOLTA device. During this time the following screen will appear. d Choose the machine from the list, and then click OK. Macintosh® 18 Install Presto! PageManager When Presto! PageManager is installed OCR capability is added to ControlCenter2. You can easily scan, share and - Konica Minolta bizhub 20 | bizhub 20 Quick Guide - Page 17
on the operating system. • The supplied CD/DVD-ROM includes ScanSoft™ PaperPort™ 11SE. This software supports Windows® 2000 (SP4 or greater), XP (SP2 or greater) and XP Professional x64 Edition. Update to the latest Windows® Service Pack before installing MultiFunction Suite. b Turn off and unplug - Konica Minolta bizhub 20 | bizhub 20 Quick Guide - Page 18
Connection, and then click Next. The installation continues. Note If you want to install the PS driver (BR-Script Driver), choose Custom Install and then follow the on-screen instructions. When the Select Features screen appears, check PS Printer Driver, and then continue following the on-screen - Konica Minolta bizhub 20 | bizhub 20 Quick Guide - Page 19
restarting the computer, you must be logged on with Administrator rights. Windows® Parallel Note If an error message appears during the software installation, run the Installation Diagnostics located in Start/All Programs/KONICA MINOLTA/bizhub 20 LPT. Finish The installation is now complete. 19 - Konica Minolta bizhub 20 | bizhub 20 Quick Guide - Page 20
operating system. • The supplied CD/DVD-ROM includes ScanSoft™ PaperPort™ 11SE. This software supports Windows® 2000 (SP4 or greater), XP (SP2 or greater), XP Professional x64 Edition, Windows Vista® and Windows® 7. Update to the latest Windows® Service Pack before installing Multi-Function Suite - Konica Minolta bizhub 20 | bizhub 20 Quick Guide - Page 21
-ROM or double-click the Start.exe program from the root folder, and continue from c to install Multi-Function Suite. • For Windows Vista®/Windows® 7, when the User Account Control screen appears, click Allow (Yes). Note If the KONICA MINOLTA screen does not appear automatically, go to My Computer - Konica Minolta bizhub 20 | bizhub 20 Quick Guide - Page 22
and continue with the installation. (Recommended) and click Next. If you are not using the Windows® Firewall, see the User's Guide for your software for information on how to add the following network ports. „ For network scanning, add UDP port 54925. „ For network PC-Fax receiving, add UDP port - Konica Minolta bizhub 20 | bizhub 20 Quick Guide - Page 23
restarting the computer, you must be logged on with Administrator rights. Note If an error message appears during the software installation, run the Installation Diagnostics located in Start/All Programs/KONICA MINOLTA/bizhub 20 LAN. 20 Install Multi-Function Suite on additional computers (If needed - Konica Minolta bizhub 20 | bizhub 20 Quick Guide - Page 24
for the software to install. After the installation, click Restart to finish installing the software. Note Please see the Network User's Guide on the CD/DVD-ROM if you want to install the PS driver. (BR-Script Driver) c The KONICA MINOLTA software will search for the KONICA MINOLTA device. During - Konica Minolta bizhub 20 | bizhub 20 Quick Guide - Page 25
name you enter will appear on the machine's LCD when you press Scan and choose a scan option. (For more information, see Network Scanning in the Software User's Guide on the CD/DVD-ROM.) e When this screen appears, click OK. The installation of Multi-Function Suite is now complete. Go to step 18 on - Konica Minolta bizhub 20 | bizhub 20 Quick Guide - Page 26
® users) BRAdmin Light is a utility for initial setup of KONICA MINOLTA network connected devices. It also can search for KONICA MINOLTA products on your network, view the status and configure basic network settings, such as IP address. Note If you require more advanced printer management, use the - Konica Minolta bizhub 20 | bizhub 20 Quick Guide - Page 27
It also can search for KONICA MINOLTA products on your network, view the status and configure basic network settings, such as IP address from a computer running Mac OS® X 10.3.9 or greater. The BRAdmin Light software will be installed automatically when you install the printer driver. If you have - Konica Minolta bizhub 20 | bizhub 20 Quick Guide - Page 28
web browser) The KONICA MINOLTA print server is equipped with a web server that allows you to monitor its status or change some of its configuration settings, using HTTP (Hyper Text Transfer Protocol). Note • The User Name is 'admin' and the default password is 'access'. You can use a web browser to - Konica Minolta bizhub 20 | bizhub 20 Quick Guide - Page 29
consumables When the time comes to replace consumable items, an error message will be indicated on the LCD. For more information about the consumables for your machine, visit http://konicaminolta.com/ or contact your local KONICA MINOLTA re-seller. Toner cartridge TNP24 Drum unit DR-P01 29 - Konica Minolta bizhub 20 | bizhub 20 Quick Guide - Page 30
a Software License Agreement specific to its proprietary programs. All other brand and product names mentioned in this manual are trademarks or registered trademarks of their respective companies. Notice KONICA MINOLTA BUSINESS TECHNOLOGIES, INC. reserves the right to make changes to this guide and - Konica Minolta bizhub 20 | bizhub 20 Quick Guide - Page 31
LX2474001 c
-
 1
1 -
 2
2 -
 3
3 -
 4
4 -
 5
5 -
 6
6 -
 7
7 -
8
-
9
-
10
-
11
-
12
-
13
-
14
-
15
-
16
-
17
-
18
-
19
-
20
-
21
-
22
-
23
-
24
-
25
-
26
-
27
-
28
-
29
-
30
-
31
 |
 |

1
Start Here
Quick Guide
A32R-9200-00
Before you can use the machine, read this Quick Guide for the correct setup and installation.
1
Unpack the machine and check the components
WARNING
Plastic bags are used in the packaging of your machine. To avoid danger of suffocation, please keep
these bags away from babies and children.
IMPORTANT
DO NOT connect the interface cable yet.
AC Power Cord
Safety Information Guide
Telephone Line Cord
Quick Guide
Control Panel
Drum Unit Assembly
(including Standard Toner Cartridge)
CD/DVD-ROM
(Windows
®
)
(Macintosh
®
)
Note
•
The components included in the box may differ depending on your country.
•
Save all packing materials and the box in case for any reason you must ship your machine.
•
The interface cable is not a standard accessory. Buy the appropriate interface cable for the interface you
want to use (USB, Parallel or Network).
USB cable
•
Please make sure you use a USB 2.0 cable (Type A/B) that is no longer than 2 metres.
•
DO NOT connect the interface cable at this time. Connecting the interface cable is done during Multi-
Function installation process.
•
When you use a USB cable, make sure you connect it to the USB port of your computer and not to a USB
port on a keyboard or non-powered USB hub.
Parallel cable
DO NOT use a parallel interface cable that is longer than 2 metres. Use a shielded interface cable that is IEEE
1284-compliant.
Network cable
Use a straight-through Category5 (or greater) twisted-pair cable for 10BASE-T or 100BASE-TX Fast Ethernet
Network.