Konica Minolta bizhub 3300P bizhub 3300P Quick Reference
Konica Minolta bizhub 3300P Manual
 |
View all Konica Minolta bizhub 3300P manuals
Add to My Manuals
Save this manual to your list of manuals |
Konica Minolta bizhub 3300P manual content summary:
- Konica Minolta bizhub 3300P | bizhub 3300P Quick Reference - Page 1
Quick Reference Quick Reference 2012. 10 A63P-9561-00A - 1 - - Konica Minolta bizhub 3300P | bizhub 3300P Quick Reference - Page 2
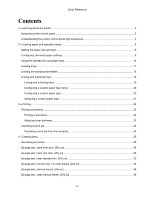
20 Configuring a custom paper type ...20 Assigning a custom paper type ...21 3-Printing...22 Printing documents ...22 Printing a document...22 Adjusting toner darkness ...23 Canceling a print job ...24 Canceling a print job from the computer 24 4-Clearing jams...25 Accessing jam areas...25 [x]-page - Konica Minolta bizhub 3300P | bizhub 3300P Quick Reference - Page 3
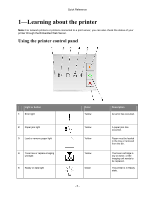
imaging unit light 5 Ready or data light Color Yellow Yellow Yellow Yellow Green - 3 - Description An error has occurred. A paper jam has occurred. Paper must be loaded in the tray or removed from the bin. The toner cartridge is low on toner, or the imaging unit needs to be replaced. The printer - Konica Minolta bizhub 3300P | bizhub 3300P Quick Reference - Page 4
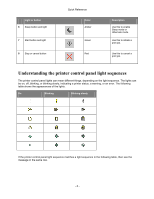
to cancel a print job. Understanding the printer control panel light sequences The printer control panel lights can mean different things, depending on the light sequence. The lights can be on, off, blinking, or blinking slowly, indicating a printer status, a warning, or an error. The following - Konica Minolta bizhub 3300P | bizhub 3300P Quick Reference - Page 5
, imaging unit mismatch Canceling print job Flushing buffer Resolution reduced Non-Printer Manufacturer toner cartridge Non-Printer Manufacturer imaging unit Printer had to restart Toner cartridge very low Imaging unit very low Toner cartridge nearly low Imaging unit nearly low Service error - Konica Minolta bizhub 3300P | bizhub 3300P Quick Reference - Page 6
Reference Message Load paper Remove paper from standard bin Change paper Toner cartridge low Imaging unit low Ready Waiting Busy Not ready If the printer control panel light sequence matches a light sequence in the "Primary light sequence" column of the following table, then press twice quickly - Konica Minolta bizhub 3300P | bizhub 3300P Quick Reference - Page 7
Quick Reference Supplemental light sequence Message Missing or unresponsive imaging unit Standard network software error Network [x] software error Insufficient memory to collate job Complex page Insufficient memory to support Resource Save feature Standard parallel port disabled Standard - Konica Minolta bizhub 3300P | bizhub 3300P Quick Reference - Page 8
Primary light sequence Quick Reference Supplemental light sequence Message Paper jam, remove standard tray to clear duplex Paper jam, remove standard tray to clear duplex Paper jam, open front door Paper jam, remove standard tray Paper jam, remove optional tray Paper jam, manual feeder - 8 - - Konica Minolta bizhub 3300P | bizhub 3300P Quick Reference - Page 9
Paper menu using the Local Printer Settings Utility or Printer Settings. Note: The paper size and type settings will be saved until you reset factory default settings. Configuring Universal paper settings The Universal paper size is a user-defined setting that lets you print on paper sizes that are - Konica Minolta bizhub 3300P | bizhub 3300P Quick Reference - Page 10
Quick Reference Using the standard bin and paper stop The standard bin holds up to 150 sheets of 20-lb paper. It collects prints facedown. The standard bin includes a paper stop that keeps paper from sliding out the front of the bin as it stacks. To open the paper - Konica Minolta bizhub 3300P | bizhub 3300P Quick Reference - Page 11
equipment instability, load each tray separately. Keep all other trays closed until needed. 1. Pull out the tray completely. Note: Do not remove trays while a job prints or while the following light sequence appears on the printer control panel. Doing so may cause a jam. Busy - Blinking - 11 - - Konica Minolta bizhub 3300P | bizhub 3300P Quick Reference - Page 12
Quick Reference 2. Squeeze, and then slide the width guide tab to the correct position for the size of the paper you are loading. - 12 - - Konica Minolta bizhub 3300P | bizhub 3300P Quick Reference - Page 13
base leaving the paper exposed to dust. To protect the paper from dust, you can purchase a dust cover separately. - If you are loading A6-size paper in the standard tray, then squeeze and slide the length guide tab toward the center of the tray to the A6-size position. - Make sure the - Konica Minolta bizhub 3300P | bizhub 3300P Quick Reference - Page 14
sure the paper is below the maximum fill indicator located on the side of the width guide. Notes: - Load with the printable side facedown when using recycled or preprinted paper. - front of the tray. For two- sided printing, load letterhead faceup with the bottom edge of the sheet toward the front of the tray - Konica Minolta bizhub 3300P | bizhub 3300P Quick Reference - Page 15
not connected to a network, then access the Paper menu using Local Printer Settings Utility or Printer Settings, depending on your operating system. - Set the correct paper size and type to avoid paper jams and print quality problems. Loading the multipurpose feeder Use the multipurpose feeder when - Konica Minolta bizhub 3300P | bizhub 3300P Quick Reference - Page 16
Quick Reference a. Pull the multipurpose feeder extender. b. Pull the extender gently so the multipurpose feeder is fully extended and open. 2. Squeeze the tab on the left width guide, and then move the guides for the paper you are loading. - 16 - - Konica Minolta bizhub 3300P | bizhub 3300P Quick Reference - Page 17
multipurpose feeder. Overfilling may cause paper jams. - Make sure the paper or specialty media is below the maximum paper fill indicator located on the paper guides. - 17 - - Konica Minolta bizhub 3300P | bizhub 3300P Quick Reference - Page 18
first. For two-sided (duplex) printing, load letterhead facedown with the bottom edge of the sheet entering the printer first. - Load envelopes with the flap on the left side facedown. Warning-Potential Damage: Never use envelopes with stamps, clasps, snaps, windows, coated linings, or self-stick - Konica Minolta bizhub 3300P | bizhub 3300P Quick Reference - Page 19
and then type the printer IP address in the address field. Notes: - Print a network setup page or menu settings page, and then locate the then temporarily disable it to load the Web page correctly. 2. Click Settings >Paper Menu. 3. From the Tray Configuration section, select a tray, and then change - Konica Minolta bizhub 3300P | bizhub 3300P Quick Reference - Page 20
the printer settings on the computer (Windows only) Access the Custom menu using the Local Printer Settings Utility. Configuring a custom paper type Using the Embedded Web Server 1. Open a Web browser, and then type the printer IP address in the address field. Notes: - Print a network setup page or - Konica Minolta bizhub 3300P | bizhub 3300P Quick Reference - Page 21
, and then type the printer IP address in the address field. Notes: - Print a network setup page or menu settings page, and then locate the temporarily disable it to load the Web page correctly. 2. Click Settings >Paper Menu. 3. From the Tray Configuration section, select a paper source, and then - Konica Minolta bizhub 3300P | bizhub 3300P Quick Reference - Page 22
to a network, then access the Paper menu using Local Printer Settings Utility or Printer Settings, depending on your operating system. 2. Send the print job. For Windows users a. With a document open, click File >Print. b. Click Properties, Preferences, Options, or Setup. c. Adjust the settings - Konica Minolta bizhub 3300P | bizhub 3300P Quick Reference - Page 23
, or select the appropriate tray or feeder. 3. Click Print. Adjusting toner darkness Using the Embedded Web Server 1. Open a Web browser, and then type the printer IP address in the address field. Notes: - Print a network setup page or menu settings page, and then locate the IP address in the TCP/IP - Konica Minolta bizhub 3300P | bizhub 3300P Quick Reference - Page 24
Click Delete. For Macintosh users 1. From the Apple Menu, navigate to either of the following: - System Preferences >Print & Scan > select a printer >Open Print Queue - System Preferences >Print & Fax > select a printer >Open Print Queue 2. From the printer window, select the print job you want to - Konica Minolta bizhub 3300P | bizhub 3300P Quick Reference - Page 25
feeder door 6 Front door Notes: • When Jam Assist is set to On, the printer automatically flushes blank pages or pages with partial prints to the standard bin after a jammed page has been cleared. Check your printed output stack for discarded pages. • When Jam Recovery is set to On or Auto, the - Konica Minolta bizhub 3300P | bizhub 3300P Quick Reference - Page 26
Quick Reference [x]-page jam, open front door. [20y.xx] - On - On If the printer control panel light sequence matches the light sequence in the preceding illustration, then press twice quickly to see the supplemental light sequence. - On - On - On If the supplemental light sequence matches the - Konica Minolta bizhub 3300P | bizhub 3300P Quick Reference - Page 27
right side of the printer, and then open the front door. 2. Pull out the toner cartridge using the handle. 3. Lift the green handle, and then pull out the imaging unit from the printer. Warning-Potential Damage: Do not touch the photoconductor drum. Doing so may affect the print quality of future - Konica Minolta bizhub 3300P | bizhub 3300P Quick Reference - Page 28
on a flat, smooth surface. Warning-Potential Damage: Do not expose the imaging unit to direct light for more than 10 minutes. Extended exposure to light can cause print quality problems. 5. Lift the green flap in front of the printer. 6. Firmly grasp the jammed paper on each side, and then gently - Konica Minolta bizhub 3300P | bizhub 3300P Quick Reference - Page 29
on the side rails inside the printer, and then insert the imaging unit into the printer. 8. Insert the toner cartridge by aligning the side rails of the cartridge with the arrows on the side rails inside the printer, and then insert the cartridge into the printer. 9. Close the front door. 10 - Konica Minolta bizhub 3300P | bizhub 3300P Quick Reference - Page 30
Reference - On - On If the printer control panel light sequence matches the light sequence in the preceding illustration, then press twice quickly to see the supplemental light sequence. - On - On - On If the supplemental light sequence matches the light sequence in the preceding illustration - Konica Minolta bizhub 3300P | bizhub 3300P Quick Reference - Page 31
2. Gently pull down the rear door. CAUTION-HOT SURFACE: The inside of the printer might be hot. To reduce the risk of injury from a hot component, allow the paper fragments are removed. 4. Close the rear and front doors. 5. From the printer control panel, press to clear the message and continue - Konica Minolta bizhub 3300P | bizhub 3300P Quick Reference - Page 32
Quick Reference [x]-page jam, clear standard bin. [20y.xx] - On - On If the printer control panel light sequence matches the light sequence in the preceding illustration, then press twice quickly to see the supplemental light sequence. - On - On - On If the supplemental light sequence matches - Konica Minolta bizhub 3300P | bizhub 3300P Quick Reference - Page 33
paper fragments are removed. 2. From the printer control panel, press to clear the message and continue printing. [x]-page jam, remove tray 1 to clear duplex. [23y.xx] - On - On If the printer control panel light sequence matches the light sequence in the preceding illustration, then press - Konica Minolta bizhub 3300P | bizhub 3300P Quick Reference - Page 34
Supplemental light sequences Light sequence Quick Reference - On - On - On - On - Blinking - On - On - On - On - 34 - - Konica Minolta bizhub 3300P | bizhub 3300P Quick Reference - Page 35
Quick Reference If the supplemental light sequence matches any of the light sequences in the preceding illustrations, then do the following. CAUTION-HOT SURFACE: The inside of the printer might be hot. To reduce the risk of injury from a hot component, allow the surface to cool before touching it. - Konica Minolta bizhub 3300P | bizhub 3300P Quick Reference - Page 36
are removed. 4. Insert the tray. 5. From the printer control panel, press to clear the message and continue printing. [x]-page jam, remove tray [x]. [24y.xx] - On - On If the printer control panel light sequence matches the light sequence in the preceding illustration, then press twice - Konica Minolta bizhub 3300P | bizhub 3300P Quick Reference - Page 37
Supplemental light sequences Light sequence Quick Reference - On - On - On - On - On - On - On - On If the supplemental light sequence matches any of the light sequences in the preceding illustrations, then do the following. - 37 - - Konica Minolta bizhub 3300P | bizhub 3300P Quick Reference - Page 38
1. Pull out the tray completely. Quick Reference 2. Firmly grasp the jammed paper on each side, and then gently pull it out. Note: Make sure all paper fragments are removed. 3. Insert the tray. 4. From the printer control panel, press to clear the message and continue printing. - 38 - - Konica Minolta bizhub 3300P | bizhub 3300P Quick Reference - Page 39
Quick Reference [x]-page jam, clear manual feeder. [250.xx] - On - On If the printer control panel light sequence matches the light sequence in the preceding illustration, then press twice quickly to see the supplemental light sequence. - 39 - - Konica Minolta bizhub 3300P | bizhub 3300P Quick Reference - Page 40
- On - On - On If the supplemental light sequence matches the light sequence in the preceding illustration, then do the following feeder. Note: Make sure the paper guide lightly rests against the edge of the paper. 4. From the printer control panel, press to clear the message and continue
-
 1
1 -
 2
2 -
 3
3 -
 4
4 -
 5
5 -
 6
6 -
 7
7 -
8
-
9
-
10
-
11
-
12
-
13
-
14
-
15
-
16
-
17
-
18
-
19
-
20
-
21
-
22
-
23
-
24
-
25
-
26
-
27
-
28
-
29
-
30
-
31
-
32
-
33
-
34
-
35
-
36
-
37
-
38
-
39
-
40
 |
 |

Quick Reference
- 1 -
Quick Reference
2012. 10
A63P-9561-00A