Konica Minolta Fujitsu fi-6800 Operating Guide - Page 121
Cleaning the ADF (with Cleaning Sheet), Cleaning with the Cleaning Sheet
 |
View all Konica Minolta Fujitsu fi-6800 manuals
Add to My Manuals
Save this manual to your list of manuals |
Page 121 highlights
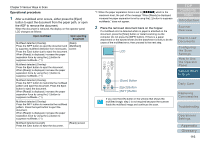
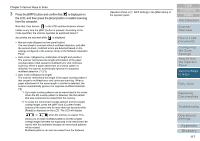
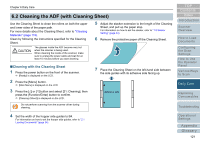
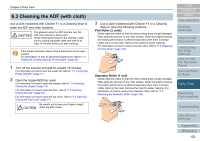
Chapter 6 Daily Care 6.2 Cleaning the ADF (with Cleaning Sheet) Use the Cleaning Sheet to clean the rollers on both the upper and lower sides of the paper path. For more details about the Cleaning Sheet, refer to "Cleaning Materials" (page 119). Clean by following the instructions specified for the Cleaning Sheet. The glasses inside the ADF become very hot when the scanner is being used. When cleaning the inside of the scanner, make sure to unplug the power cable and wait for at least 15 minutes before you start cleaning. 5 Adjust the stacker extension to the length of the Cleaning Sheet, and pull up the paper stop. For information on how to set the stacker, refer to "1.8 Stacker Setting" (page 24). 6 Remove the protective paper off the Cleaning Sheet. ■Cleaning with the Cleaning Sheet 1 Press the power button on the front of the scanner. D [Ready] is displayed on the LCD. 2 Press the [Menu] button. D [Main Menu] is displayed on the LCD. 3 Press the [U] or [V] button and select [21: Cleaning], then press the [Function/Enter] button to confirm. D [Cleaning (Sheet)] is displayed on the LCD. Do not perform scanning from the scanner driver during cleaning. 7 Place the Cleaning Sheet on the left-hand side between the side guides with its adhesive side facing up. Adhesive side TOP Contents Index Introduction Scanner Overview How to Load Documents Configuring the Scan Settings How to Use the Operator Panel Various Ways to Scan Daily Care Replacing Consumables Troubleshooting 4 Set the width of the hopper side guides to B4. For information on how to set the hopper side guides, refer to "2.1 Loading Documents" (page 34). Operational Settings Appendix Glossary 121
-
 1
1 -
2
-
3
-
4
-
5
-
6
-
7
-
8
-
9
-
10
-
11
-
12
-
13
-
14
-
15
-
16
-
17
-
18
-
19
-
20
-
21
-
22
-
23
-
24
-
25
-
26
-
27
-
28
-
29
-
30
-
31
-
32
-
33
-
34
-
35
-
36
-
37
-
38
-
39
-
40
-
41
-
42
-
43
-
44
-
45
-
46
-
47
-
48
-
49
-
50
-
51
-
52
-
53
-
54
-
55
-
56
-
57
-
58
-
59
-
60
-
61
-
62
-
63
-
64
-
65
-
66
-
67
-
68
-
69
-
70
-
71
-
72
-
73
-
74
-
75
-
76
-
77
-
78
-
79
-
80
-
81
-
82
-
83
-
84
-
85
-
86
-
87
-
88
-
89
-
90
-
91
-
92
-
93
-
94
-
95
-
96
-
97
-
98
-
99
-
100
-
101
-
102
-
103
-
104
-
105
-
106
-
107
-
108
-
109
-
110
-
111
-
112
-
113
-
114
-
115
-
 116
116 -
 117
117 -
 118
118 -
 119
119 -
 120
120 -
 121
121 -
 122
122 -
 123
123 -
 124
124 -
 125
125 -
 126
126 -
127
-
128
-
129
-
130
-
131
-
132
-
133
-
134
-
135
-
136
-
137
-
138
-
139
-
140
-
141
-
142
-
143
-
144
-
145
-
146
-
147
-
148
-
149
-
150
-
151
-
152
-
153
-
154
-
155
-
156
-
157
-
158
-
159
-
160
-
161
-
162
-
163
-
164
-
165
-
166
-
167
-
168
-
169
-
170
-
171
-
172
-
173
-
174
-
175
-
176
-
177
-
178
-
179
-
180
-
181
-
182
-
183
-
184
-
185
-
186
-
187
-
188
-
189
-
190
-
191
-
192
-
193
-
194
-
195
-
196
-
197
-
198
-
199
-
200
-
201
-
202
-
203
-
204
-
205
-
206
-
207
-
208
-
209
-
210
-
211
-
212
-
213
-
214
-
215
-
216
-
217
-
218
-
219
-
220
-
221
-
222
-
223
-
224
-
225
-
226
-
227
-
228
-
229
-
230
-
231
-
232
-
233
-
234
-
235
-
236
-
237
-
238
-
239
-
240
-
241
-
242
-
243
 |
 |