Konica Minolta Fujitsu fi-6800 Operating Guide - Page 134
Replacing the Separator Roller
 |
View all Konica Minolta Fujitsu fi-6800 manuals
Add to My Manuals
Save this manual to your list of manuals |
Page 134 highlights
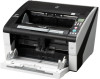
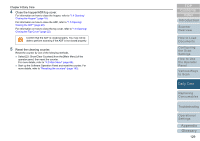
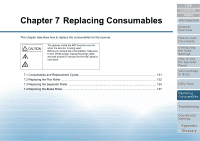
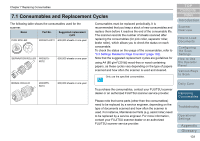
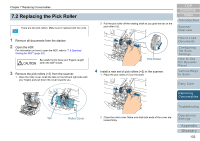
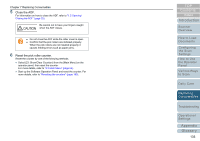
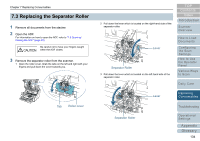
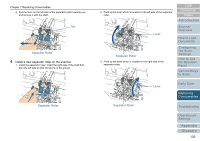
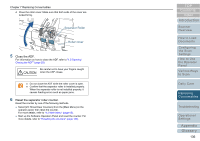
Chapter 7 Replacing Consumables 7.3 Replacing the Separator Roller 1 Remove all documents from the stacker. 2 Open the ADF. For information on how to open the ADF, refer to "1.5 Opening/ Closing the ADF" (page 20). Be careful not to have your fingers caught when the ADF closes. 3 Remove the separator roller from the scanner. 1 Open the roller cover. Grab the tabs on the left and right with your fingers and pull down the cover towards you. Tab Roller cover 2 Pull down the lever which is located on the right-hand side of the separator roller. Lever Separator Roller 3 Pull down the lever which is located on the left-hand side of the separator roller. TOP Contents Index Introduction Scanner Overview How to Load Documents Configuring the Scan Settings How to Use the Operator Panel Various Ways to Scan Daily Care Lever Replacing Consumables Separator Roller Troubleshooting Operational Settings Appendix Glossary 134
-
 1
1 -
2
-
3
-
4
-
5
-
6
-
7
-
8
-
9
-
10
-
11
-
12
-
13
-
14
-
15
-
16
-
17
-
18
-
19
-
20
-
21
-
22
-
23
-
24
-
25
-
26
-
27
-
28
-
29
-
30
-
31
-
32
-
33
-
34
-
35
-
36
-
37
-
38
-
39
-
40
-
41
-
42
-
43
-
44
-
45
-
46
-
47
-
48
-
49
-
50
-
51
-
52
-
53
-
54
-
55
-
56
-
57
-
58
-
59
-
60
-
61
-
62
-
63
-
64
-
65
-
66
-
67
-
68
-
69
-
70
-
71
-
72
-
73
-
74
-
75
-
76
-
77
-
78
-
79
-
80
-
81
-
82
-
83
-
84
-
85
-
86
-
87
-
88
-
89
-
90
-
91
-
92
-
93
-
94
-
95
-
96
-
97
-
98
-
99
-
100
-
101
-
102
-
103
-
104
-
105
-
106
-
107
-
108
-
109
-
110
-
111
-
112
-
113
-
114
-
115
-
116
-
117
-
118
-
119
-
120
-
121
-
122
-
123
-
124
-
125
-
126
-
127
-
128
-
 129
129 -
 130
130 -
 131
131 -
 132
132 -
 133
133 -
 134
134 -
 135
135 -
 136
136 -
 137
137 -
 138
138 -
 139
139 -
140
-
141
-
142
-
143
-
144
-
145
-
146
-
147
-
148
-
149
-
150
-
151
-
152
-
153
-
154
-
155
-
156
-
157
-
158
-
159
-
160
-
161
-
162
-
163
-
164
-
165
-
166
-
167
-
168
-
169
-
170
-
171
-
172
-
173
-
174
-
175
-
176
-
177
-
178
-
179
-
180
-
181
-
182
-
183
-
184
-
185
-
186
-
187
-
188
-
189
-
190
-
191
-
192
-
193
-
194
-
195
-
196
-
197
-
198
-
199
-
200
-
201
-
202
-
203
-
204
-
205
-
206
-
207
-
208
-
209
-
210
-
211
-
212
-
213
-
214
-
215
-
216
-
217
-
218
-
219
-
220
-
221
-
222
-
223
-
224
-
225
-
226
-
227
-
228
-
229
-
230
-
231
-
232
-
233
-
234
-
235
-
236
-
237
-
238
-
239
-
240
-
241
-
242
-
243
 |
 |