Konica Minolta Fujitsu fi-6800 Operating Guide - Page 50
[Resolution], [Scan Type], [Paper Size], [Image Mode], [Scan] Button
 |
View all Konica Minolta Fujitsu fi-6800 manuals
Add to My Manuals
Save this manual to your list of manuals |
Page 50 highlights
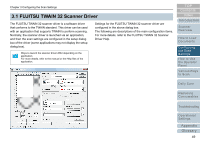
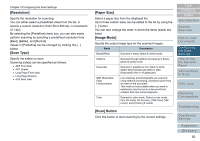
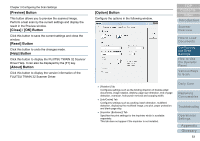
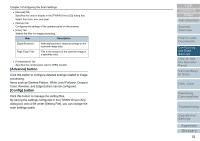
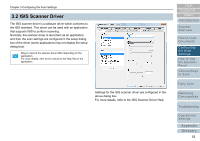
Chapter 3 Configuring the Scan Settings [Resolution] Specify the resolution for scanning. You can either select a predefined value from the list, or specify a custom resolution (from 50 to 600 dpi, in increments of 1 dpi). By selecting the [Predefine] check box, you can also easily perform scanning by selecting a predefined resolution from [Best], [Better], and [Normal]. Values in [Predefine] can be changed by clicking the [...] button. [Scan Type] Specify the side(s) to scan. Scanning side(s) can be specified as follows: z ADF Front Side z ADF Duplex z Long Page (Front side) z Long Page (Duplex) z ADF Back Side [Paper Size] Select a paper size from the displayed list. Up to three custom sizes can be added to the list by using the [...] button. You can also change the order in which the items (sizes) are listed. [Image Mode] Specify the output image type for the scanned images. Mode Description Black&White Scanned in binary (black & white) mode. Halftone Scanned through halftone processing in binary (black & white) mode. Grayscale Scanned in gradations from black to white. Select either [Grayscale] (256) or [4bit Grayscale] (4-bit or 16 grayscale). SEE (Selectable Edge Enhancement) Line drawings and photographs are scanned using halftone processing, emphasizing the lines and text on the document. This mode is most suitable when you want to emphasize only the text in a document that contains both text and photographs. Color Scanned in color mode. Select a color mode from [24 Color] (24-bit color), [256 Color] (256 colors), and [8 Color] (8 colors). [Scan] Button Click this button to start scanning by the current settings. TOP Contents Index Introduction Scanner Overview How to Load Documents Configuring the Scan Settings How to Use the Operator Panel Various Ways to Scan Daily Care Replacing Consumables Troubleshooting Operational Settings Appendix Glossary 50
-
 1
1 -
2
-
3
-
4
-
5
-
6
-
7
-
8
-
9
-
10
-
11
-
12
-
13
-
14
-
15
-
16
-
17
-
18
-
19
-
20
-
21
-
22
-
23
-
24
-
25
-
26
-
27
-
28
-
29
-
30
-
31
-
32
-
33
-
34
-
35
-
36
-
37
-
38
-
39
-
40
-
41
-
42
-
43
-
44
-
 45
45 -
 46
46 -
 47
47 -
 48
48 -
 49
49 -
 50
50 -
 51
51 -
 52
52 -
 53
53 -
 54
54 -
 55
55 -
56
-
57
-
58
-
59
-
60
-
61
-
62
-
63
-
64
-
65
-
66
-
67
-
68
-
69
-
70
-
71
-
72
-
73
-
74
-
75
-
76
-
77
-
78
-
79
-
80
-
81
-
82
-
83
-
84
-
85
-
86
-
87
-
88
-
89
-
90
-
91
-
92
-
93
-
94
-
95
-
96
-
97
-
98
-
99
-
100
-
101
-
102
-
103
-
104
-
105
-
106
-
107
-
108
-
109
-
110
-
111
-
112
-
113
-
114
-
115
-
116
-
117
-
118
-
119
-
120
-
121
-
122
-
123
-
124
-
125
-
126
-
127
-
128
-
129
-
130
-
131
-
132
-
133
-
134
-
135
-
136
-
137
-
138
-
139
-
140
-
141
-
142
-
143
-
144
-
145
-
146
-
147
-
148
-
149
-
150
-
151
-
152
-
153
-
154
-
155
-
156
-
157
-
158
-
159
-
160
-
161
-
162
-
163
-
164
-
165
-
166
-
167
-
168
-
169
-
170
-
171
-
172
-
173
-
174
-
175
-
176
-
177
-
178
-
179
-
180
-
181
-
182
-
183
-
184
-
185
-
186
-
187
-
188
-
189
-
190
-
191
-
192
-
193
-
194
-
195
-
196
-
197
-
198
-
199
-
200
-
201
-
202
-
203
-
204
-
205
-
206
-
207
-
208
-
209
-
210
-
211
-
212
-
213
-
214
-
215
-
216
-
217
-
218
-
219
-
220
-
221
-
222
-
223
-
224
-
225
-
226
-
227
-
228
-
229
-
230
-
231
-
232
-
233
-
234
-
235
-
236
-
237
-
238
-
239
-
240
-
241
-
242
-
243
 |
 |
