Konica Minolta Fujitsu fi-6800 Operating Guide - Page 61
Operator Panel, Names and Functions of the Operator Panel
 |
View all Konica Minolta Fujitsu fi-6800 manuals
Add to My Manuals
Save this manual to your list of manuals |
Page 61 highlights
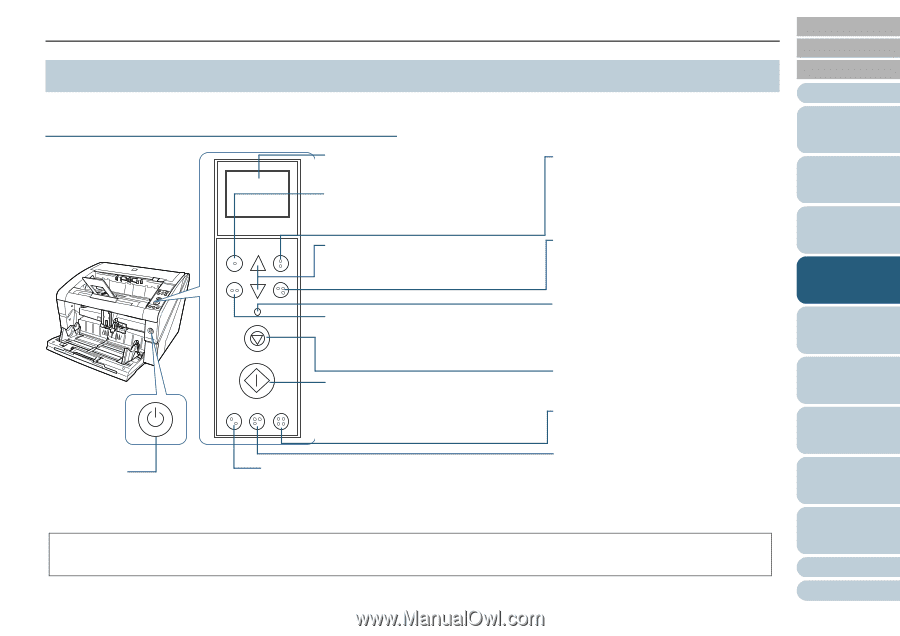
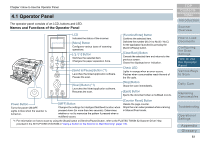
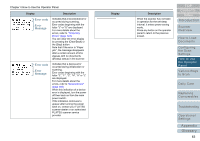
Chapter 4 How to Use the Operator Panel 4.1 Operator Panel The operator panel consists of an LCD, buttons and LED. Names and Functions of the Operator Panel Menu Function /Enter Send to /Pause Check Clear /Back Stop Scan Counter iMFF Reset Eject LCD Indicates the status of the scanner. [Menu] Button Configures various types of scanning operations. [U] / [V] Button Switches the selected item. Changes the paper separation force. [Send to/Pause] Button (*1) Launches the linked application software. Pauses the scan. [Scan] Button (*1) Launches the linked application software. Resumes the scan. [Function/Enter] Button Confirms the selected item. Switches the number (No.01 to No.50 / No.C) for the application launched by pressing the [Send to/Pause] button. [Clear/Back] Button Cancels the selected item and returns to the previous screen. Clears the displayed error indication. Check LED Lights in orange when an error occurs. Flashes when consumables reach the end of the life cycle. [Stop] Button Stops the scan immediately. [Eject] Button Ejects the document when a multifeed occurs. Power Button Turns the power ON/OFF. Lights in blue when the scanner is turned on. [iMFF] Button Changes the settings for Intelligent Multifeed function when pressed down (for more than two seconds). Determines whether or not to memorize the pattern if pressed when a multifeed occurs. [Counter Reset] Button Resets the page counter. Stops the scan when pressed while scanning in Manual Feed mode. *1: For information on how to scan by using the [Scan] button or [Send to/Pause] button, refer to the FUJITSU TWAIN 32 Scanner Driver Help provided in the SETUP DISK DVD-ROM or "Using a Button on the Scanner to Start Scanning" (page 110). TOP Contents Index Introduction Scanner Overview How to Load Documents Configuring the Scan Settings How to Use the Operator Panel Various Ways to Scan Daily Care Replacing Consumables Troubleshooting Operational Settings Appendix Glossary 61
-
 1
1 -
2
-
3
-
4
-
5
-
6
-
7
-
8
-
9
-
10
-
11
-
12
-
13
-
14
-
15
-
16
-
17
-
18
-
19
-
20
-
21
-
22
-
23
-
24
-
25
-
26
-
27
-
28
-
29
-
30
-
31
-
32
-
33
-
34
-
35
-
36
-
37
-
38
-
39
-
40
-
41
-
42
-
43
-
44
-
45
-
46
-
47
-
48
-
49
-
50
-
51
-
52
-
53
-
54
-
55
-
 56
56 -
 57
57 -
 58
58 -
 59
59 -
 60
60 -
 61
61 -
 62
62 -
 63
63 -
 64
64 -
 65
65 -
 66
66 -
67
-
68
-
69
-
70
-
71
-
72
-
73
-
74
-
75
-
76
-
77
-
78
-
79
-
80
-
81
-
82
-
83
-
84
-
85
-
86
-
87
-
88
-
89
-
90
-
91
-
92
-
93
-
94
-
95
-
96
-
97
-
98
-
99
-
100
-
101
-
102
-
103
-
104
-
105
-
106
-
107
-
108
-
109
-
110
-
111
-
112
-
113
-
114
-
115
-
116
-
117
-
118
-
119
-
120
-
121
-
122
-
123
-
124
-
125
-
126
-
127
-
128
-
129
-
130
-
131
-
132
-
133
-
134
-
135
-
136
-
137
-
138
-
139
-
140
-
141
-
142
-
143
-
144
-
145
-
146
-
147
-
148
-
149
-
150
-
151
-
152
-
153
-
154
-
155
-
156
-
157
-
158
-
159
-
160
-
161
-
162
-
163
-
164
-
165
-
166
-
167
-
168
-
169
-
170
-
171
-
172
-
173
-
174
-
175
-
176
-
177
-
178
-
179
-
180
-
181
-
182
-
183
-
184
-
185
-
186
-
187
-
188
-
189
-
190
-
191
-
192
-
193
-
194
-
195
-
196
-
197
-
198
-
199
-
200
-
201
-
202
-
203
-
204
-
205
-
206
-
207
-
208
-
209
-
210
-
211
-
212
-
213
-
214
-
215
-
216
-
217
-
218
-
219
-
220
-
221
-
222
-
223
-
224
-
225
-
226
-
227
-
228
-
229
-
230
-
231
-
232
-
233
-
234
-
235
-
236
-
237
-
238
-
239
-
240
-
241
-
242
-
243
 |
 |