Konica Minolta Fujitsu fi-6800 Operating Guide - Page 68
Checking and resetting counters, Power Button, Menu] Button, Button, Function/Enter] Button
 |
View all Konica Minolta Fujitsu fi-6800 manuals
Add to My Manuals
Save this manual to your list of manuals |
Page 68 highlights
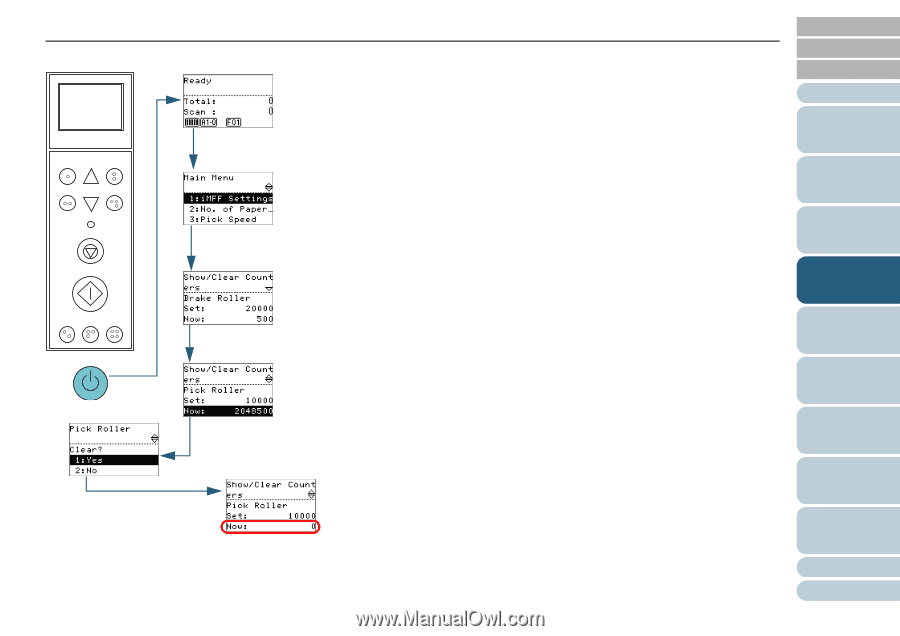
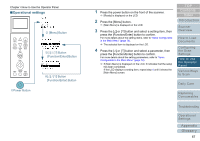
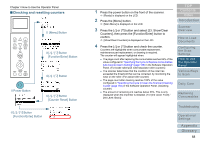
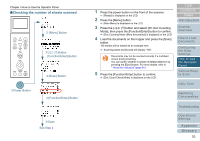
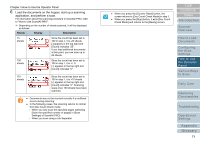
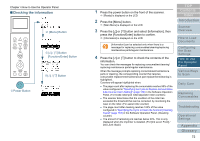
Chapter 4 How to Use the Operator Panel ■Checking and resetting counters Menu Function /Enter Send to /Pause Check Clear /Back Stop Scan Counter iMFF Reset Eject d [Menu] Button e[U] / [V] Button [Function/Enter] Button f[U] / [V] Button cPower Button g[U] / [V] Button [Counter Reset] Button h[U] / [V] Button [Function/Enter] Button 1 Press the power button on the front of the scanner. D [Ready] is displayed on the LCD. 2 Press the [Menu] button. D [Main Menu] is displayed on the LCD. 3 Press the [U] or [V] button and select [23: Show/Clear Counters], then press the [Function/Enter] button to confirm. D [Show/Clear Counters] is displayed on the LCD. 4 Press the [U] or [V] button and check the counter. Counters are highlighted when consumable replacement, maintenance part replacement, or cleaning is required. The counter will appear highlighted when: z The page count after replacing the consumable reaches 95% of the value configured in "Specifying the Cycle to Replace Consumables [Life Counter Alarm Setting]" (page 185) in the Software Operation Panel. (For brake roller/pick roller/separator roller counters) z The scanner determines that the condition of the roller has exceeded the threshold that can be corrected, by monitoring the wear on the roller. (For assist roller counter) z The page count after cleaning reaches 100% of the value configured in "Specifying the Cycle to Clean the Scanner [Cleaning Cycle]" (page 184) in the Software Operation Panel. (Cleaning counter) z The amount of remaining ink reaches below 33%. This is only displayed when the imprinter is installed. (For [Ink Level: Front] / [Ink Level: Back]) TOP Contents Index Introduction Scanner Overview How to Load Documents Configuring the Scan Settings How to Use the Operator Panel Various Ways to Scan Daily Care Replacing Consumables Troubleshooting Operational Settings Appendix Glossary 68
-
 1
1 -
2
-
3
-
4
-
5
-
6
-
7
-
8
-
9
-
10
-
11
-
12
-
13
-
14
-
15
-
16
-
17
-
18
-
19
-
20
-
21
-
22
-
23
-
24
-
25
-
26
-
27
-
28
-
29
-
30
-
31
-
32
-
33
-
34
-
35
-
36
-
37
-
38
-
39
-
40
-
41
-
42
-
43
-
44
-
45
-
46
-
47
-
48
-
49
-
50
-
51
-
52
-
53
-
54
-
55
-
56
-
57
-
58
-
59
-
60
-
61
-
62
-
 63
63 -
 64
64 -
 65
65 -
 66
66 -
 67
67 -
 68
68 -
 69
69 -
 70
70 -
 71
71 -
 72
72 -
 73
73 -
74
-
75
-
76
-
77
-
78
-
79
-
80
-
81
-
82
-
83
-
84
-
85
-
86
-
87
-
88
-
89
-
90
-
91
-
92
-
93
-
94
-
95
-
96
-
97
-
98
-
99
-
100
-
101
-
102
-
103
-
104
-
105
-
106
-
107
-
108
-
109
-
110
-
111
-
112
-
113
-
114
-
115
-
116
-
117
-
118
-
119
-
120
-
121
-
122
-
123
-
124
-
125
-
126
-
127
-
128
-
129
-
130
-
131
-
132
-
133
-
134
-
135
-
136
-
137
-
138
-
139
-
140
-
141
-
142
-
143
-
144
-
145
-
146
-
147
-
148
-
149
-
150
-
151
-
152
-
153
-
154
-
155
-
156
-
157
-
158
-
159
-
160
-
161
-
162
-
163
-
164
-
165
-
166
-
167
-
168
-
169
-
170
-
171
-
172
-
173
-
174
-
175
-
176
-
177
-
178
-
179
-
180
-
181
-
182
-
183
-
184
-
185
-
186
-
187
-
188
-
189
-
190
-
191
-
192
-
193
-
194
-
195
-
196
-
197
-
198
-
199
-
200
-
201
-
202
-
203
-
204
-
205
-
206
-
207
-
208
-
209
-
210
-
211
-
212
-
213
-
214
-
215
-
216
-
217
-
218
-
219
-
220
-
221
-
222
-
223
-
224
-
225
-
226
-
227
-
228
-
229
-
230
-
231
-
232
-
233
-
234
-
235
-
236
-
237
-
238
-
239
-
240
-
241
-
242
-
243
 |
 |