Konica Minolta Fujitsu fi-6800 Operating Guide - Page 89
Various Ways, to Scan, Click the [OK] button., Click the [OK] button in the [TWAIN Driver 32] dialog
 |
View all Konica Minolta Fujitsu fi-6800 manuals
Add to My Manuals
Save this manual to your list of manuals |
Page 89 highlights
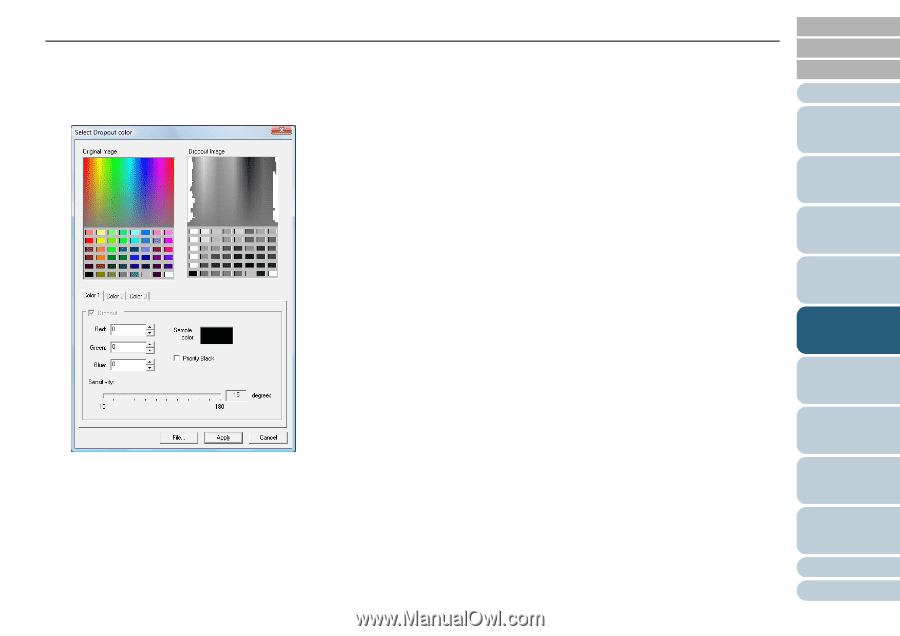
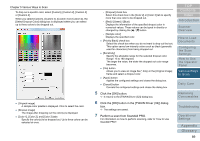
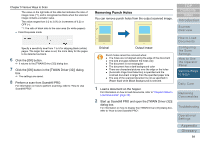
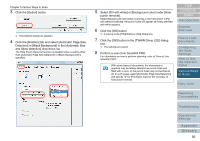
Chapter 5 Various Ways to Scan To drop out a specific color, select [Custom], [Custom 2], [Custom 3] or [Custom 4]. When you select [Custom], [Custom 2], [Custom 3] or [Custom 4], the [Select Dropout Color] dialog box is displayed where you can select up to three colors to be dropped out. z [Original image] A sample color palette is displayed. Click to select the color. z [Dropout image] The image after dropping out the color(s) is displayed. z [Color 1], [Color 2], and [Color 3] tabs Specify the color(s) to be dropped out. Up to three colors can be selected at once. - [Dropout] check box Select this check box in the [Color 2] or [Color 3] tab to specify more than one color to be dropped out. - [Red] / [Green] / [Blue] Displays the information of the specified dropout color in numerical values. These values can be typed in directly or changed by clicking the [S] / [T] button. - [Sample color] Displays the specified color. z [Priority Black] check box Select this check box when you do not want to drop out the text. This option saves low-intensity colors such as black (generally used for characters) from being dropped out. z [Sensitivity] Specify the allowable range for the selected dropout color. Range: 15 to 180 degrees The larger the value, the wider the dropped out color range becomes. z [File] button Allows you to view an image file (*.bmp) in the [Original Image] frame and select a dropout color. z [Apply] button Applies the configured settings and closes the dialog box. z [Cancel] button Cancels the configured settings and closes the dialog box. 5 Click the [OK] button. D It returns to the [TWAIN Driver (32)] dialog box. 6 Click the [OK] button in the [TWAIN Driver (32)] dialog box. D The settings are saved. 7 Perform a scan from ScandAll PRO. For information on how to perform scanning, refer to "How to Use ScandAll PRO". TOP Contents Index Introduction Scanner Overview How to Load Documents Configuring the Scan Settings How to Use the Operator Panel Various Ways to Scan Daily Care Replacing Consumables Troubleshooting Operational Settings Appendix Glossary 89
-
 1
1 -
2
-
3
-
4
-
5
-
6
-
7
-
8
-
9
-
10
-
11
-
12
-
13
-
14
-
15
-
16
-
17
-
18
-
19
-
20
-
21
-
22
-
23
-
24
-
25
-
26
-
27
-
28
-
29
-
30
-
31
-
32
-
33
-
34
-
35
-
36
-
37
-
38
-
39
-
40
-
41
-
42
-
43
-
44
-
45
-
46
-
47
-
48
-
49
-
50
-
51
-
52
-
53
-
54
-
55
-
56
-
57
-
58
-
59
-
60
-
61
-
62
-
63
-
64
-
65
-
66
-
67
-
68
-
69
-
70
-
71
-
72
-
73
-
74
-
75
-
76
-
77
-
78
-
79
-
80
-
81
-
82
-
83
-
 84
84 -
 85
85 -
 86
86 -
 87
87 -
 88
88 -
 89
89 -
 90
90 -
 91
91 -
 92
92 -
 93
93 -
 94
94 -
95
-
96
-
97
-
98
-
99
-
100
-
101
-
102
-
103
-
104
-
105
-
106
-
107
-
108
-
109
-
110
-
111
-
112
-
113
-
114
-
115
-
116
-
117
-
118
-
119
-
120
-
121
-
122
-
123
-
124
-
125
-
126
-
127
-
128
-
129
-
130
-
131
-
132
-
133
-
134
-
135
-
136
-
137
-
138
-
139
-
140
-
141
-
142
-
143
-
144
-
145
-
146
-
147
-
148
-
149
-
150
-
151
-
152
-
153
-
154
-
155
-
156
-
157
-
158
-
159
-
160
-
161
-
162
-
163
-
164
-
165
-
166
-
167
-
168
-
169
-
170
-
171
-
172
-
173
-
174
-
175
-
176
-
177
-
178
-
179
-
180
-
181
-
182
-
183
-
184
-
185
-
186
-
187
-
188
-
189
-
190
-
191
-
192
-
193
-
194
-
195
-
196
-
197
-
198
-
199
-
200
-
201
-
202
-
203
-
204
-
205
-
206
-
207
-
208
-
209
-
210
-
211
-
212
-
213
-
214
-
215
-
216
-
217
-
218
-
219
-
220
-
221
-
222
-
223
-
224
-
225
-
226
-
227
-
228
-
229
-
230
-
231
-
232
-
233
-
234
-
235
-
236
-
237
-
238
-
239
-
240
-
241
-
242
-
243
 |
 |