Konica Minolta Fujitsu fi-6800 Operating Guide - Page 98
Cropping width, Description
 |
View all Konica Minolta Fujitsu fi-6800 manuals
Add to My Manuals
Save this manual to your list of manuals |
Page 98 highlights
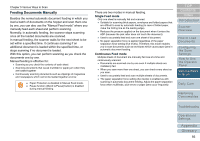
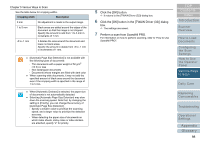
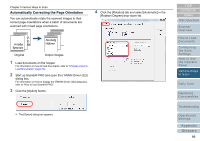
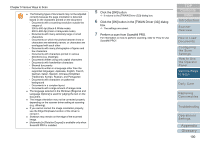
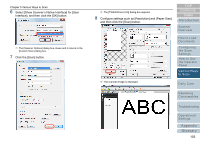
Chapter 5 Various Ways to Scan See the table below for cropping widths. Cropping width Description 0 mm No adjustment is made to the output image. 1 to 5 mm Black areas are added around the edges of the document so that the image is not chipped. Specify the amount to add from 1 to 5 mm in increments of 1 mm. -5 to -1 mm It deletes the area around the document and leave no black areas. Specify the amount to delete from -5 to -1 mm in increments of 1 mm. z [Automatic Page Size Detection] is not available with the following types of documents: - Thin documents with a paper weight of 52 g/m2 (14 lb) or less - Non-rectangular documents - Documents whose margins are filled with dark color z When scanning wide documents, it may not add the specified amount of black area around the document even if the cropping width is specified in the range of 1 to 5 mm. z When [Automatic Deskew] is selected, the paper size of documents is not automatically detected. z Selecting [Automatic Page Size Detection] may slow down the scanning speed. Note that, by changing the setting in [Priority], you can change the accuracy of [Automatic Page Size Detection]. - Specify a smaller value to prioritize the scanning speed, and a larger value to prioritize the detection accuracy. - When detecting the paper size of documents on which index sheets, sticky notes or index stickers are attached, specify "2" for priority. 5 Click the [OK] button. D It returns to the [TWAIN Driver (32)] dialog box. 6 Click the [OK] button in the [TWAIN Driver (32)] dialog box. D The settings are saved. 7 Perform a scan from ScandAll PRO. For information on how to perform scanning, refer to "How to Use ScandAll PRO". TOP Contents Index Introduction Scanner Overview How to Load Documents Configuring the Scan Settings How to Use the Operator Panel Various Ways to Scan Daily Care Replacing Consumables Troubleshooting Operational Settings Appendix Glossary 98
-
 1
1 -
2
-
3
-
4
-
5
-
6
-
7
-
8
-
9
-
10
-
11
-
12
-
13
-
14
-
15
-
16
-
17
-
18
-
19
-
20
-
21
-
22
-
23
-
24
-
25
-
26
-
27
-
28
-
29
-
30
-
31
-
32
-
33
-
34
-
35
-
36
-
37
-
38
-
39
-
40
-
41
-
42
-
43
-
44
-
45
-
46
-
47
-
48
-
49
-
50
-
51
-
52
-
53
-
54
-
55
-
56
-
57
-
58
-
59
-
60
-
61
-
62
-
63
-
64
-
65
-
66
-
67
-
68
-
69
-
70
-
71
-
72
-
73
-
74
-
75
-
76
-
77
-
78
-
79
-
80
-
81
-
82
-
83
-
84
-
85
-
86
-
87
-
88
-
89
-
90
-
91
-
92
-
 93
93 -
 94
94 -
 95
95 -
 96
96 -
 97
97 -
 98
98 -
 99
99 -
 100
100 -
 101
101 -
 102
102 -
 103
103 -
104
-
105
-
106
-
107
-
108
-
109
-
110
-
111
-
112
-
113
-
114
-
115
-
116
-
117
-
118
-
119
-
120
-
121
-
122
-
123
-
124
-
125
-
126
-
127
-
128
-
129
-
130
-
131
-
132
-
133
-
134
-
135
-
136
-
137
-
138
-
139
-
140
-
141
-
142
-
143
-
144
-
145
-
146
-
147
-
148
-
149
-
150
-
151
-
152
-
153
-
154
-
155
-
156
-
157
-
158
-
159
-
160
-
161
-
162
-
163
-
164
-
165
-
166
-
167
-
168
-
169
-
170
-
171
-
172
-
173
-
174
-
175
-
176
-
177
-
178
-
179
-
180
-
181
-
182
-
183
-
184
-
185
-
186
-
187
-
188
-
189
-
190
-
191
-
192
-
193
-
194
-
195
-
196
-
197
-
198
-
199
-
200
-
201
-
202
-
203
-
204
-
205
-
206
-
207
-
208
-
209
-
210
-
211
-
212
-
213
-
214
-
215
-
216
-
217
-
218
-
219
-
220
-
221
-
222
-
223
-
224
-
225
-
226
-
227
-
228
-
229
-
230
-
231
-
232
-
233
-
234
-
235
-
236
-
237
-
238
-
239
-
240
-
241
-
242
-
243
 |
 |