Konica Minolta PS7000 Twain Driver and Overlay Manager Software Installation a - Page 20
Paper Size, The Pr, eview Window
 |
View all Konica Minolta PS7000 manuals
Add to My Manuals
Save this manual to your list of manuals |
Page 20 highlights
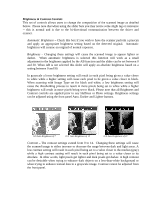
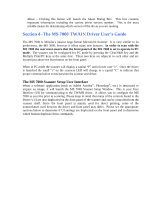
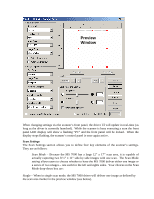
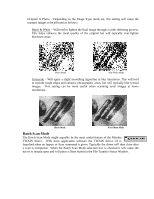
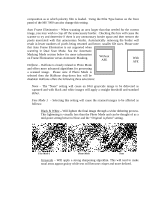
Higher DPI settings will result in better quality scans as well as longer scanning times. In addition, higher resolutions will result in larger file sizes. If using the front panel of the MS 7000 the resolution can be selected by pressing the Clear/Shift key and the Print Mode/Resolution keys at the same time. Each simultaneous press will cycle the resolution setting between 8H (when applicable), 6H, 4H, 3H and 2H. Note: The optical resolution of the scanner is 400 DPI. All other resolutions are derived from on-board interpolation or reduction algorithms. Paper Size - This drop-down box allows you to select the actual Scan Area captured by the MS 7000. The driver supports a wide range of standard U.S. and European sizes. If desired, you can also select the custom setting and define a unique scan area. The scan area selected will be reflected in the Preview Window via a dashed box. When using custom areas you can define any area within the 12" x 17" window. Ledger, Legal and Letter paper sizes can be selected via the front panel of the MS 7000. If any other size scan area is desired, an optional Manual Masking Kit, when installed, can provide functionality for setting these scan areas from the front panel. (See the Preview Window for more information on custom scan areas). Image Type - This drop-down box lets you define the bit-depth of the image. If the optional grayscale kit is not installed, you will only have the option of selecting Black/White. If the optional grayscale kit is installed then you have the following two choices: Black/White - This will cause all images delivered to the PC to have a depth of 1-bit. As a result all pixels will be either black or white. The scanner will threshold the image and perform a dithering algorithm (see the Halftone setting for more information of dithering and halftones). Grayscale - This setting will cause all images to be delivered to the PC to have a bit depth of 8. This will result in images with 256 possible shades of gray. Note: In order to utilize grayscale with the MS 7000 it will be necessary to purchase and install the optional grayscale kit. The Preview Window
-
 1
1 -
2
-
3
-
4
-
5
-
6
-
7
-
8
-
9
-
10
-
11
-
12
-
13
-
14
-
 15
15 -
 16
16 -
 17
17 -
 18
18 -
 19
19 -
 20
20 -
 21
21 -
 22
22 -
 23
23 -
 24
24 -
 25
25 -
26
-
27
-
28
-
29
-
30
-
31
-
32
-
33
-
34
-
35
-
36
-
37
-
38
-
39
-
40
-
41
-
42
-
43
-
44
-
45
-
46
-
47
-
48
-
49
-
50
-
51
-
52
-
53
-
54
-
55
-
56
-
57
-
58
-
59
 |
 |