Konica Minolta bizhub 223 bizhub 423/363/283/223 Network Administrator User Gu - Page 250
To print data, specify [Start], [ Number Type], [Print Position], [Fine-Tune]
 |
View all Konica Minolta bizhub 223 manuals
Add to My Manuals
Save this manual to your list of manuals |
Page 250 highlights
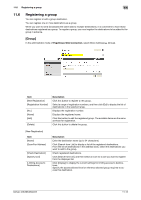
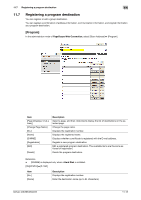
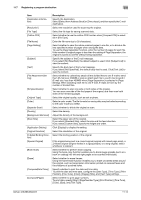
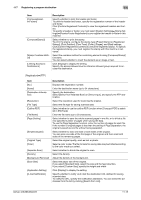
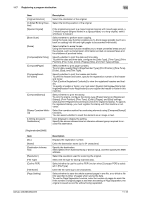
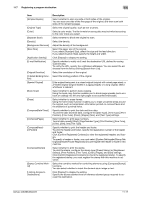
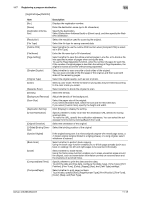
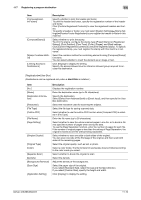
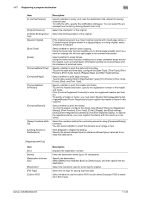
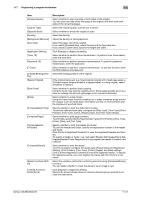
11.7 Registering a program destination 11 Item [Simplex/Duplex] [Original Type] [Color] [Separate Scan] [Density] [Background Removal] [Scan Size] [Application Setting] [E-mail Notification] [Original Direction] [2-Sided Binding Direction] [Special Original] [Book Scan] [Erase] [Compose(Date/Time)] [Compose(Page)] [Compose(Header/Footer)] [Compose(Stamp)] [Stamp Combine Method] [Limiting Access to Destinations] Description Select whether to scan one side or both sides of the original. You can scan one side of the first page of the original, and then scan both sides of the remaining pages. Select the original quality, such as text or photo. Select a color mode. The file formats for saving data may be limited according to the color mode you select. Select whether to divide the original to scan. Select the density. Adjust the density of the background. Select the paper size of the original. If you select [Standard Size], select the size and the feed direction. If you select [Custom Size], specify the height and width. Click [Display] to display the setting. Specify whether to notify via E-mail the destination URL defined for saving scanned data. To notify the URL, specify the notification addresses. You can select the addresses from the list by clicking [Search from List]. Select the orientation of the original. Select the binding position of the original. If the original being sent is a mixed original (original with mixed page sizes), a Z-folded original (original folded in a zigzag shape), or a long original, select whichever is relevant. Select whether to perform book copying. Using the book copy function enables you to divide page spreads (such as a book or catalog) into left and right pages to be scanned individually. Select whether to erase frames. Using the frame erase function enables you to erase unwanted areas around the original, such as transmission information printed on received faxes and the shadows of punched holes. Specify whether to print the date and time data. To print the date and time data, configure the [Date Type], [Time Type], [Print Position], [Fine-Tune], [Color], [Pages], [Size], and [Text Type] settings. Select whether to print page numbers. To print data, specify [Start], [Page Number Type], [Print Position], [Fine-Tune], [Color], [Size], and [Text Type]. Specify whether to print the header and footer. To print the header and footer, specify the registration number of the header and footer. Click [Confirm Registered Contents] to view the registered headers and footers. To specify a header or footer, you must select [System Settings]ö[Stamp Settings]ö[Header/Footer Registration] to pre-register the header or footer in this machine. Select whether to print the stamp. To print the stamp, configure the stamp type ([Preset Stamp] or [Registered Stamp]), [Print Position], [Fine-Tune], [Color], [Pages], and [Size] settings. Click [Confirm Registered Contents] to check the registered stamp. To specify the registered stamp, you must register the stamp with this machine in advance. Select the combine method for combining elements using [Compose(Stamp)] functions. You can select whether to insert the element as an image or text. Click [Display] to display the setting. Specify the access allowed level or reference allowed group required to access this destination. bizhub 423/363/283/223 11-17
-
 1
1 -
2
-
3
-
4
-
5
-
6
-
7
-
8
-
9
-
10
-
11
-
12
-
13
-
14
-
15
-
16
-
17
-
18
-
19
-
20
-
21
-
22
-
23
-
24
-
25
-
26
-
27
-
28
-
29
-
30
-
31
-
32
-
33
-
34
-
35
-
36
-
37
-
38
-
39
-
40
-
41
-
42
-
43
-
44
-
45
-
46
-
47
-
48
-
49
-
50
-
51
-
52
-
53
-
54
-
55
-
56
-
57
-
58
-
59
-
60
-
61
-
62
-
63
-
64
-
65
-
66
-
67
-
68
-
69
-
70
-
71
-
72
-
73
-
74
-
75
-
76
-
77
-
78
-
79
-
80
-
81
-
82
-
83
-
84
-
85
-
86
-
87
-
88
-
89
-
90
-
91
-
92
-
93
-
94
-
95
-
96
-
97
-
98
-
99
-
100
-
101
-
102
-
103
-
104
-
105
-
106
-
107
-
108
-
109
-
110
-
111
-
112
-
113
-
114
-
115
-
116
-
117
-
118
-
119
-
120
-
121
-
122
-
123
-
124
-
125
-
126
-
127
-
128
-
129
-
130
-
131
-
132
-
133
-
134
-
135
-
136
-
137
-
138
-
139
-
140
-
141
-
142
-
143
-
144
-
145
-
146
-
147
-
148
-
149
-
150
-
151
-
152
-
153
-
154
-
155
-
156
-
157
-
158
-
159
-
160
-
161
-
162
-
163
-
164
-
165
-
166
-
167
-
168
-
169
-
170
-
171
-
172
-
173
-
174
-
175
-
176
-
177
-
178
-
179
-
180
-
181
-
182
-
183
-
184
-
185
-
186
-
187
-
188
-
189
-
190
-
191
-
192
-
193
-
194
-
195
-
196
-
197
-
198
-
199
-
200
-
201
-
202
-
203
-
204
-
205
-
206
-
207
-
208
-
209
-
210
-
211
-
212
-
213
-
214
-
215
-
216
-
217
-
218
-
219
-
220
-
221
-
222
-
223
-
224
-
225
-
226
-
227
-
228
-
229
-
230
-
231
-
232
-
233
-
234
-
235
-
236
-
237
-
238
-
239
-
240
-
241
-
242
-
243
-
244
-
 245
245 -
 246
246 -
 247
247 -
 248
248 -
 249
249 -
 250
250 -
 251
251 -
 252
252 -
 253
253 -
 254
254 -
 255
255 -
256
-
257
-
258
-
259
-
260
-
261
-
262
-
263
-
264
-
265
-
266
-
267
-
268
-
269
-
270
-
271
-
272
-
273
-
274
-
275
-
276
-
277
-
278
-
279
-
280
-
281
-
282
-
283
-
284
-
285
-
286
-
287
-
288
-
289
-
290
-
291
-
292
-
293
-
294
-
295
-
296
-
297
-
298
-
299
-
300
-
301
-
302
-
303
-
304
-
305
-
306
-
307
-
308
-
309
-
310
-
311
-
312
-
313
-
314
-
315
-
316
-
317
-
318
-
319
-
320
-
321
-
322
-
323
-
324
-
325
-
326
-
327
-
328
-
329
-
330
-
331
-
332
-
333
-
334
-
335
-
336
-
337
-
338
-
339
-
340
-
341
-
342
-
343
-
344
-
345
-
346
-
347
-
348
-
349
-
350
-
351
-
352
-
353
-
354
-
355
-
356
-
357
-
358
-
359
-
360
-
361
-
362
-
363
-
364
-
365
-
366
-
367
-
368
-
369
-
370
-
371
 |
 |