Konica Minolta bizhub 223 bizhub 423/363/283/223 Network Administrator User Gu - Page 257
Stamp Combine Meth
 |
View all Konica Minolta bizhub 223 manuals
Add to My Manuals
Save this manual to your list of manuals |
Page 257 highlights
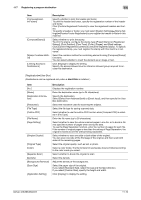
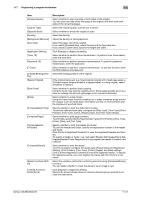
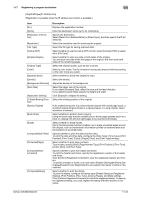
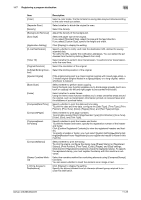
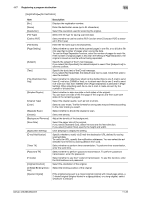
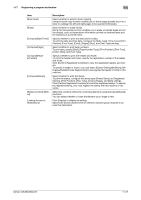
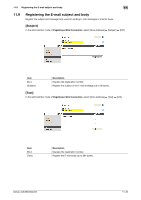
11.7 Registering a program destination 11 Item [Compose(Page)] [Compose(Header/Footer)] [Compose(Stamp)] [Stamp Combine Method] [Limiting Access to Destinations] Description Select whether to print page numbers. To print data, specify [Start], [Page Number Type], [Print Position], [Fine-Tune], [Color], [Size], and [Text Type]. Specify whether to print the header and footer. To print the header and footer, specify the registration number of the header and footer. Click [Confirm Registered Contents] to view the registered headers and footers. To specify a header or footer, you must select [System Settings]ö[Stamp Settings]ö[Header/Footer Registration] to pre-register the header or footer in this machine. Select whether to print the stamp. To print the stamp, configure the stamp type ([Preset Stamp] or [Registered Stamp]), [Print Position], [Fine-Tune], [Color], [Pages], and [Size] settings. Click [Confirm Registered Contents] to check the registered stamp. To specify the registered stamp, you must register the stamp with this machine in advance. Select the combine method for combining elements using [Compose(Stamp)] functions. You can select whether to insert the element as an image or text. Click [Display] to display the setting. Specify the access allowed level or reference allowed group required to access this destination. [Registration]ö[Group] Item [No.] [Name] [Destination Information] [Resolution] [File Type] [Outline PDF] [File Name] [Page Setting] [Subject] [Text] [File Attachment Setting] [Simplex/Duplex] [Original Type] Description Displays the registration number. Enter the destination name (up to 24 characters). Specify the destination. Click [Select from Address Book] to select the group to be registered as a program destination. Click [Check Destination] to check registered destinations. Select the resolution used for scanning the original. Select the file type for saving scanned data. Select whether to use the outline PDF function when [Compact PDF] is selected in [File Type]. Enter the file name (up to 30 characters). Select whether to save the whole scanned pages in one file, or to divide a file into specified number of pages when saving the data. To use the Page Separation function, enter the number of pages for each file. If the number of original pages is less than the setting of Page Separation, the original is saved as one file without being separated. Specify the subject of the E-mail message. If you select [Not Specified], the default subject is used. Click [Subject List] to view the content. Specify the body text of the E-mail message. If you select [Not Specified], the default body text is used. Click [Text List] to view the content. Select whether to collectively attach all the divided files to one E-mail to send them (E-mail size: 200MB or less), or to attach each file to one E-mail to send it (E-mail size: less than 400MB) when [Page Separation] is selected in [Page Setting]. When attaching each file to one E-mail, E-mails are sent by the number of divided files. Select whether to scan one side or both sides of the original. You can scan one side of the first page of the original, and then scan both sides of the remaining pages. Select the original quality, such as text or photo. bizhub 423/363/283/223 11-24
-
 1
1 -
2
-
3
-
4
-
5
-
6
-
7
-
8
-
9
-
10
-
11
-
12
-
13
-
14
-
15
-
16
-
17
-
18
-
19
-
20
-
21
-
22
-
23
-
24
-
25
-
26
-
27
-
28
-
29
-
30
-
31
-
32
-
33
-
34
-
35
-
36
-
37
-
38
-
39
-
40
-
41
-
42
-
43
-
44
-
45
-
46
-
47
-
48
-
49
-
50
-
51
-
52
-
53
-
54
-
55
-
56
-
57
-
58
-
59
-
60
-
61
-
62
-
63
-
64
-
65
-
66
-
67
-
68
-
69
-
70
-
71
-
72
-
73
-
74
-
75
-
76
-
77
-
78
-
79
-
80
-
81
-
82
-
83
-
84
-
85
-
86
-
87
-
88
-
89
-
90
-
91
-
92
-
93
-
94
-
95
-
96
-
97
-
98
-
99
-
100
-
101
-
102
-
103
-
104
-
105
-
106
-
107
-
108
-
109
-
110
-
111
-
112
-
113
-
114
-
115
-
116
-
117
-
118
-
119
-
120
-
121
-
122
-
123
-
124
-
125
-
126
-
127
-
128
-
129
-
130
-
131
-
132
-
133
-
134
-
135
-
136
-
137
-
138
-
139
-
140
-
141
-
142
-
143
-
144
-
145
-
146
-
147
-
148
-
149
-
150
-
151
-
152
-
153
-
154
-
155
-
156
-
157
-
158
-
159
-
160
-
161
-
162
-
163
-
164
-
165
-
166
-
167
-
168
-
169
-
170
-
171
-
172
-
173
-
174
-
175
-
176
-
177
-
178
-
179
-
180
-
181
-
182
-
183
-
184
-
185
-
186
-
187
-
188
-
189
-
190
-
191
-
192
-
193
-
194
-
195
-
196
-
197
-
198
-
199
-
200
-
201
-
202
-
203
-
204
-
205
-
206
-
207
-
208
-
209
-
210
-
211
-
212
-
213
-
214
-
215
-
216
-
217
-
218
-
219
-
220
-
221
-
222
-
223
-
224
-
225
-
226
-
227
-
228
-
229
-
230
-
231
-
232
-
233
-
234
-
235
-
236
-
237
-
238
-
239
-
240
-
241
-
242
-
243
-
244
-
245
-
246
-
247
-
248
-
249
-
250
-
251
-
 252
252 -
 253
253 -
 254
254 -
 255
255 -
 256
256 -
 257
257 -
 258
258 -
 259
259 -
 260
260 -
 261
261 -
 262
262 -
263
-
264
-
265
-
266
-
267
-
268
-
269
-
270
-
271
-
272
-
273
-
274
-
275
-
276
-
277
-
278
-
279
-
280
-
281
-
282
-
283
-
284
-
285
-
286
-
287
-
288
-
289
-
290
-
291
-
292
-
293
-
294
-
295
-
296
-
297
-
298
-
299
-
300
-
301
-
302
-
303
-
304
-
305
-
306
-
307
-
308
-
309
-
310
-
311
-
312
-
313
-
314
-
315
-
316
-
317
-
318
-
319
-
320
-
321
-
322
-
323
-
324
-
325
-
326
-
327
-
328
-
329
-
330
-
331
-
332
-
333
-
334
-
335
-
336
-
337
-
338
-
339
-
340
-
341
-
342
-
343
-
344
-
345
-
346
-
347
-
348
-
349
-
350
-
351
-
352
-
353
-
354
-
355
-
356
-
357
-
358
-
359
-
360
-
361
-
362
-
363
-
364
-
365
-
366
-
367
-
368
-
369
-
370
-
371
 |
 |