Konica Minolta bizhub 223 bizhub 423/363/283/223 Network Administrator User Gu - Page 260
ComposeDate/Time]
 |
View all Konica Minolta bizhub 223 manuals
Add to My Manuals
Save this manual to your list of manuals |
Page 260 highlights
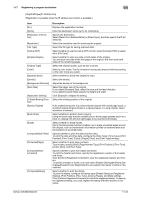
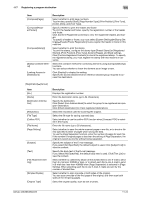
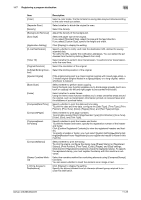
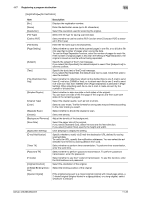
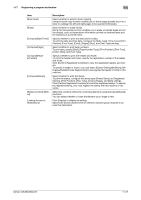
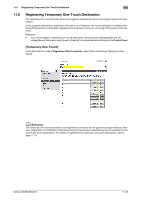
11.7 Registering a program destination 11 Item [Book Scan] [Erase] [Compose(Date/Time)] [Compose(Page)] [Compose(Header/Footer)] [Compose(Stamp)] [Stamp Combine Method] [Limiting Access to Destinations] Description Select whether to perform book copying. Using the book copy function enables you to divide page spreads (such as a book or catalog) into left and right pages to be scanned individually. Select whether to erase frames. Using the frame erase function enables you to erase unwanted areas around the original, such as transmission information printed on received faxes and the shadows of punched holes. Specify whether to print the date and time data. To print the date and time data, configure the [Date Type], [Time Type], [Print Position], [Fine-Tune], [Color], [Pages], [Size], and [Text Type] settings. Select whether to print page numbers. To print data, specify [Start], [Page Number Type], [Print Position], [Fine-Tune], [Color], [Size], and [Text Type]. Specify whether to print the header and footer. To print the header and footer, specify the registration number of the header and footer. Click [Confirm Registered Contents] to view the registered headers and footers. To specify a header or footer, you must select [System Settings]ö[Stamp Settings]ö[Header/Footer Registration] to pre-register the header or footer in this machine. Select whether to print the stamp. To print the stamp, configure the stamp type ([Preset Stamp] or [Registered Stamp]), [Print Position], [Fine-Tune], [Color], [Pages], and [Size] settings. Click [Confirm Registered Contents] to check the registered stamp. To specify the registered stamp, you must register the stamp with this machine in advance. Select the combine method for combining elements using [Compose(Stamp)] functions. You can select whether to insert the element as an image or text. Click [Display] to display the setting. Specify the access allowed level or reference allowed group required to access this destination. bizhub 423/363/283/223 11-27
-
 1
1 -
2
-
3
-
4
-
5
-
6
-
7
-
8
-
9
-
10
-
11
-
12
-
13
-
14
-
15
-
16
-
17
-
18
-
19
-
20
-
21
-
22
-
23
-
24
-
25
-
26
-
27
-
28
-
29
-
30
-
31
-
32
-
33
-
34
-
35
-
36
-
37
-
38
-
39
-
40
-
41
-
42
-
43
-
44
-
45
-
46
-
47
-
48
-
49
-
50
-
51
-
52
-
53
-
54
-
55
-
56
-
57
-
58
-
59
-
60
-
61
-
62
-
63
-
64
-
65
-
66
-
67
-
68
-
69
-
70
-
71
-
72
-
73
-
74
-
75
-
76
-
77
-
78
-
79
-
80
-
81
-
82
-
83
-
84
-
85
-
86
-
87
-
88
-
89
-
90
-
91
-
92
-
93
-
94
-
95
-
96
-
97
-
98
-
99
-
100
-
101
-
102
-
103
-
104
-
105
-
106
-
107
-
108
-
109
-
110
-
111
-
112
-
113
-
114
-
115
-
116
-
117
-
118
-
119
-
120
-
121
-
122
-
123
-
124
-
125
-
126
-
127
-
128
-
129
-
130
-
131
-
132
-
133
-
134
-
135
-
136
-
137
-
138
-
139
-
140
-
141
-
142
-
143
-
144
-
145
-
146
-
147
-
148
-
149
-
150
-
151
-
152
-
153
-
154
-
155
-
156
-
157
-
158
-
159
-
160
-
161
-
162
-
163
-
164
-
165
-
166
-
167
-
168
-
169
-
170
-
171
-
172
-
173
-
174
-
175
-
176
-
177
-
178
-
179
-
180
-
181
-
182
-
183
-
184
-
185
-
186
-
187
-
188
-
189
-
190
-
191
-
192
-
193
-
194
-
195
-
196
-
197
-
198
-
199
-
200
-
201
-
202
-
203
-
204
-
205
-
206
-
207
-
208
-
209
-
210
-
211
-
212
-
213
-
214
-
215
-
216
-
217
-
218
-
219
-
220
-
221
-
222
-
223
-
224
-
225
-
226
-
227
-
228
-
229
-
230
-
231
-
232
-
233
-
234
-
235
-
236
-
237
-
238
-
239
-
240
-
241
-
242
-
243
-
244
-
245
-
246
-
247
-
248
-
249
-
250
-
251
-
252
-
253
-
254
-
 255
255 -
 256
256 -
 257
257 -
 258
258 -
 259
259 -
 260
260 -
 261
261 -
 262
262 -
 263
263 -
 264
264 -
 265
265 -
266
-
267
-
268
-
269
-
270
-
271
-
272
-
273
-
274
-
275
-
276
-
277
-
278
-
279
-
280
-
281
-
282
-
283
-
284
-
285
-
286
-
287
-
288
-
289
-
290
-
291
-
292
-
293
-
294
-
295
-
296
-
297
-
298
-
299
-
300
-
301
-
302
-
303
-
304
-
305
-
306
-
307
-
308
-
309
-
310
-
311
-
312
-
313
-
314
-
315
-
316
-
317
-
318
-
319
-
320
-
321
-
322
-
323
-
324
-
325
-
326
-
327
-
328
-
329
-
330
-
331
-
332
-
333
-
334
-
335
-
336
-
337
-
338
-
339
-
340
-
341
-
342
-
343
-
344
-
345
-
346
-
347
-
348
-
349
-
350
-
351
-
352
-
353
-
354
-
355
-
356
-
357
-
358
-
359
-
360
-
361
-
362
-
363
-
364
-
365
-
366
-
367
-
368
-
369
-
370
-
371
 |
 |