Konica Minolta bizhub 363 bizhub 423/363/283/223 Copy Operations User Guide - Page 146
Punch Regist Loop Size Adjustment], Paper Alignment Plate Settings], Maximum Density Adjustment]
 |
View all Konica Minolta bizhub 363 manuals
Add to My Manuals
Save this manual to your list of manuals |
Page 146 highlights
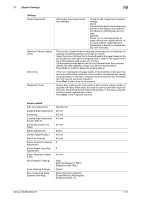
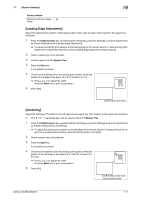
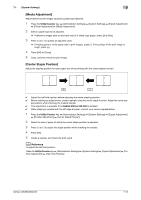
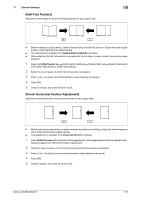
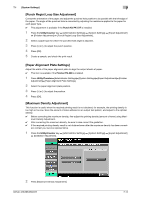
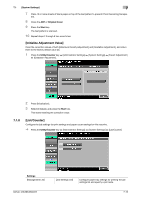
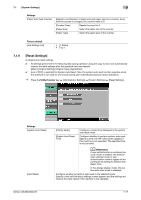
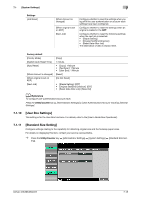
7.1 [System Settings] 7 [Punch Regist Loop Size Adjustment] Correct the orientation of the paper and adjust the punched hole position to be parallel with the left edge of the paper. The angle of the punched hole is corrected by adjusting the resistance applied to the paper for each paper type. 0 This adjustment is available if the Punch Kit PK-517 is installed. 1 Press the Utility/Counter key ö [Administrator Settings] ö [System Settings] ö [Expert Adjustment] ö [Finisher Adjustment] ö [Punch Regist Loop Size Adjustment]. 2 Select a paper type for which the punched hole angle is adjusted. 3 Press [+] or [-] to adjust the punch position. 4 Press [OK]. 5 Create a sample, and check the print result. [Paper Alignment Plate Settings] Adjust the width of the paper alignment plate to align the output sheets of paper. 0 This item is available if the Finisher FS-529 is installed. 1 Press Utility/Counterö[Administrator Settings]ö[System Settings]ö[Expert Adjustment]ö[Finisher Adjustment]ö[Paper Alignment Plate Settings]. 2 Select the paper alignment plate position. 3 Press [+] or [-] to adjust the position. 4 Press [OK]. [Maximum Density Adjustment] This function is useful when the required printing result is not obtained, for example, the printing density is too high or too low. Scan the amount of toner adhered on an output test pattern, and adjust to the optimal density. 0 Before correcting the maximum density, fine-adjust the printing density (amount of toner) using Maxi- mum Density Adjustment. 0 After correcting the maximum density, be sure to also correct the gradation. 0 If the required printing density result is not obtained even after the maximum density has been correct- ed, contact your service representative. 1 Press the Utility/Counter key ö [Administrator Settings] ö [System Settings] ö [Expert Adjustment] ö [Gradation Adjustment]. 2 Press [Maximum Density Adjustment]. bizhub 423/363/283/223 7-14
-
 1
1 -
2
-
3
-
4
-
5
-
6
-
7
-
8
-
9
-
10
-
11
-
12
-
13
-
14
-
15
-
16
-
17
-
18
-
19
-
20
-
21
-
22
-
23
-
24
-
25
-
26
-
27
-
28
-
29
-
30
-
31
-
32
-
33
-
34
-
35
-
36
-
37
-
38
-
39
-
40
-
41
-
42
-
43
-
44
-
45
-
46
-
47
-
48
-
49
-
50
-
51
-
52
-
53
-
54
-
55
-
56
-
57
-
58
-
59
-
60
-
61
-
62
-
63
-
64
-
65
-
66
-
67
-
68
-
69
-
70
-
71
-
72
-
73
-
74
-
75
-
76
-
77
-
78
-
79
-
80
-
81
-
82
-
83
-
84
-
85
-
86
-
87
-
88
-
89
-
90
-
91
-
92
-
93
-
94
-
95
-
96
-
97
-
98
-
99
-
100
-
101
-
102
-
103
-
104
-
105
-
106
-
107
-
108
-
109
-
110
-
111
-
112
-
113
-
114
-
115
-
116
-
117
-
118
-
119
-
120
-
121
-
122
-
123
-
124
-
125
-
126
-
127
-
128
-
129
-
130
-
131
-
132
-
133
-
134
-
135
-
136
-
137
-
138
-
139
-
140
-
 141
141 -
 142
142 -
 143
143 -
 144
144 -
 145
145 -
 146
146 -
 147
147 -
 148
148 -
 149
149 -
 150
150 -
 151
151 -
152
-
153
-
154
-
155
-
156
-
157
-
158
-
159
-
160
-
161
-
162
-
163
-
164
-
165
-
166
-
167
-
168
-
169
-
170
-
171
-
172
-
173
-
174
-
175
-
176
-
177
-
178
-
179
-
180
-
181
-
182
-
183
-
184
-
185
-
186
-
187
-
188
-
189
-
190
-
191
-
192
-
193
-
194
-
195
-
196
-
197
-
198
-
199
-
200
-
201
-
202
-
203
-
204
-
205
-
206
-
207
-
208
-
209
-
210
-
211
-
212
-
213
-
214
-
215
-
216
-
217
-
218
-
219
-
220
-
221
-
222
-
223
-
224
-
225
-
226
-
227
-
228
-
229
-
230
-
231
-
232
-
233
-
234
-
235
-
236
-
237
-
238
-
239
-
240
-
241
-
242
-
243
-
244
-
245
-
246
-
247
-
248
-
249
-
250
-
251
-
252
-
253
-
254
-
255
-
256
-
257
-
258
-
259
-
260
-
261
-
262
-
263
-
264
-
265
-
266
 |
 |