Konica Minolta bizhub 601 bizhub 751/601 Print Operations User Manual - IC-208 - Page 55
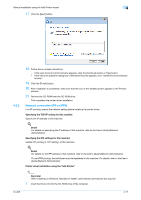
If Control Panel is displayed with Classic View, double-click Printers.
 |
View all Konica Minolta bizhub 601 manuals
Add to My Manuals
Save this manual to your list of manuals |
Page 55 highlights
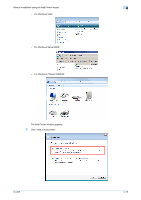
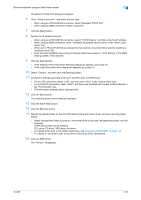
Manual installation using the Add Printer wizard 4 - To check the MAC address, select "Configuration Page". The printer driver for this machine is detected and the machine is ready to print. 6 When installation is complete, make sure that the icon for the installed printer is displayed in the "Printers" or "Devices and Printers" window. - If the printer driver is not correctly installed, the driver must be updated using [Update Driver ...]. For details, refer to ""Updating the driver after connecting this machine" on page 4-23. - In Windows Vista/Server 2008, you can continuously specify the printer driver installation disk to install the printer driver if it is not installed in advance. When the Found New Hardware Wizard dialog box appears, follow the displayed messages to perform the procedure. For details, refer to Steps 11 through 20 in the succeeding section. - In Windows 7/Server 2008 R2, you cannot specify the installation disk after connection has been completed. Install the printer driver in advance (Step 1). Printer driver installation by specifying the IP address using the "Add Printer" In Windows Vista/Server 2008, you can add a Web service device using the printer addition function after connecting this machine. 2 Reminder In Windows 7/Server 2008 R2, a window for specifying the installation disk does not appear after the machine is connected to the computer. Install the printer driver and connect this machine as described in "Recognizing the printer driver from the Network window". When installing on Windows Vista/Server 2008, administrator permissions are required. Printers will be found during installation. Connect this machine to the network, and then turn on the power. 1 Turn on the power of the machine while it is connected to the network. - To allow printers to be detected during installation, the machine must be connected to the network. 2 To use the Web Service print, check that "Network discovery" is enabled in "Network and Sharing Center" on the computer. 3 Insert the Driver CD into the CD-ROM drive of the computer. 4 Click the [Start] button, and then click "Control Panel". 5 From "Hardware and Sound", click "Printer". The Printers window appears. - If Control Panel is displayed with Classic View, double-click "Printers". 6 Click "Add a printer" from the toolbar. The Add Printer window appears. IC-208 4-20
-
 1
1 -
2
-
3
-
4
-
5
-
6
-
7
-
8
-
9
-
10
-
11
-
12
-
13
-
14
-
15
-
16
-
17
-
18
-
19
-
20
-
21
-
22
-
23
-
24
-
25
-
26
-
27
-
28
-
29
-
30
-
31
-
32
-
33
-
34
-
35
-
36
-
37
-
38
-
39
-
40
-
41
-
42
-
43
-
44
-
45
-
46
-
47
-
48
-
49
-
 50
50 -
 51
51 -
 52
52 -
 53
53 -
 54
54 -
 55
55 -
 56
56 -
 57
57 -
 58
58 -
 59
59 -
 60
60 -
61
-
62
-
63
-
64
-
65
-
66
-
67
-
68
-
69
-
70
-
71
-
72
-
73
-
74
-
75
-
76
-
77
-
78
-
79
-
80
-
81
-
82
-
83
-
84
-
85
-
86
-
87
-
88
-
89
-
90
-
91
-
92
-
93
-
94
-
95
-
96
-
97
-
98
-
99
-
100
-
101
-
102
-
103
-
104
-
105
-
106
-
107
-
108
-
109
-
110
-
111
-
112
-
113
-
114
-
115
-
116
-
117
-
118
-
119
-
120
-
121
-
122
-
123
-
124
-
125
-
126
-
127
-
128
-
129
-
130
-
131
-
132
-
133
-
134
-
135
-
136
-
137
-
138
-
139
-
140
-
141
-
142
-
143
-
144
-
145
-
146
-
147
-
148
-
149
-
150
-
151
-
152
-
153
-
154
-
155
-
156
-
157
-
158
-
159
-
160
-
161
-
162
-
163
-
164
-
165
-
166
-
167
-
168
-
169
-
170
-
171
-
172
-
173
-
174
-
175
-
176
-
177
-
178
-
179
-
180
-
181
-
182
-
183
-
184
-
185
-
186
-
187
-
188
-
189
-
190
-
191
-
192
-
193
-
194
-
195
-
196
-
197
-
198
-
199
-
200
-
201
-
202
-
203
-
204
-
205
-
206
-
207
-
208
-
209
-
210
-
211
-
212
-
213
-
214
-
215
-
216
-
217
-
218
-
219
-
220
-
221
-
222
-
223
-
224
-
225
-
226
-
227
-
228
-
229
-
230
-
231
-
232
-
233
-
234
-
235
-
236
-
237
-
238
-
239
-
240
-
241
-
242
-
243
-
244
-
245
-
246
-
247
-
248
-
249
-
250
-
251
-
252
-
253
-
254
-
255
-
256
-
257
-
258
-
259
-
260
-
261
-
262
-
263
-
264
-
265
-
266
-
267
-
268
-
269
-
270
-
271
-
272
-
273
 |
 |