Konica Minolta bizhub 601 bizhub 751/601 Print Operations User Manual - IC-208 - Page 81
Mac OS 9.2 - hard drive
 |
View all Konica Minolta bizhub 601 manuals
Add to My Manuals
Save this manual to your list of manuals |
Page 81 highlights
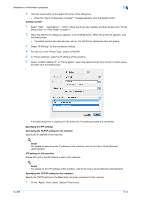
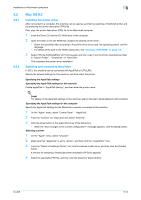
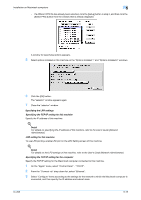
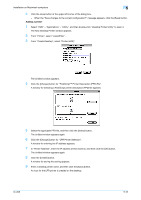
Installation on Macintosh computers 5 5.2 5.2.1 5.2.2 Mac OS 9.2 Installing the printer driver After connected to a computer, this machine can be used as a printer by selecting a PostScript printer and by specifying the printer description (PPD) file. First, copy the printer description (PPD) file to the Macintosh computer. 1 Insert the Driver CD into the CD-ROM drive of the computer. 2 Open the folder on the CD-ROM that contains the desired printer driver. - Select the specified folder according to the printer driver to be used, the operating system, and the language. - For details of the built-in CD-ROM construction, see "Contents of CD-ROM" on page 1-9. 3 Select PPD file KONICAMINOLTA751UVxxx.ppd, and then copy it into the Printer Descriptions folder in "System Folder" - "Extensions" of "Hard Disk". This completes the printer driver installation. Selecting and connecting the printer In OS 9, this machine can be connected with AppleTalk or LPR (LPD). Specify the network settings for this machine, and then select the printer. Specifying the AppleTalk settings Specifying the AppleTalk settings for this machine Enable AppleTalk in "AppleTalk Setting", and then enter the printer name. ! Detail For details on the AppleTalk settings of this machine, refer to the User's Guide [Network Administrator]. Specifying the AppleTalk settings for the computer Specify the AppleTalk settings for the Macintosh computer connected to this machine. 1 On the "Apple" menu, select "Control Panel" - "AppleTalk". 2 From the "Connect via" drop-down list, select "Ethernet". 3 Click the close button at the upper left corner of the dialog box. - When the "Save changes to the current configuration?" message appears, click the [Save] button. Selecting a printer 1 On the "Apple" menu, select "Chooser". 2 Make sure that "AppleTalk" is set to "Active", and then click the "LaserWriter" icon. 3 From the "Select a PostScript Printer" list, click the desired model name, and then click the [Create] button. A window for selecting a PostScript printer description (PPD) file appears. 4 Select the applicable PPD file, and then click the [Select] or [Open] button. IC-208 5-14
-
 1
1 -
2
-
3
-
4
-
5
-
6
-
7
-
8
-
9
-
10
-
11
-
12
-
13
-
14
-
15
-
16
-
17
-
18
-
19
-
20
-
21
-
22
-
23
-
24
-
25
-
26
-
27
-
28
-
29
-
30
-
31
-
32
-
33
-
34
-
35
-
36
-
37
-
38
-
39
-
40
-
41
-
42
-
43
-
44
-
45
-
46
-
47
-
48
-
49
-
50
-
51
-
52
-
53
-
54
-
55
-
56
-
57
-
58
-
59
-
60
-
61
-
62
-
63
-
64
-
65
-
66
-
67
-
68
-
69
-
70
-
71
-
72
-
73
-
74
-
75
-
 76
76 -
 77
77 -
 78
78 -
 79
79 -
 80
80 -
 81
81 -
 82
82 -
 83
83 -
 84
84 -
 85
85 -
 86
86 -
87
-
88
-
89
-
90
-
91
-
92
-
93
-
94
-
95
-
96
-
97
-
98
-
99
-
100
-
101
-
102
-
103
-
104
-
105
-
106
-
107
-
108
-
109
-
110
-
111
-
112
-
113
-
114
-
115
-
116
-
117
-
118
-
119
-
120
-
121
-
122
-
123
-
124
-
125
-
126
-
127
-
128
-
129
-
130
-
131
-
132
-
133
-
134
-
135
-
136
-
137
-
138
-
139
-
140
-
141
-
142
-
143
-
144
-
145
-
146
-
147
-
148
-
149
-
150
-
151
-
152
-
153
-
154
-
155
-
156
-
157
-
158
-
159
-
160
-
161
-
162
-
163
-
164
-
165
-
166
-
167
-
168
-
169
-
170
-
171
-
172
-
173
-
174
-
175
-
176
-
177
-
178
-
179
-
180
-
181
-
182
-
183
-
184
-
185
-
186
-
187
-
188
-
189
-
190
-
191
-
192
-
193
-
194
-
195
-
196
-
197
-
198
-
199
-
200
-
201
-
202
-
203
-
204
-
205
-
206
-
207
-
208
-
209
-
210
-
211
-
212
-
213
-
214
-
215
-
216
-
217
-
218
-
219
-
220
-
221
-
222
-
223
-
224
-
225
-
226
-
227
-
228
-
229
-
230
-
231
-
232
-
233
-
234
-
235
-
236
-
237
-
238
-
239
-
240
-
241
-
242
-
243
-
244
-
245
-
246
-
247
-
248
-
249
-
250
-
251
-
252
-
253
-
254
-
255
-
256
-
257
-
258
-
259
-
260
-
261
-
262
-
263
-
264
-
265
-
266
-
267
-
268
-
269
-
270
-
271
-
272
-
273
 |
 |