Konica Minolta bizhub C364e PageScope Authentication Manager User Manual Versi - Page 32
Creating a deletion file
 |
View all Konica Minolta bizhub C364e manuals
Add to My Manuals
Save this manual to your list of manuals |
Page 32 highlights
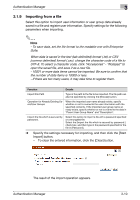
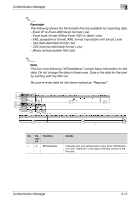
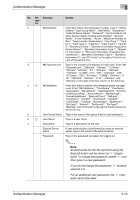
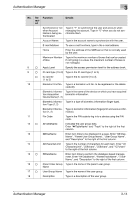
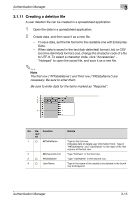
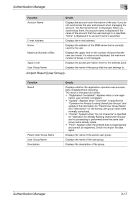
Authentication Manager 3 3.1.11 Creating a deletion file A user deletion file can be created in a spreadsheet application. 1 Open the data in a spreadsheet application. 2 Create data, and then save it as a new file. - To save data, set the file format to the readable one with Enterprise Suite. - When data is saved in the text (tab-delimited) format (.txt) or CSV (comma-delimited) format (.csv), change the character code of a file to UTF-8. To select a character code, click "Accessories" "Notepad" to open the saved file, and save it as a new file. 2 Note The first row ("##TableName") and third row ("##DataName") are necessary. Be sure to enter them. Be sure to enter data for the items marked as "Required". 1 2 3 4 No. Re- Function quir ed 1 o ##TableName 2 ##CharacterLimit 3 o ##DataName 4 o User Name Details Type in the first row. Indicates data to delete user information from. Type in "##TableName" and "UserDelete" to the right of the first column of the first row. Type "64chars" in the third row. Type "UserName" in the second row. Type in the name of the user(s) to be deleted in the fourth row and beyond. Authentication Manager 3-15
-
 1
1 -
2
-
3
-
4
-
5
-
6
-
7
-
8
-
9
-
10
-
11
-
12
-
13
-
14
-
15
-
16
-
17
-
18
-
19
-
20
-
21
-
22
-
23
-
24
-
25
-
26
-
 27
27 -
 28
28 -
 29
29 -
 30
30 -
 31
31 -
 32
32 -
 33
33 -
 34
34 -
 35
35 -
 36
36 -
 37
37 -
38
-
39
-
40
-
41
-
42
-
43
-
44
-
45
-
46
-
47
-
48
-
49
-
50
-
51
-
52
-
53
-
54
-
55
-
56
-
57
-
58
-
59
-
60
-
61
-
62
-
63
-
64
-
65
-
66
-
67
-
68
-
69
-
70
-
71
-
72
-
73
-
74
-
75
-
76
-
77
-
78
-
79
-
80
-
81
-
82
-
83
-
84
-
85
-
86
-
87
-
88
-
89
-
90
-
91
-
92
-
93
-
94
-
95
-
96
-
97
-
98
-
99
-
100
-
101
-
102
-
103
-
104
-
105
-
106
-
107
-
108
-
109
-
110
-
111
-
112
-
113
-
114
-
115
-
116
-
117
-
118
-
119
-
120
-
121
-
122
-
123
-
124
-
125
-
126
-
127
-
128
-
129
-
130
-
131
-
132
-
133
-
134
-
135
-
136
-
137
-
138
-
139
-
140
-
141
-
142
-
143
-
144
-
145
-
146
-
147
-
148
-
149
-
150
-
151
-
152
-
153
-
154
-
155
-
156
-
157
-
158
-
159
-
160
-
161
-
162
-
163
-
164
-
165
-
166
-
167
-
168
-
169
-
170
-
171
-
172
-
173
-
174
-
175
-
176
-
177
-
178
-
179
-
180
-
181
-
182
-
183
-
184
-
185
-
186
-
187
-
188
 |
 |