Konica Minolta bizhub C364e PageScope Authentication Manager User Manual Versi - Page 55
Account Track List
 |
View all Konica Minolta bizhub C364e manuals
Add to My Manuals
Save this manual to your list of manuals |
Page 55 highlights
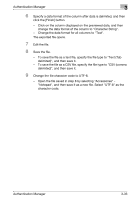
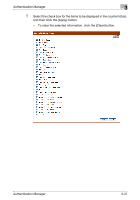
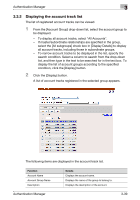
Authentication Manager 3 3.3 Account Track List 3.3.1 Available operations in the Account Track List page From the Account Track List page, settings can be specified with the following. Function Search Condition [Register] button [Edit] button [Delete] button [Import] button [Export] button Select All/Uncheck All button Details Specify the condition to narrow down account tracks to be displayed in the list. Click this button to register a new account. Click this button to edit the information for a registered account. Click this button to delete a registered account. Click this button to import account information to register the account. Click this button to export the information for the currently registered account and save it. Click this button to select or uncheck all displayed settings. 2 Note In the same way as for User List, Account Track List can be used as the "Account Track" function of the device. When managing output data of a specific user in multiple account tracks based on the user's operations, for example, when handling different customers' jobs, the Account Track function provides the flexibility. When logging in to a device under control of Authentication Manager, you can manage account tracks centrally. For the account name, specify the same account name registered from the device panel. The account name is not case-sensitive. For example, "ACCOUNTTRACK1" and "accounttrack1" are considered to be the same account name. Authentication Manager 3-38
-
 1
1 -
2
-
3
-
4
-
5
-
6
-
7
-
8
-
9
-
10
-
11
-
12
-
13
-
14
-
15
-
16
-
17
-
18
-
19
-
20
-
21
-
22
-
23
-
24
-
25
-
26
-
27
-
28
-
29
-
30
-
31
-
32
-
33
-
34
-
35
-
36
-
37
-
38
-
39
-
40
-
41
-
42
-
43
-
44
-
45
-
46
-
47
-
48
-
49
-
 50
50 -
 51
51 -
 52
52 -
 53
53 -
 54
54 -
 55
55 -
 56
56 -
 57
57 -
 58
58 -
 59
59 -
 60
60 -
61
-
62
-
63
-
64
-
65
-
66
-
67
-
68
-
69
-
70
-
71
-
72
-
73
-
74
-
75
-
76
-
77
-
78
-
79
-
80
-
81
-
82
-
83
-
84
-
85
-
86
-
87
-
88
-
89
-
90
-
91
-
92
-
93
-
94
-
95
-
96
-
97
-
98
-
99
-
100
-
101
-
102
-
103
-
104
-
105
-
106
-
107
-
108
-
109
-
110
-
111
-
112
-
113
-
114
-
115
-
116
-
117
-
118
-
119
-
120
-
121
-
122
-
123
-
124
-
125
-
126
-
127
-
128
-
129
-
130
-
131
-
132
-
133
-
134
-
135
-
136
-
137
-
138
-
139
-
140
-
141
-
142
-
143
-
144
-
145
-
146
-
147
-
148
-
149
-
150
-
151
-
152
-
153
-
154
-
155
-
156
-
157
-
158
-
159
-
160
-
161
-
162
-
163
-
164
-
165
-
166
-
167
-
168
-
169
-
170
-
171
-
172
-
173
-
174
-
175
-
176
-
177
-
178
-
179
-
180
-
181
-
182
-
183
-
184
-
185
-
186
-
187
-
188
 |
 |