Konica Minolta bizhub C650 bizhub C650 Print Operations User Guide - Page 155
Printing the date and numbers
 |
View all Konica Minolta bizhub C650 manuals
Add to My Manuals
Save this manual to your list of manuals |
Page 155 highlights
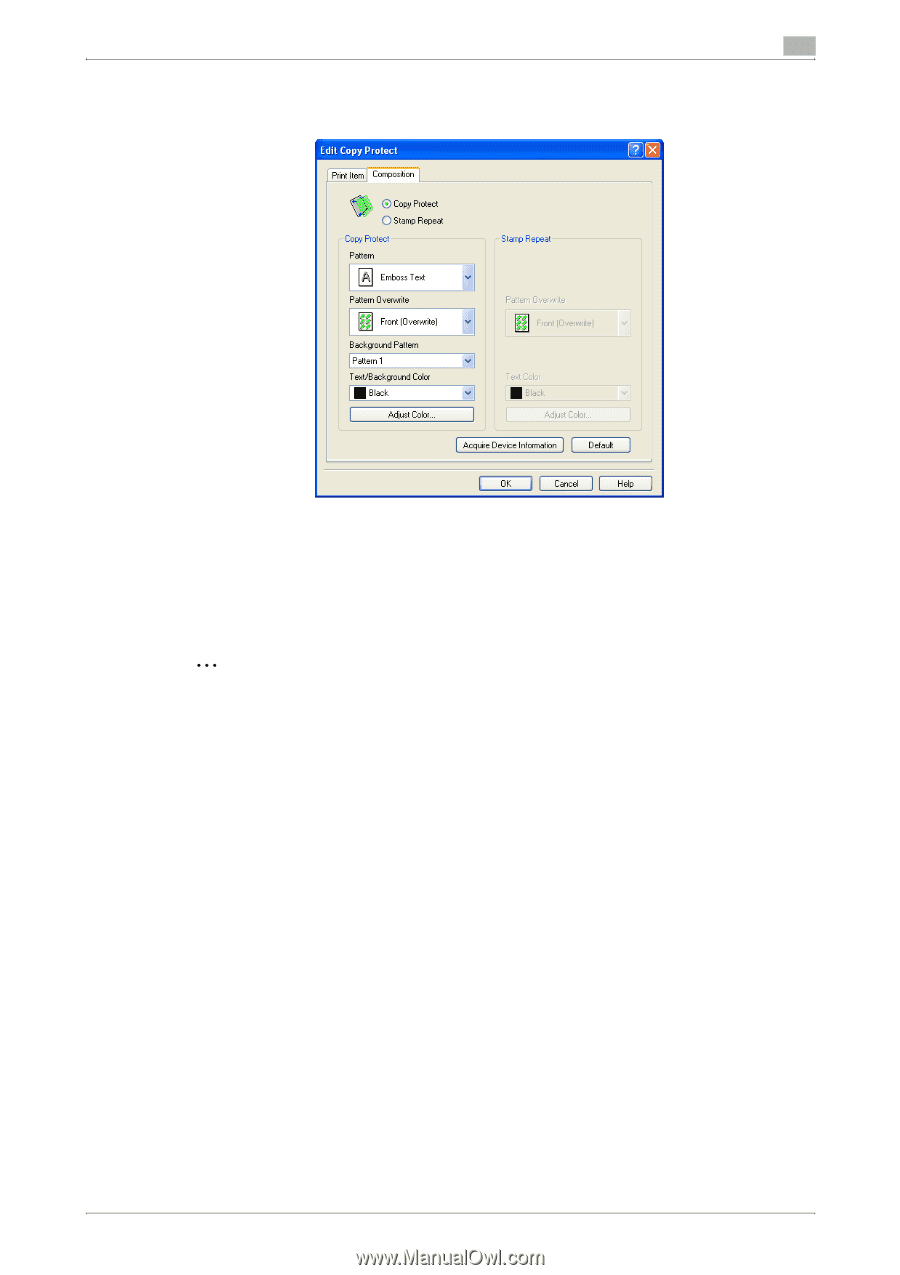
Setting up the PostScript driver (Windows) 6 5 Select the composition method for copy protection. Select "Copy Protect" to specify the desired results when copying, or simply select "Stamp Repeat". In addition, you can select the embedding conditions. - Pattern: Specifies the embedding method of a pattern. - Pattern Overwrite: Specifies the order for printing a pattern on the original document. - Background Pattern: Specifies the pattern background. - Text/Background Color: Specifies the pattern color. The density and color contrast can be specified by clicking the [Adjust Color] button. 6 Click the [OK] button. 2 Note Click the [Acquire Device Information] button to communicate with this machine and read the status of the settings specified on this machine. You cannot use this function if you are not connected to or able to communicate with this machine. In addition, when use the [Acquire Device Information] function, in the Administrator Settings of the machine, select [System Connection] - [Open API Settings] - [Authentication], and then select "OFF". For details, refer to "Authentication Setting for the OpenAPI Settings" on page 10-38. Printing the date and page numbers You can print the date and page numbers on a document. 1 Click the Stamp/Composition tab. 2 Select the "Date/Time" or the "Page Number" check box. The "Date/Time" and "Page Number" check boxes can be selected at the same time. 3 Click the [Edit] button under "Page Number". The Edit Date/Time/Page Number dialog box appears. C650 6-24
-
 1
1 -
2
-
3
-
4
-
5
-
6
-
7
-
8
-
9
-
10
-
11
-
12
-
13
-
14
-
15
-
16
-
17
-
18
-
19
-
20
-
21
-
22
-
23
-
24
-
25
-
26
-
27
-
28
-
29
-
30
-
31
-
32
-
33
-
34
-
35
-
36
-
37
-
38
-
39
-
40
-
41
-
42
-
43
-
44
-
45
-
46
-
47
-
48
-
49
-
50
-
51
-
52
-
53
-
54
-
55
-
56
-
57
-
58
-
59
-
60
-
61
-
62
-
63
-
64
-
65
-
66
-
67
-
68
-
69
-
70
-
71
-
72
-
73
-
74
-
75
-
76
-
77
-
78
-
79
-
80
-
81
-
82
-
83
-
84
-
85
-
86
-
87
-
88
-
89
-
90
-
91
-
92
-
93
-
94
-
95
-
96
-
97
-
98
-
99
-
100
-
101
-
102
-
103
-
104
-
105
-
106
-
107
-
108
-
109
-
110
-
111
-
112
-
113
-
114
-
115
-
116
-
117
-
118
-
119
-
120
-
121
-
122
-
123
-
124
-
125
-
126
-
127
-
128
-
129
-
130
-
131
-
132
-
133
-
134
-
135
-
136
-
137
-
138
-
139
-
140
-
141
-
142
-
143
-
144
-
145
-
146
-
147
-
148
-
149
-
 150
150 -
 151
151 -
 152
152 -
 153
153 -
 154
154 -
 155
155 -
 156
156 -
 157
157 -
 158
158 -
 159
159 -
 160
160 -
161
-
162
-
163
-
164
-
165
-
166
-
167
-
168
-
169
-
170
-
171
-
172
-
173
-
174
-
175
-
176
-
177
-
178
-
179
-
180
-
181
-
182
-
183
-
184
-
185
-
186
-
187
-
188
-
189
-
190
-
191
-
192
-
193
-
194
-
195
-
196
-
197
-
198
-
199
-
200
-
201
-
202
-
203
-
204
-
205
-
206
-
207
-
208
-
209
-
210
-
211
-
212
-
213
-
214
-
215
-
216
-
217
-
218
-
219
-
220
-
221
-
222
-
223
-
224
-
225
-
226
-
227
-
228
-
229
-
230
-
231
-
232
-
233
-
234
-
235
-
236
-
237
-
238
-
239
-
240
-
241
-
242
-
243
-
244
-
245
-
246
-
247
-
248
-
249
-
250
-
251
-
252
-
253
-
254
-
255
-
256
-
257
-
258
-
259
-
260
-
261
-
262
-
263
-
264
-
265
-
266
-
267
-
268
-
269
-
270
-
271
-
272
-
273
-
274
-
275
-
276
-
277
-
278
-
279
-
280
-
281
-
282
-
283
-
284
-
285
-
286
-
287
-
288
-
289
-
290
-
291
-
292
-
293
-
294
-
295
-
296
-
297
-
298
-
299
-
300
-
301
-
302
-
303
 |
 |