Konica Minolta bizhub C650 bizhub C650 Print Operations User Guide - Page 55
LPR printing, Operations on this machine, Printer driver settings
 |
View all Konica Minolta bizhub C650 manuals
Add to My Manuals
Save this manual to your list of manuals |
Page 55 highlights
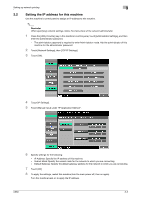
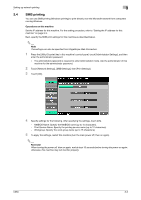
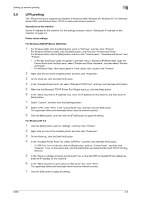
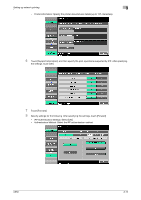
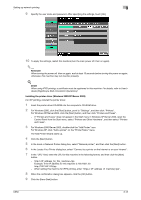
Setting up network printing 3 3.5 LPR printing The LPR print service is supported as standard in Windows 2000, Windows XP, Windows NT 4.0, Windows Server 2003, and Windows Vista. TCP/IP is used as the network protocol. Operations on this machine Set the IP address for this machine. For the setting procedure, refer to "Setting the IP address for this machine" on page 3-3. Printer driver settings For Windows 2000/XP/Server 2003/Vista 1 For Windows 2000, click the [Start] button, point to "Settings", and then click "Printers". For Windows XP/Server 2003, click the [Start] button, and then click "Printers and Faxes". For Windows Vista, click the [Start] button, and then click "Control panel", "Hardware and Sound", and "Printers". - If "Printers and Faxes" does not appear in the Start menu in Windows XP/Server 2003, open the Control Panel from the Start menu, select "Printers and Other Hardware", and then select "Printers and Faxes". - For Windows Vista, if the control panel is in the classic view, double-click "Printers". 2 Right-click the icon of the installed printer, and then click "Properties". 3 On the Ports tab, click the [Add Port] button. 4 In the "Available Printer Ports" list, select "Standard TCP/IP Port", and then click the [New Port] button. 5 When the Add Standard TCP/IP Printer Port Wizard starts up, click the [Next] button. 6 In the "Name of printer or IP address" box, enter the IP address for this machine, and then click the [Next] button. 7 Select "Custom", and then click the [Settings] button. 8 Select "LPR", enter "Print" in the "Queue Name" box, and then click the [OK] button. The uppercase letters and lowercase letters must be entered correctly. 9 Click the [Next] button, and then click the [Finish] button to apply the setting. For Windows NT 4.0 1 Click the [Start] button, point to "Settings", and then click "Printers". 2 Right-click the icon of the installed printer, and then click "Properties". 3 On the Ports tab, click the [Add Port] button. 4 In the "Available Printer Ports" list, select "LPR Port", and then click the [New Port] button. - If "LPR Port" is not in the list, click the [Start] button, point to "Control Panel", and then click "Network". Then, on the Service tab, click the [Add] button and install the Microsoft TCP/IP Printing Services. 5 In the "Name or address of server providing lpd" box on the Add LPR Compatible Printer dialog box, enter the IP address for this machine. 6 In the "Name of printer or print queue on that server" box, enter "Print". The uppercase letters and lowercase letters must be entered correctly. 7 Click the [OK] button to apply the setting. C650 3-8
-
 1
1 -
2
-
3
-
4
-
5
-
6
-
7
-
8
-
9
-
10
-
11
-
12
-
13
-
14
-
15
-
16
-
17
-
18
-
19
-
20
-
21
-
22
-
23
-
24
-
25
-
26
-
27
-
28
-
29
-
30
-
31
-
32
-
33
-
34
-
35
-
36
-
37
-
38
-
39
-
40
-
41
-
42
-
43
-
44
-
45
-
46
-
47
-
48
-
49
-
 50
50 -
 51
51 -
 52
52 -
 53
53 -
 54
54 -
 55
55 -
 56
56 -
 57
57 -
 58
58 -
 59
59 -
 60
60 -
61
-
62
-
63
-
64
-
65
-
66
-
67
-
68
-
69
-
70
-
71
-
72
-
73
-
74
-
75
-
76
-
77
-
78
-
79
-
80
-
81
-
82
-
83
-
84
-
85
-
86
-
87
-
88
-
89
-
90
-
91
-
92
-
93
-
94
-
95
-
96
-
97
-
98
-
99
-
100
-
101
-
102
-
103
-
104
-
105
-
106
-
107
-
108
-
109
-
110
-
111
-
112
-
113
-
114
-
115
-
116
-
117
-
118
-
119
-
120
-
121
-
122
-
123
-
124
-
125
-
126
-
127
-
128
-
129
-
130
-
131
-
132
-
133
-
134
-
135
-
136
-
137
-
138
-
139
-
140
-
141
-
142
-
143
-
144
-
145
-
146
-
147
-
148
-
149
-
150
-
151
-
152
-
153
-
154
-
155
-
156
-
157
-
158
-
159
-
160
-
161
-
162
-
163
-
164
-
165
-
166
-
167
-
168
-
169
-
170
-
171
-
172
-
173
-
174
-
175
-
176
-
177
-
178
-
179
-
180
-
181
-
182
-
183
-
184
-
185
-
186
-
187
-
188
-
189
-
190
-
191
-
192
-
193
-
194
-
195
-
196
-
197
-
198
-
199
-
200
-
201
-
202
-
203
-
204
-
205
-
206
-
207
-
208
-
209
-
210
-
211
-
212
-
213
-
214
-
215
-
216
-
217
-
218
-
219
-
220
-
221
-
222
-
223
-
224
-
225
-
226
-
227
-
228
-
229
-
230
-
231
-
232
-
233
-
234
-
235
-
236
-
237
-
238
-
239
-
240
-
241
-
242
-
243
-
244
-
245
-
246
-
247
-
248
-
249
-
250
-
251
-
252
-
253
-
254
-
255
-
256
-
257
-
258
-
259
-
260
-
261
-
262
-
263
-
264
-
265
-
266
-
267
-
268
-
269
-
270
-
271
-
272
-
273
-
274
-
275
-
276
-
277
-
278
-
279
-
280
-
281
-
282
-
283
-
284
-
285
-
286
-
287
-
288
-
289
-
290
-
291
-
292
-
293
-
294
-
295
-
296
-
297
-
298
-
299
-
300
-
301
-
302
-
303
 |
 |