Konica Minolta bizhub C650 bizhub C650 Print Operations User Guide - Page 75
Specifying client (Windows) settings when using the NetWare server
 |
View all Konica Minolta bizhub C650 manuals
Add to My Manuals
Save this manual to your list of manuals |
Page 75 highlights
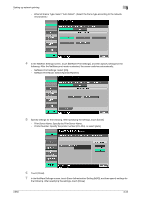
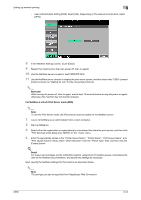
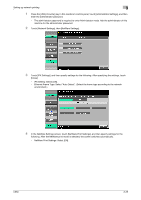
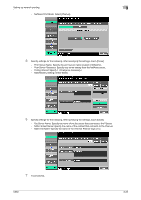
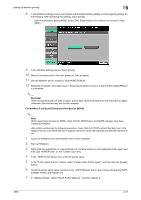
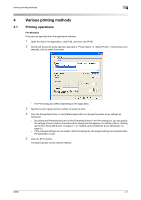
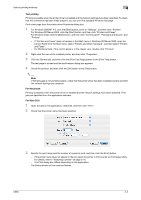
Setting up network printing 3 8 In the Configure Novell PDS for Printer Agent window, select "(None)" for the printer type and "Novell Port Handler" for the port handler type, and then register the settings. 9 In "Connection type", select "Remote (LPR on IP)", and then register it. 10 Enter the IP address set for this machine as the host address, enter "Print" as the printer name, and then click the [Finish] button to register the settings. 11 The printer driver registration screen appears. Select "None" for each operating system to complete the registration. ! Detail For printer user rights, printer notification options, and assignment of queues, refer to the NetWare documentation, and specify the settings as necessary. Specifying client (Windows) settings when using the NetWare server 1 For Windows 2000/NT 4.0, click the [Start] button, point to "Settings", and then click "Printers". For Windows XP/Server 2003, click the [Start] button, and then click "Printers and Faxes". For Windows Vista, click the [Start] button, and then click "Control panel", "Hardware and Sound", and "Printers". - If "Printers and Faxes" does not appear in the Start menu in Windows XP/Server 2003, open the Control Panel from the Start menu, select "Printers and Other Hardware", and then select "Printers and Faxes". - For Windows Vista, if the control panel is in the classic view, double-click "Printers". 2 For Windows 2000/NT 4.0/Server 2003, double-click the "Add Printer" icon. For Windows XP, click "Add a printer" on the "Printer Tasks" menu. For Windows Vista, click "Add a printer" on the toolbar. The Add Printer Wizard starts up. 3 In the port settings, browse the network, and specify the name of the created queue (or NDPS printer name). 4 From the printer model list, specify the desired folder on the CD-ROM that contains the printer driver. - Select the specified folder according to the printer driver to be used, the operating system, and the language. - Printer drivers that can be selected: Windows 2000/XP/Server 2003/Vista: PCL driver, PS driver Windows NT 4.0: PCL driver 5 Follow the on-screen instructions to complete the installation. C650 3-28
-
 1
1 -
2
-
3
-
4
-
5
-
6
-
7
-
8
-
9
-
10
-
11
-
12
-
13
-
14
-
15
-
16
-
17
-
18
-
19
-
20
-
21
-
22
-
23
-
24
-
25
-
26
-
27
-
28
-
29
-
30
-
31
-
32
-
33
-
34
-
35
-
36
-
37
-
38
-
39
-
40
-
41
-
42
-
43
-
44
-
45
-
46
-
47
-
48
-
49
-
50
-
51
-
52
-
53
-
54
-
55
-
56
-
57
-
58
-
59
-
60
-
61
-
62
-
63
-
64
-
65
-
66
-
67
-
68
-
69
-
 70
70 -
 71
71 -
 72
72 -
 73
73 -
 74
74 -
 75
75 -
 76
76 -
 77
77 -
 78
78 -
 79
79 -
 80
80 -
81
-
82
-
83
-
84
-
85
-
86
-
87
-
88
-
89
-
90
-
91
-
92
-
93
-
94
-
95
-
96
-
97
-
98
-
99
-
100
-
101
-
102
-
103
-
104
-
105
-
106
-
107
-
108
-
109
-
110
-
111
-
112
-
113
-
114
-
115
-
116
-
117
-
118
-
119
-
120
-
121
-
122
-
123
-
124
-
125
-
126
-
127
-
128
-
129
-
130
-
131
-
132
-
133
-
134
-
135
-
136
-
137
-
138
-
139
-
140
-
141
-
142
-
143
-
144
-
145
-
146
-
147
-
148
-
149
-
150
-
151
-
152
-
153
-
154
-
155
-
156
-
157
-
158
-
159
-
160
-
161
-
162
-
163
-
164
-
165
-
166
-
167
-
168
-
169
-
170
-
171
-
172
-
173
-
174
-
175
-
176
-
177
-
178
-
179
-
180
-
181
-
182
-
183
-
184
-
185
-
186
-
187
-
188
-
189
-
190
-
191
-
192
-
193
-
194
-
195
-
196
-
197
-
198
-
199
-
200
-
201
-
202
-
203
-
204
-
205
-
206
-
207
-
208
-
209
-
210
-
211
-
212
-
213
-
214
-
215
-
216
-
217
-
218
-
219
-
220
-
221
-
222
-
223
-
224
-
225
-
226
-
227
-
228
-
229
-
230
-
231
-
232
-
233
-
234
-
235
-
236
-
237
-
238
-
239
-
240
-
241
-
242
-
243
-
244
-
245
-
246
-
247
-
248
-
249
-
250
-
251
-
252
-
253
-
254
-
255
-
256
-
257
-
258
-
259
-
260
-
261
-
262
-
263
-
264
-
265
-
266
-
267
-
268
-
269
-
270
-
271
-
272
-
273
-
274
-
275
-
276
-
277
-
278
-
279
-
280
-
281
-
282
-
283
-
284
-
285
-
286
-
287
-
288
-
289
-
290
-
291
-
292
-
293
-
294
-
295
-
296
-
297
-
298
-
299
-
300
-
301
-
302
-
303
 |
 |