Konica Minolta bizhub C650 bizhub C650 Print Operations User Guide - Page 80
Test printing, For Macintosh, For Mac OS X, If the test is not printed properly
 |
View all Konica Minolta bizhub C650 manuals
Add to My Manuals
Save this manual to your list of manuals |
Page 80 highlights
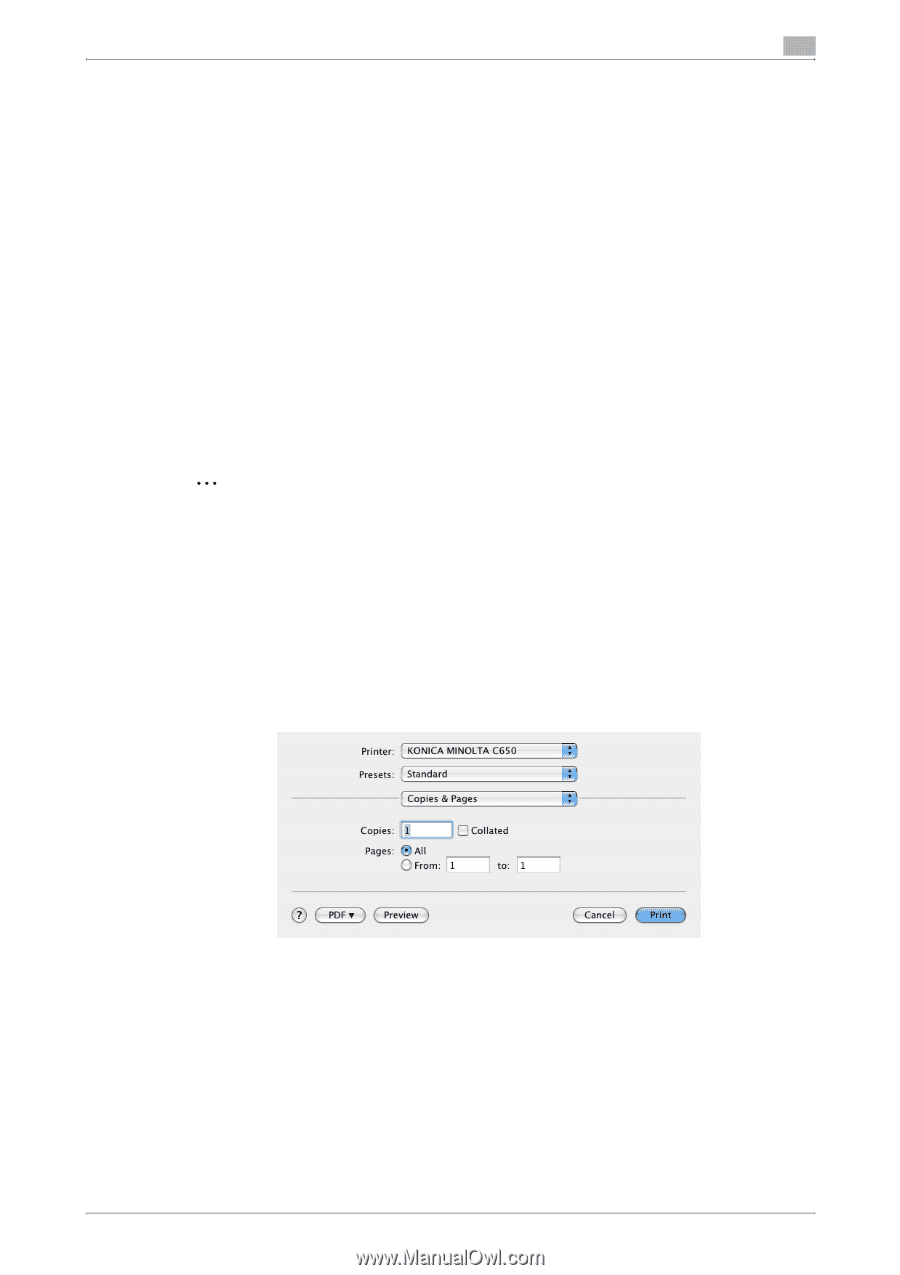
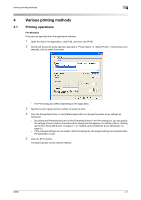
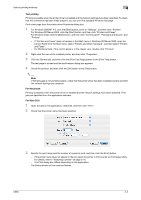
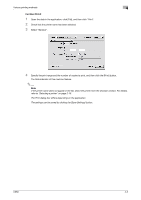
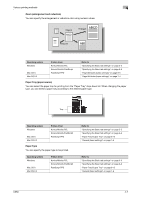
Various printing methods 4 Test printing Printing is possible when the printer driver is installed and the network settings have been specified. To check that the connection has been made properly, you can print the standard Windows test page. Print a test page from the printer driver Properties dialog box. 1 For Windows 2000/NT 4.0, click the [Start] button, point to "Settings", and then click "Printers". For Windows XP/Server 2003, click the [Start] button, and then click "Printers and Faxes". For Windows Vista, click the [Start] button, and then click "Control panel", "Hardware and Sound", and "Printers". - If "Printers and Faxes" does not appear in the Start menu in Windows XP/Server 2003, open the Control Panel from the Start menu, select "Printers and Other Hardware", and then select "Printers and Faxes". - For Windows Vista, if the control panel is in the classic view, double-click "Printers". 2 Right-click the icon of the installed printer, and then click "Properties". 3 Click the General tab, and then click the [Print Test Page] button or the [Print Test] button. The test page is printed and the confirmation dialog box appears. 4 Check the printout, and then click the [OK] button or the [Yes] button. 2 Note If the test page is not printed properly, check that the printer driver has been installed properly and that the network settings are complete. For Macintosh Printing is possible when the printer driver is installed and the network settings have been specified. Print jobs are specified from the application software. For Mac OS X 1 Open the data in the application, click [File], and then click "Print". 2 Check that the printer name has been selected. 3 Specify the print range and the number of copies to print, and then click the [Print] button. - If the printer name does not appear in the list, select the printer in Print Center or Print Setup Utility. For details, refer to "Selecting a printer" on page 2-16. - The Print dialog box differs depending on the application. The Data indicator of this machine flashes. C650 4-2
-
 1
1 -
2
-
3
-
4
-
5
-
6
-
7
-
8
-
9
-
10
-
11
-
12
-
13
-
14
-
15
-
16
-
17
-
18
-
19
-
20
-
21
-
22
-
23
-
24
-
25
-
26
-
27
-
28
-
29
-
30
-
31
-
32
-
33
-
34
-
35
-
36
-
37
-
38
-
39
-
40
-
41
-
42
-
43
-
44
-
45
-
46
-
47
-
48
-
49
-
50
-
51
-
52
-
53
-
54
-
55
-
56
-
57
-
58
-
59
-
60
-
61
-
62
-
63
-
64
-
65
-
66
-
67
-
68
-
69
-
70
-
71
-
72
-
73
-
74
-
 75
75 -
 76
76 -
 77
77 -
 78
78 -
 79
79 -
 80
80 -
 81
81 -
 82
82 -
 83
83 -
 84
84 -
 85
85 -
86
-
87
-
88
-
89
-
90
-
91
-
92
-
93
-
94
-
95
-
96
-
97
-
98
-
99
-
100
-
101
-
102
-
103
-
104
-
105
-
106
-
107
-
108
-
109
-
110
-
111
-
112
-
113
-
114
-
115
-
116
-
117
-
118
-
119
-
120
-
121
-
122
-
123
-
124
-
125
-
126
-
127
-
128
-
129
-
130
-
131
-
132
-
133
-
134
-
135
-
136
-
137
-
138
-
139
-
140
-
141
-
142
-
143
-
144
-
145
-
146
-
147
-
148
-
149
-
150
-
151
-
152
-
153
-
154
-
155
-
156
-
157
-
158
-
159
-
160
-
161
-
162
-
163
-
164
-
165
-
166
-
167
-
168
-
169
-
170
-
171
-
172
-
173
-
174
-
175
-
176
-
177
-
178
-
179
-
180
-
181
-
182
-
183
-
184
-
185
-
186
-
187
-
188
-
189
-
190
-
191
-
192
-
193
-
194
-
195
-
196
-
197
-
198
-
199
-
200
-
201
-
202
-
203
-
204
-
205
-
206
-
207
-
208
-
209
-
210
-
211
-
212
-
213
-
214
-
215
-
216
-
217
-
218
-
219
-
220
-
221
-
222
-
223
-
224
-
225
-
226
-
227
-
228
-
229
-
230
-
231
-
232
-
233
-
234
-
235
-
236
-
237
-
238
-
239
-
240
-
241
-
242
-
243
-
244
-
245
-
246
-
247
-
248
-
249
-
250
-
251
-
252
-
253
-
254
-
255
-
256
-
257
-
258
-
259
-
260
-
261
-
262
-
263
-
264
-
265
-
266
-
267
-
268
-
269
-
270
-
271
-
272
-
273
-
274
-
275
-
276
-
277
-
278
-
279
-
280
-
281
-
282
-
283
-
284
-
285
-
286
-
287
-
288
-
289
-
290
-
291
-
292
-
293
-
294
-
295
-
296
-
297
-
298
-
299
-
300
-
301
-
302
-
303
 |
 |