Konica Minolta bizhub C652 bizhub C452/C552/C552DS/C652/C652DS Enlarge Display - Page 49
Fax Number - service manual
 |
View all Konica Minolta bizhub C652 manuals
Add to My Manuals
Save this manual to your list of manuals |
Page 49 highlights
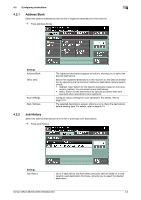
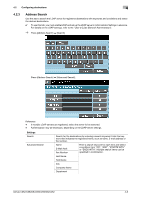
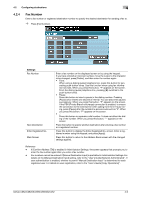
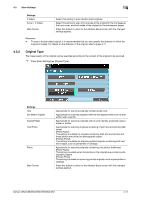
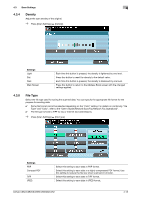
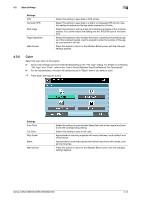
4.2 Configuring destinations 4 4.2.4 Fax Number Enter a fax number or registered destination number to specify the desired destination for sending a fax to. % Press [Fax Number]. Settings Fax Number Next Destination Enter Registered No. Main Screen Enter a fax number on the displayed screen or by using the keypad. If you have entered an incorrect number, move the cursor to the character to be changed, press [Delete], and then enter the number again. • Tone: When using a dialing (pulse) telephone line, press this button for generating push-button tones. Use this function when using fax information services. When you press this button, "T" appears on the screen. From the dialing (pulse) telephone line, pressing [1] switches to the push-button tones. • Pause: Press this button to insert a pause in the dialing number. Pressing [Pause] once inserts one second of interval. You can also enter pauses successively. When you press this button, "P" appears on the screen. If the PBX (Private Branch eXchange) connection is enabled, to ensure the connection to the external line when calling from the in-house wiring, press [Pause] after the outside line access code such as "0". When you press this button, "P" appears on the screen. • -: Press this button to separate a dial number. It does not affect the dialing of the number. When you press this button, "-" appears on the screen. Press this button to specify another destination after entering a fax number or a registered number. Press this button to display the Enter Registered No. screen. Enter a registered number using the keypad, and press [Apply]. Press this button to return to the Address Book screen with the changed settings applied. Reference - If [Confirm Address (TX)] is enabled in Administrator Settings, the screen appears that prompts you to enter the fax number again after you enter a fax number. - Fax numbers cannot be entered if [Manual Destination Input] is prohibited in Administrator Settings. For details on the [Manual Destination Input] setting, refer to the "User's Guide [Network Administrator]". If user authentication is enabled, whether to permit "Manual Destination Input" is determined for each registered user. For details on user registration, refer to the "User's Guide [Copy Operations]". bizhub C652/C652DS/C552/C552DS/C452 4-9
-
 1
1 -
2
-
3
-
4
-
5
-
6
-
7
-
8
-
9
-
10
-
11
-
12
-
13
-
14
-
15
-
16
-
17
-
18
-
19
-
20
-
21
-
22
-
23
-
24
-
25
-
26
-
27
-
28
-
29
-
30
-
31
-
32
-
33
-
34
-
35
-
36
-
37
-
38
-
39
-
40
-
41
-
42
-
43
-
 44
44 -
 45
45 -
 46
46 -
 47
47 -
 48
48 -
 49
49 -
 50
50 -
 51
51 -
 52
52 -
 53
53 -
 54
54 -
55
-
56
-
57
-
58
-
59
-
60
-
61
-
62
-
63
-
64
 |
 |
