Kyocera ECOSYS FS-4100DN PRESCRIBE Commands Technical Reference Manual - Rev. - Page 34
Defining Fill Patterns, Dot Pattern and a Filled Block
 |
View all Kyocera ECOSYS FS-4100DN manuals
Add to My Manuals
Save this manual to your list of manuals |
Page 34 highlights
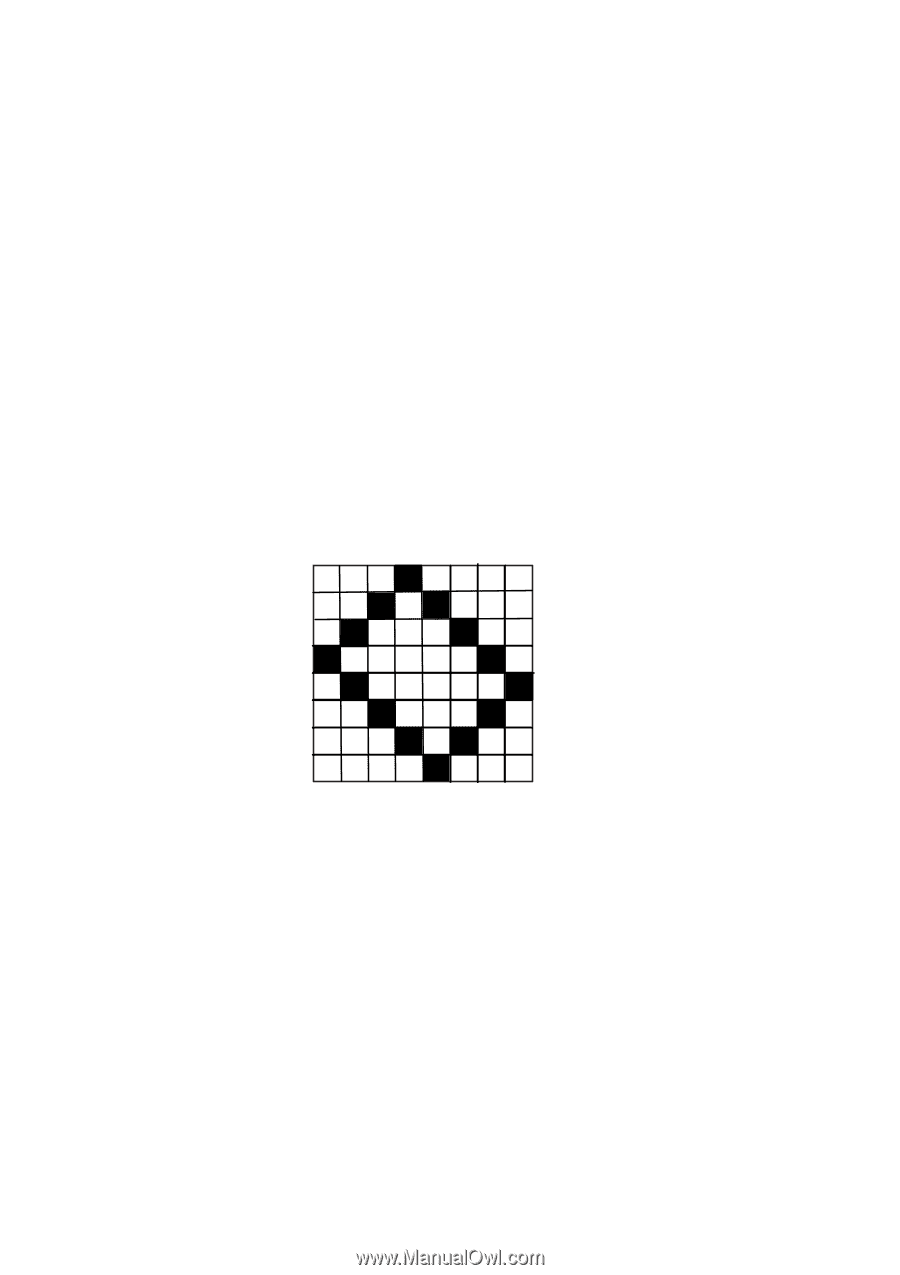
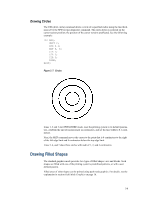
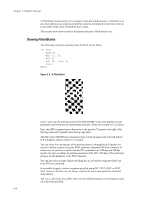
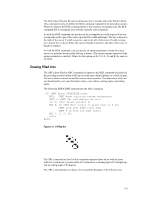
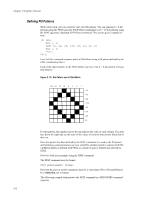
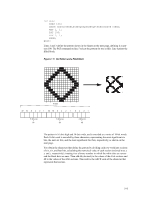
Chapter 2 Graphics Tutorial Defining Fill Patterns With a little work, you can construct your own fill patterns. You can generate 8 × 8 dot patterns using the FPAT (generate Fill PATtern) command, or 16 × 16 dot patterns using the XPAT (generate eXpanded fill PATtern) command. This section gives examples of both. !R! RES; MZP 1, 1; FPAT 16, 40, 68, 130, 65, 34, 20, 8; BLK 1, 1; PAGE; EXIT; Line 4 of this command sequence prints a filled block using a fill pattern defined by the FPAT command on line 3. Each of the eight numbers in the FPAT defines one row of an 8 × 8 dot pattern. The pat- tern follows: Figure 2. 10. Dot Pattern and a Filled Block 128 64 32 16 8 42 1 = 16 = 40 = 68 = 130 = 65 = 34 = 20 =8 For this pattern, the numbers across the top indicate the value of each column. The numbers down the right side are the sums of the values of columns that contain black dots in that row. Once this pattern has been defined by the FPAT command, it is used as the fill pattern until printing system parameters are reset with RES, another pattern is selected with PAT, a different pattern is defined with FPAT, or a shade of gray is defined and selected by GPAT. Now let's look at an example using the XPAT command. The XPAT command uses the format XPAT pattern-number; bit map; Note that the pattern-number parameter must be a value from 100 to 105 and followed by a semicolon, not a comma. The following example demonstrates the XPAT command in a PRESCRIBE command sequence. 2-12
-
 1
1 -
2
-
3
-
4
-
5
-
6
-
7
-
8
-
9
-
10
-
11
-
12
-
13
-
14
-
15
-
16
-
17
-
18
-
19
-
20
-
21
-
22
-
23
-
24
-
25
-
26
-
27
-
28
-
 29
29 -
 30
30 -
 31
31 -
 32
32 -
 33
33 -
 34
34 -
 35
35 -
 36
36 -
 37
37 -
 38
38 -
 39
39 -
40
-
41
-
42
-
43
-
44
-
45
-
46
-
47
-
48
-
49
-
50
-
51
-
52
-
53
-
54
-
55
-
56
-
57
-
58
-
59
-
60
-
61
-
62
-
63
-
64
-
65
-
66
-
67
-
68
-
69
-
70
-
71
-
72
-
73
-
74
-
75
-
76
-
77
-
78
-
79
-
80
-
81
-
82
-
83
-
84
-
85
-
86
-
87
-
88
-
89
-
90
-
91
-
92
-
93
-
94
-
95
-
96
-
97
-
98
-
99
-
100
-
101
-
102
-
103
-
104
-
105
-
106
-
107
-
108
-
109
-
110
-
111
-
112
-
113
-
114
-
115
-
116
-
117
-
118
-
119
-
120
-
121
-
122
-
123
-
124
-
125
-
126
-
127
-
128
-
129
-
130
-
131
-
132
-
133
-
134
-
135
-
136
-
137
-
138
-
139
-
140
-
141
-
142
-
143
-
144
-
145
-
146
-
147
-
148
-
149
-
150
-
151
-
152
-
153
-
154
-
155
-
156
-
157
-
158
-
159
-
160
-
161
-
162
-
163
-
164
-
165
-
166
-
167
-
168
-
169
-
170
-
171
-
172
-
173
-
174
-
175
-
176
-
177
-
178
-
179
-
180
-
181
-
182
-
183
-
184
-
185
-
186
-
187
-
188
-
189
-
190
-
191
-
192
-
193
-
194
-
195
-
196
-
197
-
198
-
199
-
200
-
201
-
202
-
203
-
204
-
205
-
206
-
207
-
208
-
209
-
210
-
211
-
212
-
213
-
214
-
215
-
216
-
217
-
218
-
219
-
220
-
221
-
222
-
223
-
224
-
225
-
226
-
227
-
228
-
229
-
230
-
231
-
232
-
233
-
234
-
235
-
236
-
237
-
238
-
239
-
240
-
241
-
242
-
243
-
244
-
245
-
246
-
247
-
248
-
249
-
250
-
251
-
252
-
253
-
254
-
255
-
256
-
257
-
258
-
259
-
260
 |
 |