Kyocera FS-1135MFP KM-NET ADMIN Operation Guide for Ver 2.0 - Page 60
Diagram View, Subscription View, Manage Views, Managing the List View
 |
View all Kyocera FS-1135MFP manuals
Add to My Manuals
Save this manual to your list of manuals |
Page 60 highlights
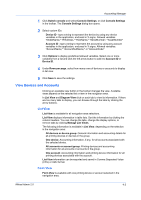
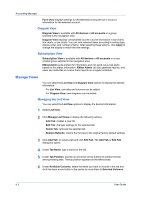
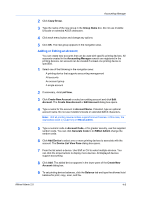
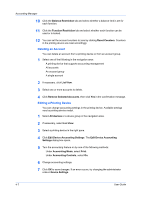
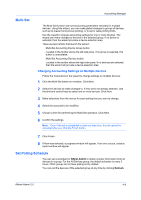
Accounting Manager Form View displays settings for the selected printing device or account information for the selected account. Diagram View Diagram View is available with All devices or All accounts or a group selected in the navigation area. Diagram View displays consolidated counter volume information in bar charts, line charts, or pie charts. You can rank selected items according to sorting type, display order, and number of items. After selecting these options, click Apply to change the display to match the new settings. Subscription View Subscription View is available with All devices or All accounts or a user created group selected in the navigation area. KMnet Admin polls printers for information and can send out e-mail alerts based on this status information. KMnet Admin can also generate reports, and users can subscribe to receive these reports on a regular schedule. Manage Views You can select the List View and Diagram View options to display the desired information. For List View, new tabs and columns can be added. For Diagram View, new diagrams can be added. Managing the List View You can select the List View options to display the desired information. 1 Select List View. 2 Click Manage List Views to display the following options: Add Tab: creates a new tab Edit Tab: changes settings for the selected tab Delete Tab: removes the selected tab Restore Defaults: restore the list view to the original factory default settings 3 Click Add Tab, or select a tab and click Edit Tab. The Add Tab or Edit Tab dialog box opens. 4 Under Tab Name, type a name for the tab. 5 Under Tab Position, use the up and down arrow buttons to position the tab among existing tabs. The top position appears as the leftmost tab. 6 Under Available Columns, select the items you want to include in the tab and click the down arrow button in the center to move them to Selected Columns. 4-3 User Guide
-
 1
1 -
2
-
3
-
4
-
5
-
6
-
7
-
8
-
9
-
10
-
11
-
12
-
13
-
14
-
15
-
16
-
17
-
18
-
19
-
20
-
21
-
22
-
23
-
24
-
25
-
26
-
27
-
28
-
29
-
30
-
31
-
32
-
33
-
34
-
35
-
36
-
37
-
38
-
39
-
40
-
41
-
42
-
43
-
44
-
45
-
46
-
47
-
48
-
49
-
50
-
51
-
52
-
53
-
54
-
 55
55 -
 56
56 -
 57
57 -
 58
58 -
 59
59 -
 60
60 -
 61
61 -
 62
62 -
 63
63 -
 64
64 -
 65
65 -
66
-
67
-
68
-
69
-
70
-
71
-
72
-
73
-
74
-
75
-
76
-
77
-
78
-
79
-
80
-
81
-
82
-
83
-
84
-
85
-
86
-
87
-
88
-
89
-
90
-
91
-
92
-
93
-
94
-
95
-
96
-
97
-
98
-
99
-
100
-
101
-
102
-
103
-
104
-
105
-
106
-
107
 |
 |