Kyocera FS-1135MFP KM-NET ADMIN Operation Guide for Ver 2.0 - Page 80
Creating a Report, Report Layout, Total s with Monochrome & Color
 |
View all Kyocera FS-1135MFP manuals
Add to My Manuals
Save this manual to your list of manuals |
Page 80 highlights
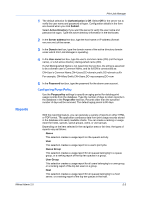
Print Job Manager All Queues This selection provides a usage report of all queues, or a ranking report of the top ten queues. All Users This selection provides a usage report for all users, or a ranking report of the top ten users. All Queue Groups This selection provides a ranking report of the top ten queue groups. All User Groups This selection provides a ranking report of the top ten user groups. All Hosts This selection provides a ranking report of the top ten hosts. Creating a Report Reports can, in different ways, present data about the counters in Print Job Manager. A ranking report is presented as a bar chart. Usage reports can be presented as either a bar chart, or a line chart, according to the reporting period (date, week, month). 1 Click to select an item in the navigation area or list view, and then click Report in the navigation or list view toolbar. Alternatively, you can right-click the item to open the shortcut menu, and then click Report. The Print Job Manager Reports dialog box opens. 2 In the Report type list, select either Ranking or Usage. The default type is Ranking. Reports are available according to the item selected in the navigation area or list view: All Queue Groups, All Queues, User-defined Queue groups, All User Groups, All Users, User-defined User Groups, All Hosts, Print Servers. 3 In the Counter type list, select the type of output for which reporting will keep a tally. The default type is Total Pages with Monochrome & Color. Options for Counter Type are Total Pages with Monochrome and Color, Monochrome Pages, Color Pages, Total Pages, Job Counts, and Print Data Size (KB). 4 For Report Period, type or select a time period that the system will use to select print usage records from the database. The default period is today's date. Options for Report Period are: Date, Week of, and Month. Format Date and Week of as (mm/dd/yyyy). 5 In the Format list, select either HTML or PDF. The default format is HTML. An HTML report is a view-only report that opens in a new window. A PDF report opens in Adobe Acrobat Reader, which lets you view, print, or save the PDF file. 6 To create the report, click Generate Now. A separate window opens with the report in either HTML or PDF format, as you selected in the Print Job Manager Reports dialog. If you do not want to create the report, click Close instead. Report Layout The report layout depends on your selections submitted through the Print Job Manager Reports dialog. The chart type of the report layout varies according to the Report Type and Report Period. 5-6 User Guide
-
 1
1 -
2
-
3
-
4
-
5
-
6
-
7
-
8
-
9
-
10
-
11
-
12
-
13
-
14
-
15
-
16
-
17
-
18
-
19
-
20
-
21
-
22
-
23
-
24
-
25
-
26
-
27
-
28
-
29
-
30
-
31
-
32
-
33
-
34
-
35
-
36
-
37
-
38
-
39
-
40
-
41
-
42
-
43
-
44
-
45
-
46
-
47
-
48
-
49
-
50
-
51
-
52
-
53
-
54
-
55
-
56
-
57
-
58
-
59
-
60
-
61
-
62
-
63
-
64
-
65
-
66
-
67
-
68
-
69
-
70
-
71
-
72
-
73
-
74
-
 75
75 -
 76
76 -
 77
77 -
 78
78 -
 79
79 -
 80
80 -
 81
81 -
 82
82 -
 83
83 -
 84
84 -
 85
85 -
86
-
87
-
88
-
89
-
90
-
91
-
92
-
93
-
94
-
95
-
96
-
97
-
98
-
99
-
100
-
101
-
102
-
103
-
104
-
105
-
106
-
107
 |
 |