Kyocera FS3820N FS-3820N/3830N Installation Guide Rev 1.1
Kyocera FS3820N - B/W Laser Printer Manual
 |
View all Kyocera FS3820N manuals
Add to My Manuals
Save this manual to your list of manuals |
Kyocera FS3820N manual content summary:
- Kyocera FS3820N | FS-3820N/3830N Installation Guide Rev 1.1 - Page 1
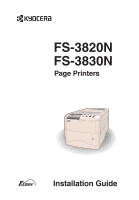
FS-3820N FS-3830N Page Printers Installation Guide - Kyocera FS3820N | FS-3820N/3830N Installation Guide Rev 1.1 - Page 2
Kyocera Mita Corporation is prohibited. Any copies made of all or part of this manual, any copyrightable subject must contain the same copyright notice as the material from which the copying is done. Table of Contents STEP 1 Unpacking 1 STEP 2 Positioning the Printer 2 STEP 3 Installing the Toner - Kyocera FS3820N | FS-3820N/3830N Installation Guide Rev 1.1 - Page 3
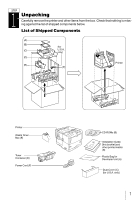
list of shipped components below. List of Shipped Components (A) (B) (for (C) U.S.A. only) (D) (E) (F) Printer Printer Waste Toner Box (E) Toner Container (D) Power Cord (F) CD-ROMs (B) Installation Guide [this booklet] and other printed matter (B) Plastic Bag for Developer Unit (A) Dust - Kyocera FS3820N | FS-3820N/3830N Installation Guide Rev 1.1 - Page 4
in fire. Environment Temperature Humidity 10 to 32.5 °C (50 to 90.5 °F), ideally about 23 °C (73.4 °F) 20 to 80 %, ideally 60 % Do not install the printer where temperature or humidity is outside the recommended range. Print quality may suffer and there will be an increased chance of paper jams - Kyocera FS3820N | FS-3820N/3830N Installation Guide Rev 1.1 - Page 5
and set up the interfacing with the computer. Top Cover 1 Open the printer top cover all the way. Toner Container 10 times or more 2 Take the toner container from the bag. 3 With the label side down, thoroughly shake the toner container (in the direction of the arrow) ten times or more to loosen - Kyocera FS3820N | FS-3820N/3830N Installation Guide Rev 1.1 - Page 6
6 Push firmly on the top of the toner con- tainer at the positions marked PUSH HERE. When the toner container fits into place, it will lock with a clicking sound. 7 Close the top cover. To remove the toner container Lock Lever Pull the lock lever (blue colored) to the right and gently lift the - Kyocera FS3820N | FS-3820N/3830N Installation Guide Rev 1.1 - Page 7
Installing the Waste Toner Box The waste toner box is supplied with the printer. The waste toner box must be installed in the printer. 1 Open the cap of the waste toner box. Cap Waste Toner Box Left Cover 2 Open the left cover on the left side of the printer. 3 Insert the waste toner box as - Kyocera FS3820N | FS-3820N/3830N Installation Guide Rev 1.1 - Page 8
4 Ensuring that it is correctly inserted, close the left cover. To remove the Waste Toner Box While holding the waste toner box, press the lock lever and then gently remove the waste toner box. Lock Lever 6 - Kyocera FS3820N | FS-3820N/3830N Installation Guide Rev 1.1 - Page 9
a second network interface are optionally available as well. Printer Connections Option Serial Interface Board Kit (3.3 V DC) Serial Interface Connector for option sorter (See the option sorter's user's manual.) Parallel Interface Printer (Rear) Power Supply Network Option Network Interface Card - Kyocera FS3820N | FS-3820N/3830N Installation Guide Rev 1.1 - Page 10
not be longer than 3 meters (10 feet). 2 Close the clips on both sides to fix the connector in place. Plug the other end of the printer cable into the computer's parallel interface connector. USB (Universal Serial Bus) Interface Connection 1 Plug one end of the USB cable into the USB interface - Kyocera FS3820N | FS-3820N/3830N Installation Guide Rev 1.1 - Page 11
to 240V) ±2 % 8.0 A at 110/120 V, or 4.0 A at 220 to 240 V To Connect the Power Cord • Be sure the printer's power switch is turned off. • Only use the power cord supplied with the printer. Power Cord Connector Power Cord 1 Plug the power cord into the power cord connector on the rear of the - Kyocera FS3820N | FS-3820N/3830N Installation Guide Rev 1.1 - Page 12
can also be loaded into the cassette. When loading other sizes into the cassette, the size must be input into the printer on the operator panel (Refer to the Operation Guide [PDF file] provided on the CD-ROM). Standard size paper settings are indicated as fixed positions in the cassette. The - Kyocera FS3820N | FS-3820N/3830N Installation Guide Rev 1.1 - Page 13
1 Pull the paper cassette all the way out of the printer. Paper Cassette 2 Push the bottom plate down until it locks. Bottom Plate Standard paper sizes are attached to the inside of the paper cassette as - Kyocera FS3820N | FS-3820N/3830N Installation Guide Rev 1.1 - Page 14
printer on the operator panel. See the Operation Guide (PDF file) provided on the CD-ROM. Paper Size Window 4 Adjust the position of the paper guides When shipped from the factory, the paper cassette is set to A4 size. When using other size paper, move the paper guides and paper stopper all - Kyocera FS3820N | FS-3820N/3830N Installation Guide Rev 1.1 - Page 15
the paper into the paper cassette. Load Limit Load Limit • Do not load more paper than will fit under the load limits on the paper guides. • The paper cassette will hold approximately 500 sheets of paper with a 80 g/m² (21 lb.) basis weight, or with a thickness of 0.11 mm. 7 Set the stack - Kyocera FS3820N | FS-3820N/3830N Installation Guide Rev 1.1 - Page 16
8 Insert the paper cassette into the slot in the printer. Push it straight in as far as it will go. Paper Gauge can hold the Legal size paper, install the dust cover at the back of the printer. (The Legal size cassette and the dust cover are supplied for U.S.A. only.) Removing the Dust Cover 14 - Kyocera FS3820N | FS-3820N/3830N Installation Guide Rev 1.1 - Page 17
the MP tray. Standard paper sizes are attached to the MP tray. For standard paper sizes, slide the guides to the position marked correspondingly. Paper Guides Load Limit 4 Align the paper with the paper guides and insert as far as it will go. Do not load more paper than will fit under the - Kyocera FS3820N | FS-3820N/3830N Installation Guide Rev 1.1 - Page 18
To avoid trouble, we recommend that envelopes be delivered face-up using the option rear tray. Refer to next page. Some types of envelopes are not suitable for printing. For details on suitable types of envelopes, see the Operation Guide contained as a PDF file in the CDROM supplied with the printer - Kyocera FS3820N | FS-3820N/3830N Installation Guide Rev 1.1 - Page 19
Installing the Option Rear Tray Use the rear tray when you wish paper to be stacked with the printed side facing up (reverse order), or when you are printing on envelopes, postcards, transparencies, or thick paper. This rear tray is a separate option. Legal Size A4 Size Letter Size Paper Stopper - Kyocera FS3820N | FS-3820N/3830N Installation Guide Rev 1.1 - Page 20
printer gets ready to print as the developer unit needs to be filled with toner. During this period, the message display shows Please wait (Adding toner). dealer can download major languages other than English, French, German, Italian, Dutch, Spanish, and Portuguese to your printer. Please contact - Kyocera FS3820N | FS-3820N/3830N Installation Guide Rev 1.1 - Page 21
panel lights and the printer gets ready to print. 9STEP Printing a Status Page To test the printer, print a status page indicating factory settings. 1 Press status page prints correctly, printer setup is complete. For details on using the printer, refer to the Operation Guide contained as a PDF - Kyocera FS3820N | FS-3820N/3830N Installation Guide Rev 1.1 - Page 22
Correcting a Paper Jam If a paper jam occurs while you are printing, remove the jammed paper as described below. After you have removed the jammed paper, open and close the top cover or the paper transfer unit. When pulling the paper, pull it gently so as not to tear it. Torn pieces of paper are - Kyocera FS3820N | FS-3820N/3830N Installation Guide Rev 1.1 - Page 23
Jam Inside the Printer 1 While pulling the paper transfer unit release lever (green colored), pull out the paper transfer unit. 2 If paper is jammed before the registration roller, remove - Kyocera FS3820N | FS-3820N/3830N Installation Guide Rev 1.1 - Page 24
to Part 15 instructions Kyocera Mita as the manufacturer cannot guarantee compliance with FCC rules. To use equipment which does not comply with FCC rules is prohibited. The printer may be optionally installed with the following units: ■ Options Conforming to the Class B limits • DU-61 Duplexer - Kyocera FS3820N | FS-3820N/3830N Installation Guide Rev 1.1 - Page 25
to the printer. Label inside the printer (Laser radiation warning) (European/Pacific countries) (U.S.A/Canada) Label on the printer's rear panel the printer in a confined area where ventilation is blocked. IMPORTANT SAFEGUARDS 1. Read all of these instructions and save these instructions for - Kyocera FS3820N | FS-3820N/3830N Installation Guide Rev 1.1 - Page 26
336/EEC and 73/23/EEC Manufacturer's name: Kyocera Mita Corporation, Tamaki Plant Manufacturer's address: 704-19 Nojino, Tamaki-Cho, Watarai-Gun, Mie-Ken 519-0497, Japan declares that the product Product name: Page Printer Model number: FS-3820N/FS-3830N (as tested with the enhancement optional unit - Kyocera FS3820N | FS-3820N/3830N Installation Guide Rev 1.1 - Page 27
of Conformity (U.S.A.) Model Number: Trade Name: Responsible Party: Address: Telephone number: Fax number: Laser Printer FS-3820N/FS-3830N (as tested with enhancement optional units: PF-60, DU-61, SO-60.) Kyocera Kyocera Mita America Inc. 225 Sand Road PO Box 40008 Fairfield, New Jersey 07004-0008 - Kyocera FS3820N | FS-3820N/3830N Installation Guide Rev 1.1 - Page 28
and duplexer before moving the printer. If you need to move the printer to another location, remove the toner container, waste toner box, and developer unit. The procedure for removing these is as follows: 1 Remove the toner container and waste toner box from the printer. Put the toner container - Kyocera FS3820N | FS-3820N/3830N Installation Guide Rev 1.1 - Page 29
to the CD-ROM instruction manual provided with the printer. Initial settings of the sleep timer function and power saved using the sleep timer function: Model name Initial sleep mode setting Power consumption in sleep mode FS-3820N 15 minutes (30 minutes) 13 W (30 W) FS-3830N 15 minutes (60 - Kyocera FS3820N | FS-3820N/3830N Installation Guide Rev 1.1 - Page 30
card into the option interface slot at the rear of the printer. The printer can be used on network environments including Windows, Macintosh, UNIX, NetWare, etc. Serial lnterface Board Kit (IB-11) Connect to the computer's serial printer port with a serial cable. 4 Envelope Feeder (EF-60) Holds more - Kyocera FS3820N | FS-3820N/3830N Installation Guide Rev 1.1 - Page 31
Adobe Systems Incorporated. Adobe and Acrobat are trademarks of Adobe Systems Incorporated. ENERGY STAR is a U.S. registered mark. This Kyocera Mita page printer uses PeerlessPrintXL to provide the HP LaserJet compatible PCL 6 language emulation. PeerlessPrintXL is a trademark of The Peerless Group - Kyocera FS3820N | FS-3820N/3830N Installation Guide Rev 1.1 - Page 32
the protective cap supplied. Note: Use shielded interface cable. Safety Information ■ Laser Safety This printer is certified as a Class 1 laser product under the U.S. Department of Health and Human Services (DHHS) Radiation Performance Standard according to Radiation Control for Health and Safety - Kyocera FS3820N | FS-3820N/3830N Installation Guide Rev 1.1 - Page 33
This page intentionally left blank. - Kyocera FS3820N | FS-3820N/3830N Installation Guide Rev 1.1 - Page 34
This page intentionally left blank. - Kyocera FS3820N | FS-3820N/3830N Installation Guide Rev 1.1 - Page 35
- Kyocera FS3820N | FS-3820N/3830N Installation Guide Rev 1.1 - Page 36
Guide contained as a PDF file in the CD-ROM supplied with the printer printer needs maintenance attention or the printer is warming up (Please wait). Lit: Indicates when a problem or • Wakes from sleep mode. • Abandons a printing job, resets numeric values, or cancels a setting procedure. • Used to
-
 1
1 -
 2
2 -
 3
3 -
 4
4 -
 5
5 -
 6
6 -
 7
7 -
8
-
9
-
10
-
11
-
12
-
13
-
14
-
15
-
16
-
17
-
18
-
19
-
20
-
21
-
22
-
23
-
24
-
25
-
26
-
27
-
28
-
29
-
30
-
31
-
32
-
33
-
34
-
35
-
36
 |
 |

Installation Guide
FS-3820N
FS-3830N
Page Printers