Kyocera KM-1820 1820 Operation Guide (Advanced Edition) - Page 18
Print Override Mode, File Name Entry, Function, Enter, Select, Start - factory default
 |
View all Kyocera KM-1820 manuals
Add to My Manuals
Save this manual to your list of manuals |
Page 18 highlights
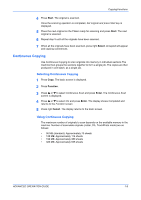
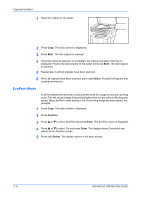
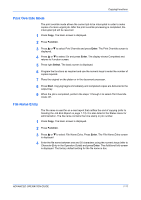
Copying Functions Print Override Mode The print override mode allows the current job to be interrupted in order to make copies of a more urgent job. After the print override processing is completed, the interrupted job will be resumed. 1 Press Copy. The basic screen is displayed. 2 Press Function. 3 Press S or T to select Print Override and press Enter. The Print Override screen is displayed. 4 Press S or T to select On and press Enter. The display shows Completed and returns to Function screen. 5 Press right Select. The basic screen is displayed. 6 Program the functions as required and use the numeric keys to enter the number of copies required. 7 Place the original on the platen or in the document processor. 8 Press Start. Copying begins immediately and completed copies are delivered to the output tray. 9 When the job is completed, perform the steps 1 through 4 to select Print Override mode Off. File Name Entry The file name is used for an e-mail report that notifies the end of copying (refer to Sending the Job End Report on page 1-13). It is also listed in the Status menu for administration. The file name contains the time stamp or job number. 1 Press Copy. The basic screen is displayed. 2 Press Function. 3 Press S or T to select File Name Entry. Press Enter. The File Name Entry screen is displayed. 4 Enter the file name between one and 30 characters using the numeric keys (refer to Character Entry in the Operation Guide) and press Enter. The Additional Info screen is displayed. The factory default setting for the file name is doc. ADVANCED OPERATION GUIDE 1-11
-
 1
1 -
2
-
3
-
4
-
5
-
6
-
7
-
8
-
9
-
10
-
11
-
12
-
 13
13 -
 14
14 -
 15
15 -
 16
16 -
 17
17 -
 18
18 -
 19
19 -
 20
20 -
 21
21 -
 22
22 -
 23
23 -
24
-
25
-
26
-
27
-
28
-
29
-
30
-
31
-
32
-
33
-
34
-
35
-
36
-
37
-
38
-
39
-
40
-
41
-
42
-
43
-
44
-
45
-
46
-
47
-
48
-
49
-
50
-
51
-
52
-
53
-
54
-
55
-
56
-
57
-
58
-
59
-
60
-
61
-
62
-
63
-
64
-
65
-
66
-
67
-
68
-
69
-
70
-
71
-
72
-
73
-
74
-
75
-
76
-
77
-
78
-
79
-
80
-
81
-
82
-
83
-
84
-
85
-
86
-
87
-
88
-
89
-
90
-
91
-
92
-
93
-
94
-
95
-
96
-
97
-
98
-
99
-
100
-
101
-
102
-
103
-
104
-
105
-
106
-
107
-
108
-
109
-
110
-
111
-
112
-
113
-
114
-
115
-
116
-
117
-
118
-
119
-
120
-
121
-
122
-
123
-
124
-
125
-
126
-
127
-
128
-
129
-
130
-
131
-
132
-
133
-
134
-
135
-
136
-
137
-
138
-
139
-
140
-
141
-
142
-
143
-
144
-
145
-
146
-
147
 |
 |