Kyocera KM-1820 1820 Operation Guide (Basic Edition) Rev-1.1 - Page 40
Network Settings, Registering the IP Address, Registering the Subnet Mask
 |
View all Kyocera KM-1820 manuals
Add to My Manuals
Save this manual to your list of manuals |
Page 40 highlights
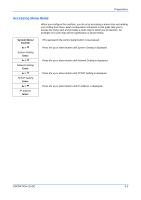
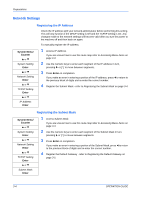
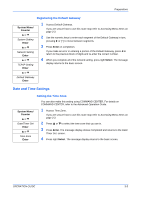
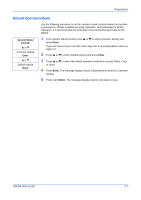
Preparations Network Settings Registering the IP Address Check the IP address with your network administrator before performing this setting. This will only function if the DHCP setting is Off and the TCP/IP setting is On. Any changes made to the network settings will become valid after you turn the power to the machine off and then back on again. To manually register the IP address. System Menu/ Counter S or T System Setting Enter S or T Network Setting Enter S or T TCP/IP Setting Enter S or T IP Address Enter 1 Access IP Address. If you are unsure how to use this route map refer to Accessing Menu Items on page 3-3. 2 Use the numeric keys to enter each segment of the IP address in turn, pressing X or [*.] to move between segments. 3 Press Enter on completion. If you make an error in entering a portion of the IP address, press W to return to the previous block of digits and re-enter the correct number. 4 Register the Subnet Mask - refer to Registering the Subnet Mask on page 3-4. Registering the Subnet Mask System Menu/ Counter S or T System Setting Enter S or T Network Setting Enter S or T TCP/IP Setting Enter S or T Subnet Mask Enter 1 Access Subnet Mask. If you are unsure how to use this route map refer to Accessing Menu Items on page 3-3. 2 Use the numeric keys to enter each segment of the Subnet Mask in turn, pressing X or [*.] to move between segments. 3 Press Enter on completion. If you make an error in entering a portion of the Subnet Mask, press W to return to the previous block of digits and re-enter the correct number. 4 Register the Default Gateway - refer to Registering the Default Gateway on page 3-5. 3-4 OPERATION GUIDE
-
 1
1 -
2
-
3
-
4
-
5
-
6
-
7
-
8
-
9
-
10
-
11
-
12
-
13
-
14
-
15
-
16
-
17
-
18
-
19
-
20
-
21
-
22
-
23
-
24
-
25
-
26
-
27
-
28
-
29
-
30
-
31
-
32
-
33
-
34
-
 35
35 -
 36
36 -
 37
37 -
 38
38 -
 39
39 -
 40
40 -
 41
41 -
 42
42 -
 43
43 -
 44
44 -
 45
45 -
46
-
47
-
48
-
49
-
50
-
51
-
52
-
53
-
54
-
55
-
56
-
57
-
58
-
59
-
60
-
61
-
62
-
63
-
64
-
65
-
66
-
67
-
68
-
69
-
70
-
71
-
72
-
73
-
74
-
75
-
76
-
77
-
78
-
79
-
80
-
81
-
82
-
83
-
84
-
85
-
86
-
87
-
88
-
89
-
90
 |
 |