Kyocera KM-1820 1820 Operation Guide (Basic Edition) Rev-1.1 - Page 44
Character Entry, Keys Used for Entering Characters
 |
View all Kyocera KM-1820 manuals
Add to My Manuals
Save this manual to your list of manuals |
Page 44 highlights
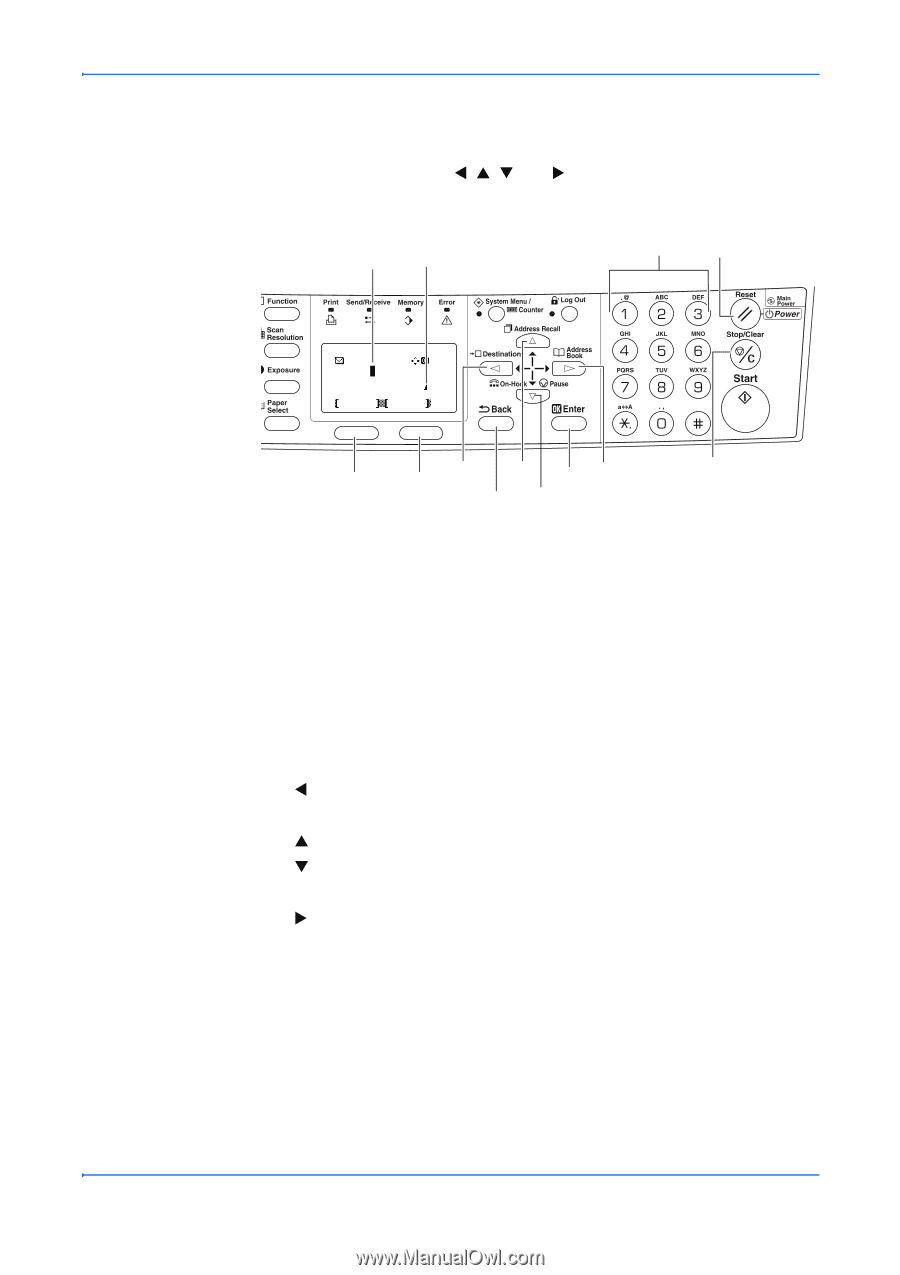
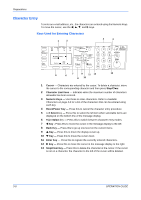
Preparations Character Entry To enter an e-mail address, etc., the characters are entered using the Numeric Keys. To move the cursor, use the W, S, T, and X keys. Keys Used for Entering Characters 1 2 3 4 Address Entry: h_pttr@ ABC Cancel Text 5 7 6 9 11 12 13 8 10 1 Cursor - Characters are entered by the cursor. To delete a character, move the cursor to the corresponding character and then press Stop/Clear. 2 Character Limit Icon - Indicates when the maximum number of characters allowable has been entered. 3 Numeric Keys - Use these to enter characters. Refer to Available Characters on page 3-9 for a list of the characters that can be entered using each key. 4 Reset/Power Key - Press this to cancel the character entry procedure. 5 Left Select key - Press this to select the left item when selectable items are displayed on the bottom line of the message display. 6 Right Select key - Press this to switch between character entry modes. 7 W Key - Press this to move the cursor in the message display to the left. 8 Back Key - Press this to go up one level on the current menu. 9 S Key - Press this to move the display cursor up. 10 T Key - Press this to move the cursor down. 11 Enter Key - Press this to register the currently entered characters. 12 X Key - Press this to move the cursor in the message display to the right. 13 Stop/Clear Key - Press this to delete the character at the cursor. If the cursor is not on a character, the character to the left of the cursor will be deleted. 3-8 OPERATION GUIDE
-
 1
1 -
2
-
3
-
4
-
5
-
6
-
7
-
8
-
9
-
10
-
11
-
12
-
13
-
14
-
15
-
16
-
17
-
18
-
19
-
20
-
21
-
22
-
23
-
24
-
25
-
26
-
27
-
28
-
29
-
30
-
31
-
32
-
33
-
34
-
35
-
36
-
37
-
38
-
 39
39 -
 40
40 -
 41
41 -
 42
42 -
 43
43 -
 44
44 -
 45
45 -
 46
46 -
 47
47 -
 48
48 -
 49
49 -
50
-
51
-
52
-
53
-
54
-
55
-
56
-
57
-
58
-
59
-
60
-
61
-
62
-
63
-
64
-
65
-
66
-
67
-
68
-
69
-
70
-
71
-
72
-
73
-
74
-
75
-
76
-
77
-
78
-
79
-
80
-
81
-
82
-
83
-
84
-
85
-
86
-
87
-
88
-
89
-
90
 |
 |