Kyocera KM-3035 Printer Accounting Systems Settings Guide
Kyocera KM-3035 Manual
 |
View all Kyocera KM-3035 manuals
Add to My Manuals
Save this manual to your list of manuals |
Kyocera KM-3035 manual content summary:
- Kyocera KM-3035 | Printer Accounting Systems Settings Guide - Page 1
Accounting System Settings Guide - Kyocera KM-3035 | Printer Accounting Systems Settings Guide - Page 2
Guide Table of Contents Introduction...3 Chapter 1 Overview of the Accounting System 4 Chapter 2 Setting Up the Accounting System 5 2-1 Accounting System Menus ...6 2-2 Entering Settings through the Printer for Printing without Accounting code Specification 32 Chapter 3 Error Messages 33 2 - Kyocera KM-3035 | Printer Accounting Systems Settings Guide - Page 3
System Settings Guide Introduction Introduction With the increasing popularity of office networks, it has become very common for multiple users to share a single printer or multi-function product. This has made it much easier for users to obtain printouts, but they then faced the problem of - Kyocera KM-3035 | Printer Accounting Systems Settings Guide - Page 4
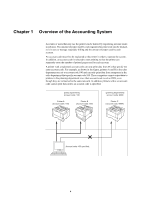
of the Accounting System Accounts or users that may use the printer can be limited by registering account can only print data from computers in the sales department that specify account code 100. These computers cannot output data to printers in the planning department since their account code - Kyocera KM-3035 | Printer Accounting Systems Settings Guide - Page 5
specific models. Administration IDs An administration ID is required to control the accounting system. An administration ID is a 15-digit number. The default setting is the printer model number followed by a string of zeros (e.g., 602000000000000 for the FS-6020). The - Kyocera KM-3035 | Printer Accounting Systems Settings Guide - Page 6
must be set to On in order to use the accounting system. Add Account Adds a new account code that is permitted to use the printer. Delete Account Deletes a previously registered account code. Change Admin. ID Changes the administration ID. Print Account Management List Prints out accounting system - Kyocera KM-3035 | Printer Accounting Systems Settings Guide - Page 7
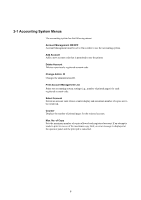
Accounting System Settings Guide Chapter 2 Setting Up the Accounting System The following diagram illustrates the accounting system menu structure. Menu structure AdministrationID 012345678912345 Account Management > On >Select Account> 12345678 >> - Kyocera KM-3035 | Printer Accounting Systems Settings Guide - Page 8
Operator Panel This section describes how to enter accounting system settings through the printer operator panel. Basic operations are the same as those for the printer mode menu. Set Account Management ON/OFF Turns Account Management ON/OFF. At least 1 Account must exist before turning ON. 1 Make - Kyocera KM-3035 | Printer Accounting Systems Settings Guide - Page 9
Accounting System Settings Guide Chapter 2 Setting Up the Accounting System 7 Press [ENTER] again. ? blinks on the digits are deleted and replaced by black squares („), and the cursor moves to the far left. Adds an account code that is permitted to use the printer. An account code must be registered - Kyocera KM-3035 | Printer Accounting Systems Settings Guide - Page 10
2 Press [ ]. Select Account appears on the operator panel. >Select Account> 00000000 3 Press [ ] or [ ] to display Add Account. >Add Account 4 Press [ENTER]. The cursor blinks on the operator panel. >Add Account _ 5 Press [ ] or [ ] to enter a number (0 through 9). >Add Account 1 6 Press [ ]. The - Kyocera KM-3035 | Printer Accounting Systems Settings Guide - Page 11
Accounting System Settings Guide Chapter 2 Setting Up the Accounting System Delete Account Code Deletes a ID. Default administration ID is set as the printer's model number followed by a string of zeros. (Example:602000000000000 for model FS-6020) 1 Display Account Management on the operator - Kyocera KM-3035 | Printer Accounting Systems Settings Guide - Page 12
3 Press [ ] or [ ] to display Change Admin. ID. >Change Admin.ID 4 Press [ENTER]. The cursor blinks on the operator panel. >Change Admin.ID 5 Enter the first digit of the new account code. Press [ ] or [ ] to enter a number (0 through 9). >Change Admin.ID 1 6 Press [ ]. The number is - Kyocera KM-3035 | Printer Accounting Systems Settings Guide - Page 13
Print Account Management List Display Number of Printed Pages Accounting System Settings Guide Chapter 2 Setting Up the Accounting System Prints out the number of printed pages and the maximum number of copy for each registered accounts code as - Kyocera KM-3035 | Printer Accounting Systems Settings Guide - Page 14
5 Press [ ], then press [ ] or [ ] to display Counter. The number of printed pages for the selected account code is displayed. >>Counter 000035 6 Press [MENU]. Ready is displayed again on the operator panel. Ready Set Maximum Number of Copies Sets the maximum number of copy for each registered - Kyocera KM-3035 | Printer Accounting Systems Settings Guide - Page 15
Accounting System Settings Guide Chapter 2 Setting Up the Accounting System 7 Press [ ] or [ ] to enter the maximum number of copy. >>Max. No. of Copy 000015 8 Press [ENTER]. The maximum number of copy setting is entered. 9 Press [MENU]. Ready is displayed again on the operator panel. Ready 15 - Kyocera KM-3035 | Printer Accounting Systems Settings Guide - Page 16
the accounting system using the PRESCRIBE commands. The PRESCRIBE commands can be used to enter more detailed settings than those entered through the printer operator panel. During programming which includes accounting functions, the ACNT "ADMN" command is used in the program to declare the start of - Kyocera KM-3035 | Printer Accounting Systems Settings Guide - Page 17
Accounting System Settings Guide Chapter 2 Setting Up the Accounting System EDAD-EnD of accounting Administrator mode Function This command sets the Accounting function administrator mode to OFF. Command/Parameter - Kyocera KM-3035 | Printer Accounting Systems Settings Guide - Page 18
DELT-accounting code DELeTion ALAS-accounting code ALiAs • The setting of an account code for a print job made by using the ACNT "CODE"; command is also reset whenever a job is completed by returning to UEL or Ready or other such. • In cases where the ACNT "CODE"; command is used to specify an - Kyocera KM-3035 | Printer Accounting Systems Settings Guide - Page 19
Accounting System Settings Guide Chapter 2 Setting Up the Accounting System Description • Registers an number of copy is set (numeric string consisting of 1 to 8 digits) #2 Function 0: Total 1: Printer 2: Copier 3: Scanner 4: FAX #3 Paper size 0: Total 1-: Paper size No. (in accordance with - Kyocera KM-3035 | Printer Accounting Systems Settings Guide - Page 20
": Clears all counters for all accounts to 0. #2 Function "ALLC": Clears all counters for the account specified 0: Total in #1 to 0. 1: Printer 2: Copier 3: Scanner 4: FAX #3 Paper size 0: Total 1-: Paper size No. (in accordance with SPSZ) #4 Color mode 0: Total 1: Monochrome 2: Monochrome - Kyocera KM-3035 | Printer Accounting Systems Settings Guide - Page 21
Accounting System Settings Guide Chapter 2 Setting Up the Accounting System FAXS- FAX related Setup Function This command sets FAX specific settings. Command/Parameters Command Parameter ACNT "FAXS", #1, #2, #3, #4, #5, #6; #1 Setting applicability 0?99999999: Information for each account - Kyocera KM-3035 | Printer Accounting Systems Settings Guide - Page 22
Function This command sets the Accounting function to ON/OFF. Command/Parameters Command Parameter ACNT "MAIN", #1, #2, #3, #4, #5; #1 Function 0: Total 1: Printer 2: Copier 3: Scanner 4: FAX #2 Paper size 0: Total 1-: Paper size No. (in accordance with SPSZ) #3 Color mode 0: Total 1: Monochrome - Kyocera KM-3035 | Printer Accounting Systems Settings Guide - Page 23
Accounting System Settings Guide Chapter 2 Setting Up the Accounting System SECR-accounting SECuRity Description • The security level setting is valid for SNMP access. (For details, refer to the SNMP Specifications.) • The security level can be set between the ACNT "ADMN"; and ACNT "EDAD"; commands. - Kyocera KM-3035 | Printer Accounting Systems Settings Guide - Page 24
count method can be set between the ACNT "ADMN", and ACNT "EDAD"; commands. • The following table shows whether or not the count method setting is supported and default values for each paper size. 24 - Kyocera KM-3035 | Printer Accounting Systems Settings Guide - Page 25
Accounting System Settings Guide Chapter 2 Setting Up the Accounting System Available Count Methods by Paper Size x 8.5 inch) 210 x 330 mm 114 x 162 mm 105 x 235 mm 25 Supported Yes Yes Yes Yes Yes Yes Yes Yes Yes - Default value Single Double Single Double Single Double Double Double Double - - Kyocera KM-3035 | Printer Accounting Systems Settings Guide - Page 26
ERRM-ERRor Management Function This command sets the method for error handling when an error occurs. Command/Parameters Command Parameter ACNT "ERRM", #1, #2,#3; #1 "ACCD": Account code error "EXMN": Exceeded the maximum number of copy #2 #1: "ACCD" "CNCL": Cancels printing. "PRNT": Prints an - Kyocera KM-3035 | Printer Accounting Systems Settings Guide - Page 27
ACLR-Auto CleaR managemet Accounting System Settings Guide Chapter 2 Setting Up the Accounting System Function This command sets whether or not the front panel menus of the Accounting function are automatically cleared. Command/ - Kyocera KM-3035 | Printer Accounting Systems Settings Guide - Page 28
-up. • It is reflected in a restriction number-of-sheets check. • When 1 is set, it counts as color even if only using Black toner. ATRC-ATtRibute combination of Counters Function This command enters settings related to the itemized paper counter. Command/Parameters Command Parameter ACNT "ATRC - Kyocera KM-3035 | Printer Accounting Systems Settings Guide - Page 29
Accounting System Settings Guide Chapter 2 Setting Up the Accounting System Examples of Use Set itemized paper counter 3 to "Letter" paper size and "Treated paper" paper type. !R! ACNT "ADMN", "123456789012345"; - Kyocera KM-3035 | Printer Accounting Systems Settings Guide - Page 30
ACNT "FRST", #1, #2, #3, #4, #5, #6; #1 0 - 99999999: Applicable account code (numeric string consisting of 1 to 8 digits) #2 Function 0: All (computer and printer) 1: Printer 2: Copier 3: Scanner 4: Fax (sending) 5: Fax (receiving) #3 Paper size 0: Total 1-: Paper size No. (in accordance with SPSZ - Kyocera KM-3035 | Printer Accounting Systems Settings Guide - Page 31
Accounting System Settings Guide Chapter 2 Setting Up the Accounting System RSTP-selection applied to accounts listed as "Other". • Limitation pattern Pattern 1 Function Details Support Copie/printer Total (full color/monocolor/monochrome) Full color Monocolor monochrome (copier only) Yes - Kyocera KM-3035 | Printer Accounting Systems Settings Guide - Page 32
PPAS-Permission for Printing without Accounting code Specification Function This command allows printing of jobs without to manage accounts in, for example, an environment containing hosts that cannot use drivers supporting the accounting functions • Even in cases where this command is set to allow - Kyocera KM-3035 | Printer Accounting Systems Settings Guide - Page 33
printing, and describes how to respond to these errors. If you are unable to solve a problem, contact the Kyocera Mita Corporation authorized dealer where you made your purchase or contact our customer service center. The account code may not have been set for the transmitted job, or the specified - Kyocera KM-3035 | Printer Accounting Systems Settings Guide - Page 34
Error numbers for account errors ACNT command function ADMN EDAD CODE (at registration) DELT ALAS MAXN CRST LIST MAIN SECR CTMD ERRM ACLR CLMN FAXS ATRC FRST RSTP PPAS Panel error indication (Press GO) 01 02 03 04 05 06 08 09 Account error 10 11 12 13 14 15 16 17 18 34 - Kyocera KM-3035 | Printer Accounting Systems Settings Guide - Page 35
- Kyocera KM-3035 | Printer Accounting Systems Settings Guide - Page 36
Kyocera Mita Corporation 2-28, 1-Chome, Tamatsukuri Chuo-ku, Osaka, 540-8585 Japan ©2003 by KYOCERA MITA CORPORATION All rights reserved. Revision 1.0., 2003.6
-
 1
1 -
 2
2 -
 3
3 -
 4
4 -
 5
5 -
 6
6 -
 7
7 -
8
-
9
-
10
-
11
-
12
-
13
-
14
-
15
-
16
-
17
-
18
-
19
-
20
-
21
-
22
-
23
-
24
-
25
-
26
-
27
-
28
-
29
-
30
-
31
-
32
-
33
-
34
-
35
-
36
 |
 |

Accounting System
Settings Guide