Kyocera KM-3035 iTag Specification/Setup/Operation Guide Ver. 8.0
Kyocera KM-3035 Manual
 |
View all Kyocera KM-3035 manuals
Add to My Manuals
Save this manual to your list of manuals |
Kyocera KM-3035 manual content summary:
- Kyocera KM-3035 | iTag Specification/Setup/Operation Guide Ver. 8.0 - Page 1
Specification/Setup/Operation Guide for the iTag Configuration Utility - Kyocera KM-3035 | iTag Specification/Setup/Operation Guide Ver. 8.0 - Page 2
Kyocera Mita Corporation. Microsoft, Microsoft Windows SharePoint Services, Exchange, Windows, Windows 95, Windows 98, Windows NT, Windows 2000, Windows XP, Windows in this Guide is subject to change without notices. Reproduction of the information contained herein is prohibited. Kyocera Mita does - Kyocera KM-3035 | iTag Specification/Setup/Operation Guide Ver. 8.0 - Page 3
Retrieval from SharePoint Services 45 How to Enable Color Scanning...49 Adding Scan to PC & Send to E-Mail Addresses 74 Device Manager Common Book ...79 Device Manager - PC list ...80 Device Manager - Authlist ...81 Enterprise Mode ...82 Scan To PC...84 Copyright © 2005~2007 Kyocera Mita - Kyocera KM-3035 | iTag Specification/Setup/Operation Guide Ver. 8.0 - Page 4
iTag Specification/Setup/Operation Table of Contents Scan To PC - Export and Import...87 Scan To E-Mail ...90 Scan To E-Mail Import and Export...92 Copyright © 2005~2007 Kyocera Mita America, Inc All Rights Reserved. Version 8.0 Page 3 - Kyocera KM-3035 | iTag Specification/Setup/Operation Guide Ver. 8.0 - Page 5
size for storage. NOTE: Auto Color Scan (ACS) - The Auto Color Key feature needs to be enabled on the MFP side (C2520/ C3225/C3232/C2525E/C3225E/C3232E/C4035E), please see How to Enable Color Scanning on page 51 of this document. Copyright © 2005~2007 Kyocera Mita America, Inc All Rights Reserved - Kyocera KM-3035 | iTag Specification/Setup/Operation Guide Ver. 8.0 - Page 6
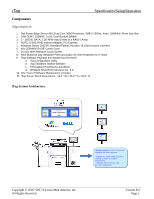
, Dual Ranked DIMMs 3. 3 - 160GB, SATA, 7.2K RPM Hard Drives in a RAID 5 Array 4. PERC 5I SAS RAID Internet Adapter, PCI Express 5. Windows Server 2003 R2 Standard Edition, Includes 15 Client Access Licenses 6. 48x CDRW/DVD IDE Combo Drive 7. 15 inch Wire Resistive Touch Screen 8. Next Business Day - Kyocera KM-3035 | iTag Specification/Setup/Operation Guide Ver. 8.0 - Page 7
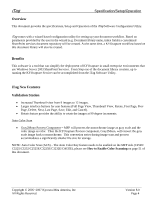
or department, there are several installation scenarios. Installation Example 1 - Single device environment Client Client Installation Example 2 - Multiple device environments Client Client Client Copyright © 2005~2007 Kyocera Mita America, Inc All Rights Reserved. Version 8.0 Page 6 - Kyocera KM-3035 | iTag Specification/Setup/Operation Guide Ver. 8.0 - Page 8
library in Microsoft SharePoint Services. Send to Folder - Route image files to any local or network directory folder. Send to Printer - Route image files to printers that are located anywhere on the network using the installed print driver. Copyright © 2005~2007 Kyocera Mita America, Inc All - Kyocera KM-3035 | iTag Specification/Setup/Operation Guide Ver. 8.0 - Page 9
iTag is Kyocera's document management solution for your business. This utility guides you scanned documents will be stored. iTag is configured to work with Windows 2003 Server (R) SharePoint services. Windows 2003 SharePoint Services (OCR), Gray2Mono, Send to Printer, and Send to Folder. These - Kyocera KM-3035 | iTag Specification/Setup/Operation Guide Ver. 8.0 - Page 10
to proceed to the next page. All inputs for the current screen will be stored. To review the settings input on the previous page, click the "Back" button. To terminate the entire corner of the screen. Copyright © 2005~2007 Kyocera Mita America, Inc All Rights Reserved. Version 8.0 Page 9 - Kyocera KM-3035 | iTag Specification/Setup/Operation Guide Ver. 8.0 - Page 11
the last page. Once you station is powered up, your display will be as follows; Double click on the iTag configuration icon. Copyright © 2005~2007 Kyocera Mita America, Inc All Rights Reserved. Version 8.0 Page 10 - Kyocera KM-3035 | iTag Specification/Setup/Operation Guide Ver. 8.0 - Page 12
iTag Setup using the Wizard Specification/Setup/Operation Select Next Copyright © 2005~2007 Kyocera Mita America, Inc All Rights Reserved. Version 8.0 Page 11 - Kyocera KM-3035 | iTag Specification/Setup/Operation Guide Ver. 8.0 - Page 13
iTag License Agreement Specification/Setup/Operation Select Accept and click Next. Copyright © 2005~2007 Kyocera Mita America, Inc All Rights Reserved. Version 8.0 Page 12 - Kyocera KM-3035 | iTag Specification/Setup/Operation Guide Ver. 8.0 - Page 14
Page allows the user to define defaults for the following scan settings: • Scanning Mode: OCR, Photo, Text and Text + Photo • File Format: TIFF or PDF • Resolution: 200, 300, 400, 600 • Color Type: B&W, Color, Gray, and AutoColor Copyright © 2005~2007 Kyocera Mita America, Inc All Rights Reserved - Kyocera KM-3035 | iTag Specification/Setup/Operation Guide Ver. 8.0 - Page 15
remains accessible through other pages of the SharePoint Services site (Default is Yes). • Create a version of the document each time you edit. This option is related to how the documents options, click Next. Copyright © 2005~2007 Kyocera Mita America, Inc All Rights Reserved. Version 8.0 Page 14 - Kyocera KM-3035 | iTag Specification/Setup/Operation Guide Ver. 8.0 - Page 16
document is available for editing only from the SharePoint Services web site (Default is checked). • Use this field to rename the file. A check means the data for this field is used to rename the file. MFP scanners typically have a pre-defined naming scheme for the scanned file. Checking this button - Kyocera KM-3035 | iTag Specification/Setup/Operation Guide Ver. 8.0 - Page 17
the MFP and SharePoint Services. • Default Value. The default data that appears for this field. When this optional setting is provided, the data appears on the field's input box instead of blank. This allows for faster input since the operator can simply press enter or do some editing to enter the - Kyocera KM-3035 | iTag Specification/Setup/Operation Guide Ver. 8.0 - Page 18
this field. All choices should be separated by a new line. • Default Value. The default data that appears for this field. This is required for the String This setting applies only when the index field is input or edited from SharePoint Services. A check on this setting means that users can input - Kyocera KM-3035 | iTag Specification/Setup/Operation Guide Ver. 8.0 - Page 19
field type. • Default Value. The default data that appears for numbers), 1, 2, 3, 4, and 5. • Show value as percentage. This setting applies only when this field is input or edited in SharePoint Services. When checked, the number Kyocera Mita America, Inc All Rights Reserved. Version 8.0 Page 18 - Kyocera KM-3035 | iTag Specification/Setup/Operation Guide Ver. 8.0 - Page 20
day, month and year is provided in SharePoint Services when this field is input or edited. • Use date and time of document save date as default. When selected the current date is used as the default value in the input box in SharePoint Services. • Default value. The date and time selected is the - Kyocera KM-3035 | iTag Specification/Setup/Operation Guide Ver. 8.0 - Page 21
. The default data that appears for this field. When this optional setting is provided, the data appears on the field's input box instead of blank. This allows for faster input since the operator can simply press enter or do some editing to enter the desired data for this field. • Number of decimal - Kyocera KM-3035 | iTag Specification/Setup/Operation Guide Ver. 8.0 - Page 22
Watermark Send To Printer Optical Character Recognition (OCR) Send To Folder SharePoint Services 2007 Description The Kyocera capture component extends the capabilities of the following Kyocera MFP's: 3035/4035/5035/3050/4050/5050/6030/8030, C2630/C4008/C4035E/C3232E/C3225E/C2525E/C3232/C3225/C2520 - Kyocera KM-3035 | iTag Specification/Setup/Operation Guide Ver. 8.0 - Page 23
user selects all the components, the following is an example of what the CFG file would look like from KYOcapture Process Designer: Copyright © 2005~2007 Kyocera Mita America, Inc All Rights Reserved. Version 8.0 Page 22 - Kyocera KM-3035 | iTag Specification/Setup/Operation Guide Ver. 8.0 - Page 24
user to review the configurations set. The summary screen consists of a tree view of the settings. If any item needs to be changed, double click on the item, and the utility will redirect you to the screen where you can input the changes. Select Next. Copyright © 2005~2007 Kyocera - Kyocera KM-3035 | iTag Specification/Setup/Operation Guide Ver. 8.0 - Page 25
; otherwise, you can always go back to the previous screens by pressing the 'Back' button. Select Create the Library. Click on Next. Copyright © 2005~2007 Kyocera Mita America, Inc All Rights Reserved. Version 8.0 Page 24 - Kyocera KM-3035 | iTag Specification/Setup/Operation Guide Ver. 8.0 - Page 26
Service automatically. After properly configuring the MFP, you should be able to start scanning, processing and storing your documents (Default KYOcapture workflow manually (Send to Printer/Folder and KYOcapture Service and Process Designer will/will not launch. Copyright © 2005~2007 Kyocera Mita - Kyocera KM-3035 | iTag Specification/Setup/Operation Guide Ver. 8.0 - Page 27
KYOcapture Service Manager will display the following screen: If the Launch KYOcapture Process Designer has been selected, the following screen will be displayed, and the associated iTag configuration file can be displayed by browsing to the following default location: C:\Program Files\Kyocera\iTag - Kyocera KM-3035 | iTag Specification/Setup/Operation Guide Ver. 8.0 - Page 28
interface and the touch screen interface. If this component is checked (enabled) in the Document Workflow Component Screen, a window will display a view of up to twelve (12) TIFF files scanned from the MFP. Copyright © 2005~2007 Kyocera Mita America, Inc All Rights Reserved. Version 8.0 Page 27 - Kyocera KM-3035 | iTag Specification/Setup/Operation Guide Ver. 8.0 - Page 29
by selecting Data input from the MFP. the Index Data field and clicking on the Edit Button. Save - saves image and index data changes. Passes changes to the iTag workflow. Edit - allows edit of Index Data Fields. Cancel - Cancels the iTag workflow without saving image or index data. Copyright - Kyocera KM-3035 | iTag Specification/Setup/Operation Guide Ver. 8.0 - Page 30
the KYOcapture Service 1. Logged in as Administrator, launch the KYOcapture Service Manager found in the iTag Server 'Start Menu > All Programs > Kyocera > KYOcapture > KYOcapture Service Manager'. 2. Confirm the path to the AutoStore Script (iTag configuration file). By default, the configuration - Kyocera KM-3035 | iTag Specification/Setup/Operation Guide Ver. 8.0 - Page 31
1. Logged in as Administrator, launch the KYOcapture Process Designer from the iTag Server 'Start Menu > All Programs > Kyocera > KYOcapture > KYOcapture Service Manager'. 2. Select 'File>Open', and browse to the iTag.CFG file (default location C:\Program Files\Kyocera\iTag\iTag Configuration - Kyocera KM-3035 | iTag Specification/Setup/Operation Guide Ver. 8.0 - Page 32
for your printouts: • Destination printer • Paper size • Paper source • Number of copies • Pages per sheet • Orientation 1. Open the configuration file C:\Program Files\Kyocera\iTag\iTag Configuration Utility\iTag.CFG . 2. On the right-hand side of the window depicting the document workflow, select - Kyocera KM-3035 | iTag Specification/Setup/Operation Guide Ver. 8.0 - Page 33
the screen. 8. Do not forget to save the new configuration from the Process Designer. To learn more about how to start the KYOcapture Service manually, go to page 29, Manually Launching the KYOcapture Service Copyright © 2005~2007 Kyocera Mita America, Inc All Rights Reserved. Version 8.0 Page 32 - Kyocera KM-3035 | iTag Specification/Setup/Operation Guide Ver. 8.0 - Page 34
hand side of the window depicting the document workflow, select 'Kyocera MFP'. 3. Right click on the icon, and select 'Properties'. 4. Expand the list until you find the names of the index fields that you input. Choose any one of the index fields, and press the 'Edit' button. 5. A dialog called 'MFP - Kyocera KM-3035 | iTag Specification/Setup/Operation Guide Ver. 8.0 - Page 35
the Auto Color Key (Scanner Default Settings), the MFP will C3232/C2525E/C3225E/C3232E/C4035E), please see How to Enable Color Scanning on Page 51 of this document. 1. From the MFP Form within the KYOcapture Process Designe,r make Kyocera Mita America, Inc All Rights Reserved. Version 8.0 Page 34 - Kyocera KM-3035 | iTag Specification/Setup/Operation Guide Ver. 8.0 - Page 36
iTag Removing a Workflow from iTag Specification/Setup/Operation 1. Click the Start>Programs>Kyocera>KYOcapture> KYOcapture Process Designer>Open. This opens the KYOcapture Process Designer. Copyright © 2005~2007 Kyocera Mita America, Inc All Rights Reserved. Version 8.0 Page 35 - Kyocera KM-3035 | iTag Specification/Setup/Operation Guide Ver. 8.0 - Page 37
iTag Specification/Setup/Operation 2. Click Tools>Service Manager to open the KYOcapture Service Manager Application. Copyright © 2005~2007 Kyocera Mita America, Inc All Rights Reserved. Version 8.0 Page 36 - Kyocera KM-3035 | iTag Specification/Setup/Operation Guide Ver. 8.0 - Page 38
iTag Specification/Setup/Operation 3. Click Stop, Apply, and OK. At this point the Service is stopped. Copyright © 2005~2007 Kyocera Mita America, Inc All Rights Reserved. Version 8.0 Page 37 - Kyocera KM-3035 | iTag Specification/Setup/Operation Guide Ver. 8.0 - Page 39
iTag Specification/Setup/Operation 4. From within the KYOcapture Process Designer open the iTag CFG file, located at C:\Program Files\Kyocera\iTag\iTag Configuration Utility\iTag. Copyright © 2005~2007 Kyocera Mita America, Inc All Rights Reserved. Version 8.0 Page 38 - Kyocera KM-3035 | iTag Specification/Setup/Operation Guide Ver. 8.0 - Page 40
iTag Specification/Setup/Operation 5. Double click on the Kyocera MFP. This will open the workflow window. Copyright © 2005~2007 Kyocera Mita America, Inc All Rights Reserved. Version 8.0 Page 39 - Kyocera KM-3035 | iTag Specification/Setup/Operation Guide Ver. 8.0 - Page 41
iTag Specification/Setup/Operation 6. Click the + sign next to the Common MFP Group and highlight the workflow you would like to remove. In this example we are deleting date. Copyright © 2005~2007 Kyocera Mita America, Inc All Rights Reserved. Version 8.0 Page 40 - Kyocera KM-3035 | iTag Specification/Setup/Operation Guide Ver. 8.0 - Page 42
iTag 7. Click Remove. Click Yes to remove the date form. Specification/Setup/Operation Copyright © 2005~2007 Kyocera Mita America, Inc All Rights Reserved. Version 8.0 Page 41 - Kyocera KM-3035 | iTag Specification/Setup/Operation Guide Ver. 8.0 - Page 43
iTag 8. The Form date is deleted. Click OK. Specification/Setup/Operation Copyright © 2005~2007 Kyocera Mita America, Inc All Rights Reserved. Version 8.0 Page 42 - Kyocera KM-3035 | iTag Specification/Setup/Operation Guide Ver. 8.0 - Page 44
iTag Specification/Setup/Operation 9. Click the Save button. 10. Click Tools>Service Manager to open the KYOcapture Service Manager dialogue box. Copyright © 2005~2007 Kyocera Mita America, Inc All Rights Reserved. Version 8.0 Page 43 - Kyocera KM-3035 | iTag Specification/Setup/Operation Guide Ver. 8.0 - Page 45
iTag Specification/Setup/Operation 11. Click Start, Apply and then OK to start the KYOcapture Service and new workflow. 12. Close the KYOcapture Process Designer. Copyright © 2005~2007 Kyocera Mita America, Inc All Rights Reserved. Version 8.0 Page 44 - Kyocera KM-3035 | iTag Specification/Setup/Operation Guide Ver. 8.0 - Page 46
/Internet Explorer. 2. You should have a Path to SharePoint Services. Specification/Setup/Operation 3. To search across multiple folders within a single document library, you can use the sub-folder search. Copyright © 2005~2007 Kyocera Mita America, Inc All Rights Reserved. Version 8.0 Page 45 - Kyocera KM-3035 | iTag Specification/Setup/Operation Guide Ver. 8.0 - Page 47
iTag Specification/Setup/Operation 4. Select your document library from the drop down menu, for this example we are searching in the search document library. Copyright © 2005~2007 Kyocera Mita America, Inc All Rights Reserved. Version 8.0 Page 46 - Kyocera KM-3035 | iTag Specification/Setup/Operation Guide Ver. 8.0 - Page 48
iTag Specification/Setup/Operation 5. Select the index field you want to search, for this example we have selected First Name. Copyright © 2005~2007 Kyocera Mita America, Inc All Rights Reserved. Version 8.0 Page 47 - Kyocera KM-3035 | iTag Specification/Setup/Operation Guide Ver. 8.0 - Page 49
, your search result will return any documents indexed with first name data of dan. 7. Double clicking the image file will open it. Copyright © 2005~2007 Kyocera Mita America, Inc All Rights Reserved. Version 8.0 Page 48 - Kyocera KM-3035 | iTag Specification/Setup/Operation Guide Ver. 8.0 - Page 50
iTag Specification/Setup/Operation How to Enable Color Scanning 1. Click Start/Programs/KYOcapture/KYOcapture Process Designer. Copyright © 2005~2007 Kyocera Mita America, Inc All Rights Reserved. Version 8.0 Page 49 - Kyocera KM-3035 | iTag Specification/Setup/Operation Guide Ver. 8.0 - Page 51
iTag Specification/Setup/Operation 2. Click File Open. Go to the iTag configuration Utility. Open the iTag .cfg file. Copyright © 2005~2007 Kyocera Mita America, Inc All Rights Reserved. Version 8.0 Page 50 - Kyocera KM-3035 | iTag Specification/Setup/Operation Guide Ver. 8.0 - Page 52
iTag 3. Double Click the Kyocera MFP Specification/Setup/Operation Copyright © 2005~2007 Kyocera Mita America, Inc All Rights Reserved. Version 8.0 Page 51 - Kyocera KM-3035 | iTag Specification/Setup/Operation Guide Ver. 8.0 - Page 53
iTag Specification/Setup/Operation 4. Click the + sign next to the common MFP Group. Click the + sign next to your menu item. In this case, Fields for Closed Loans. 5. Click the Edit Button. Copyright © 2005~2007 Kyocera Mita America, Inc All Rights Reserved. Version 8.0 Page 52 - Kyocera KM-3035 | iTag Specification/Setup/Operation Guide Ver. 8.0 - Page 54
iTag Specification/Setup/Operation 6. From the Color Type drop down, Select Color and click OK. Copyright © 2005~2007 Kyocera Mita America, Inc All Rights Reserved. Version 8.0 Page 53 - Kyocera KM-3035 | iTag Specification/Setup/Operation Guide Ver. 8.0 - Page 55
iTag 7. Click OK again. Specification/Setup/Operation Copyright © 2005~2007 Kyocera Mita America, Inc All Rights Reserved. Version 8.0 Page 54 - Kyocera KM-3035 | iTag Specification/Setup/Operation Guide Ver. 8.0 - Page 56
iTag 8. Click File Save. Specification/Setup/Operation Copyright © 2005~2007 Kyocera Mita America, Inc All Rights Reserved. Version 8.0 Page 55 - Kyocera KM-3035 | iTag Specification/Setup/Operation Guide Ver. 8.0 - Page 57
iTag 9. Click Tools/Service Manager. Specification/Setup/Operation Copyright © 2005~2007 Kyocera Mita America, Inc All Rights Reserved. Version 8.0 Page 56 - Kyocera KM-3035 | iTag Specification/Setup/Operation Guide Ver. 8.0 - Page 58
iTag 10. Click Stop. Specification/Setup/Operation 11. Click Start and Click OK. Copyright © 2005~2007 Kyocera Mita America, Inc All Rights Reserved. Version 8.0 Page 57 - Kyocera KM-3035 | iTag Specification/Setup/Operation Guide Ver. 8.0 - Page 59
iTag Specification/Setup/Operation 12. Exit the Process Designer by clicking the (x) in the upper right hand corner. Copyright © 2005~2007 Kyocera Mita America, Inc All Rights Reserved. Version 8.0 Page 58 - Kyocera KM-3035 | iTag Specification/Setup/Operation Guide Ver. 8.0 - Page 60
System Menu / Counter System Menu Copy Default > Scanner Default > Printer Default > Machine Default > Document Management > 3. Using the numeric keys, enter the code 6 4 8 2 Enter the administrator number Copyright © 2005~2007 Kyocera Mita America, Inc All Rights Reserved. Version - Kyocera KM-3035 | iTag Specification/Setup/Operation Guide Ver. 8.0 - Page 61
File Name Input Selec of senders (users) Input E-mail Address Color setting B&W setting Auto/Manual On On Full Color Grayscale Change B&W setting Select default B/W setting B&W setting Black& White Gray scale Copyright © 2005~2007 Kyocera Mita America, Inc All Rights Reserved. Version 8.0 Page - Kyocera KM-3035 | iTag Specification/Setup/Operation Guide Ver. 8.0 - Page 62
iTag Enabling Multiple Pages Per Document Specification/Setup/Operation 1. Click Start/Programs/KYOcapture/KYOcapture Process Designer. Copyright © 2005~2007 Kyocera Mita America, Inc All Rights Reserved. Version 8.0 Page 61 - Kyocera KM-3035 | iTag Specification/Setup/Operation Guide Ver. 8.0 - Page 63
iTag Specification/Setup/Operation 2. Click File Open. Go to the iTag configuration Utility. Open the iTag .cfg file. Copyright © 2005~2007 Kyocera Mita America, Inc All Rights Reserved. Version 8.0 Page 62 - Kyocera KM-3035 | iTag Specification/Setup/Operation Guide Ver. 8.0 - Page 64
iTag 3. Double Click the Kyocera MFP Specification/Setup/Operation Copyright © 2005~2007 Kyocera Mita America, Inc All Rights Reserved. Version 8.0 Page 63 - Kyocera KM-3035 | iTag Specification/Setup/Operation Guide Ver. 8.0 - Page 65
iTag Specification/Setup/Operation 4. Click the + sign next to the common MFP Group. Click the + sign next to your menu item. In this case, Fields for Closed Loans. 5. Click the Edit Button. Copyright © 2005~2007 Kyocera Mita America, Inc All Rights Reserved. Version 8.0 Page 64 - Kyocera KM-3035 | iTag Specification/Setup/Operation Guide Ver. 8.0 - Page 66
iTag 6. Click the Component Tab. Specification/Setup/Operation Copyright © 2005~2007 Kyocera Mita America, Inc All Rights Reserved. Version 8.0 Page 65 - Kyocera KM-3035 | iTag Specification/Setup/Operation Guide Ver. 8.0 - Page 67
iTag 7. Click the Basic Image Management Ellipsis. Specification/Setup/Operation Copyright © 2005~2007 Kyocera Mita America, Inc All Rights Reserved. Version 8.0 Page 66 - Kyocera KM-3035 | iTag Specification/Setup/Operation Guide Ver. 8.0 - Page 68
iTag 8. Select Split Type None. Specification/Setup/Operation Copyright © 2005~2007 Kyocera Mita America, Inc All Rights Reserved. Version 8.0 Page 67 - Kyocera KM-3035 | iTag Specification/Setup/Operation Guide Ver. 8.0 - Page 69
iTag 9. Click OK. Click OK again. Specification/Setup/Operation Copyright © 2005~2007 Kyocera Mita America, Inc All Rights Reserved. Version 8.0 Page 68 - Kyocera KM-3035 | iTag Specification/Setup/Operation Guide Ver. 8.0 - Page 70
iTag 10. The Menu Configuration Screen will appear. Specification/Setup/Operation 11. Click OK. Copyright © 2005~2007 Kyocera Mita America, Inc All Rights Reserved. Version 8.0 Page 69 - Kyocera KM-3035 | iTag Specification/Setup/Operation Guide Ver. 8.0 - Page 71
iTag 12. Click File Save. Specification/Setup/Operation Copyright © 2005~2007 Kyocera Mita America, Inc All Rights Reserved. Version 8.0 Page 70 - Kyocera KM-3035 | iTag Specification/Setup/Operation Guide Ver. 8.0 - Page 72
iTag 13. Click Tools/Service Manager. Specification/Setup/Operation Copyright © 2005~2007 Kyocera Mita America, Inc All Rights Reserved. Version 8.0 Page 71 - Kyocera KM-3035 | iTag Specification/Setup/Operation Guide Ver. 8.0 - Page 73
iTag 14. Click Stop. Specification/Setup/Operation 15. Click Start and Click OK. Copyright © 2005~2007 Kyocera Mita America, Inc All Rights Reserved. Version 8.0 Page 72 - Kyocera KM-3035 | iTag Specification/Setup/Operation Guide Ver. 8.0 - Page 74
iTag Specification/Setup/Operation 16. Exit the Process Designer by clicking the (x) in the upper right hand corner. Copyright © 2005~2007 Kyocera Mita America, Inc All Rights Reserved. Version 8.0 Page 73 - Kyocera KM-3035 | iTag Specification/Setup/Operation Guide Ver. 8.0 - Page 75
Kyocera MFP Devices. Once Enterprise Mode is enabled you will lose the ability to enter your Scan to PC and Scan to E-Mail addresses directly from the Web Interface of the Network if your Kyocera MFP is not in KYOcapture/Enterprise Mode the device will not be displayed in the device window. In the - Kyocera KM-3035 | iTag Specification/Setup/Operation Guide Ver. 8.0 - Page 76
purchase KYOcapture Authentication Server, which will require a Novell Server, Windows Domain Controller or an Active Directory Server. From this tab you for user credentials when accessing the Scanner features of the Device. Copyright © 2005~2007 Kyocera Mita America, Inc All Rights Reserved. Version - Kyocera KM-3035 | iTag Specification/Setup/Operation Guide Ver. 8.0 - Page 77
gives you the ability to Enable/Disable KYOcapture or assign the IP Address of the iTag Server to the MFP Device. You can also assign the port number that the device will communicate with to the iTag Server. The Port Number should always be 37169. Please Note: Device Manager is not designed to - Kyocera KM-3035 | iTag Specification/Setup/Operation Guide Ver. 8.0 - Page 78
the option to run LDAP from the KYOcapture/Enterprise Enabled devices on your network. Now you will point the LDAP Settings below to the LDAP Server. The port number for LDAP in the Device Manager is 46490. The port number for the LDAP Converter is 389. LDAP is Not Covered in this Document - Kyocera KM-3035 | iTag Specification/Setup/Operation Guide Ver. 8.0 - Page 79
five additional tabs are available to choose from: • Common Book (E-Mail) • PC List (Send To PC) • Auth List (List of Authenticating Users) • Private Book Details (No iTag Support) • Private Books (No iTag Support) • The Private Book Details and Private Books can be utilized in the full version of - Kyocera KM-3035 | iTag Specification/Setup/Operation Guide Ver. 8.0 - Page 80
/Operation Device Manager - Common Book The Common book stores e-mail addresses. They can be manually entered or imported via text file import. Once all E-Mail Addresses are entered in to the device you can easily Export the file to be Imported into another Kyocera MFP. With Device Manager you - Kyocera KM-3035 | iTag Specification/Setup/Operation Guide Ver. 8.0 - Page 81
iTag Specification/Setup/Operation Device Manager - PC list The PC List is the replacement for the Scan To PC Destination List. Again the PC List can be manually entered or an import file can be created. Copyright © 2005~2007 Kyocera Mita America, Inc All Rights Reserved. Version 8.0 Page 80 - Kyocera KM-3035 | iTag Specification/Setup/Operation Guide Ver. 8.0 - Page 82
/Setup/Operation Device Manager - Authlist The Auth List will allow you to add up to 100,000 thousand users of the Kyocera Device. This table is only necessary when you are using Local Authentication. Copyright © 2005~2007 Kyocera Mita America, Inc All Rights Reserved. Version 8.0 Page 81 - Kyocera KM-3035 | iTag Specification/Setup/Operation Guide Ver. 8.0 - Page 83
reboot. (If Enterprise Mode does not become enabled you must disable Scan to FTP in Simulation 511.) 5. On the Operation Panel of the Kyocera MFP Enter Simulation Mode. Simulation Mode is accessed by pressing 10871087 on the number key pad. 6. Enter Simulation 024 Execute Format Hard Drive and Press - Kyocera KM-3035 | iTag Specification/Setup/Operation Guide Ver. 8.0 - Page 84
Tab along the bottom Right Panel and Enable KYOcapture, Enter the IP Address of the iTag Server and the Port Number 37169 as follows: 10. Click Update Device The MFP is now configured to work with iTag. Copyright © 2005~2007 Kyocera Mita America, Inc All Rights Reserved. Version 8.0 Page 83 - Kyocera KM-3035 | iTag Specification/Setup/Operation Guide Ver. 8.0 - Page 85
is how you enter the information into the MFP. You still need the Scan File Utility to scan from a Kyocera MFP. To configure Scan To PC open Device Manager by Clicking the Start Button - > Kyocera -> Device Manager -> KYOcapture Device Manager. 1. Highlight the desired device, in the example below - Kyocera KM-3035 | iTag Specification/Setup/Operation Guide Ver. 8.0 - Page 86
iTag 2. Click the Device Tables Tab. Specification/Setup/Operation 3. Click the PC List Tab. Copyright © 2005~2007 Kyocera Mita America, Inc All Rights Reserved. Version 8.0 Page 85 - Kyocera KM-3035 | iTag Specification/Setup/Operation Guide Ver. 8.0 - Page 87
example enter your information in the following fields. Display Name, PC Address, SFU Save # and Organization. 5. Click the Update Device button and Select "Yes to the Update Device Prompt". That Scan to PC entry is now saved on the Kyocera MFP. To enter additional fields you can now follow the - Kyocera KM-3035 | iTag Specification/Setup/Operation Guide Ver. 8.0 - Page 88
desired MFP, Click the Device Tables Tab, PC List Tab. Click the Export Button. 2. You will be prompted to Save the Text File. For this demonstration we are saving the file in a ScanToPCFolder and naming the text fie ScanToPc.txt. Copyright © 2005~2007 Kyocera Mita America, Inc All Rights Reserved - Kyocera KM-3035 | iTag Specification/Setup/Operation Guide Ver. 8.0 - Page 89
in Notepad. The Following is the lay out of the Text File (XXX|Display Name|PC Address|SFU Save No.|Organization). The Separator is the Pipe Character ( | ). You can begin entering the names of the other Scan To PC Locations. When completed click File and Save to save this file. 4. From with in - Kyocera KM-3035 | iTag Specification/Setup/Operation Guide Ver. 8.0 - Page 90
iTag Specification/Setup/Operation 5. Click the file you edited in Notepad (ScanToPc.TXT) and Click Open. 6. The names you entered in the text file will then be shown in Device Manager. 7. You now can scan to the Scan To PC Locations imported. If you have additional MFP devices, you can now - Kyocera KM-3035 | iTag Specification/Setup/Operation Guide Ver. 8.0 - Page 91
the desired device. In the example below I highlighted the LAB-KM5035. Select the Device Tables Tab and then the Common Book Tab. 2. As we did with Scan To PC, we can now do the same with E-Mail Addresses. Copyright © 2005~2007 Kyocera Mita America, Inc All Rights Reserved. Version 8.0 Page 90 - Kyocera KM-3035 | iTag Specification/Setup/Operation Guide Ver. 8.0 - Page 92
and Press the Update Device Button. Select Yes from the Update Device Prompt. You can now follow steps one through three to add E-Mail Addresses or you can follow the Import and Export steps below. Copyright © 2005~2007 Kyocera Mita America, Inc All Rights Reserved. Version 8.0 Page 91 - Kyocera KM-3035 | iTag Specification/Setup/Operation Guide Ver. 8.0 - Page 93
for E-Mail Addresses. To configure Scan To PC open Device Manager by Clicking the Start Button - > Kyocera -> Device Manager -> KYOcapture Device Manager. 1. Highlight the desired device, in the example below I highlighted the LAB-KM5035. Select the Device Tables Tab and then the Common Book Tab - Kyocera KM-3035 | iTag Specification/Setup/Operation Guide Ver. 8.0 - Page 94
the Text File (XXX|Display Name|E-Mail Address|Organization). The Separator is the Pipe Character ( | ). You can begin entering the names of the other Scan To E-Mail Addresses. When completed click File and Save to save this file. Copyright © 2005~2007 Kyocera Mita America, Inc All Rights Reserved - Kyocera KM-3035 | iTag Specification/Setup/Operation Guide Ver. 8.0 - Page 95
From with in Device Manager, click on the desired MFP, Click the Device Tables Tab, E-Mail Addresses Tab and Click the Import Button. 6. Click the file you edited in Notepad (ScanToE-mail.TXT) and Click Open. Copyright © 2005~2007 Kyocera Mita America, Inc All Rights Reserved. Version 8.0 Page 94 - Kyocera KM-3035 | iTag Specification/Setup/Operation Guide Ver. 8.0 - Page 96
/Setup/Operation 7. The E-Mail Addresses you entered in the text file will then be shown in Device Manager. 8. If you have additional MFP devices, you can now import this text file into the remaining devices by following steps 5 - 7. E-Mails can now be sent from the Kyocera MFP. Copyright © 2005
-
 1
1 -
 2
2 -
 3
3 -
 4
4 -
 5
5 -
 6
6 -
 7
7 -
8
-
9
-
10
-
11
-
12
-
13
-
14
-
15
-
16
-
17
-
18
-
19
-
20
-
21
-
22
-
23
-
24
-
25
-
26
-
27
-
28
-
29
-
30
-
31
-
32
-
33
-
34
-
35
-
36
-
37
-
38
-
39
-
40
-
41
-
42
-
43
-
44
-
45
-
46
-
47
-
48
-
49
-
50
-
51
-
52
-
53
-
54
-
55
-
56
-
57
-
58
-
59
-
60
-
61
-
62
-
63
-
64
-
65
-
66
-
67
-
68
-
69
-
70
-
71
-
72
-
73
-
74
-
75
-
76
-
77
-
78
-
79
-
80
-
81
-
82
-
83
-
84
-
85
-
86
-
87
-
88
-
89
-
90
-
91
-
92
-
93
-
94
-
95
-
96
 |
 |
Specification/Setup/Operation Guide
for the
iTag
Configuration Utility