Kyocera KM-3530 2530/3530/4030 Operation Guide Rev 2C - Page 15
Operation panel - fax kit
 |
View all Kyocera KM-3530 manuals
Add to My Manuals
Save this manual to your list of manuals |
Page 15 highlights
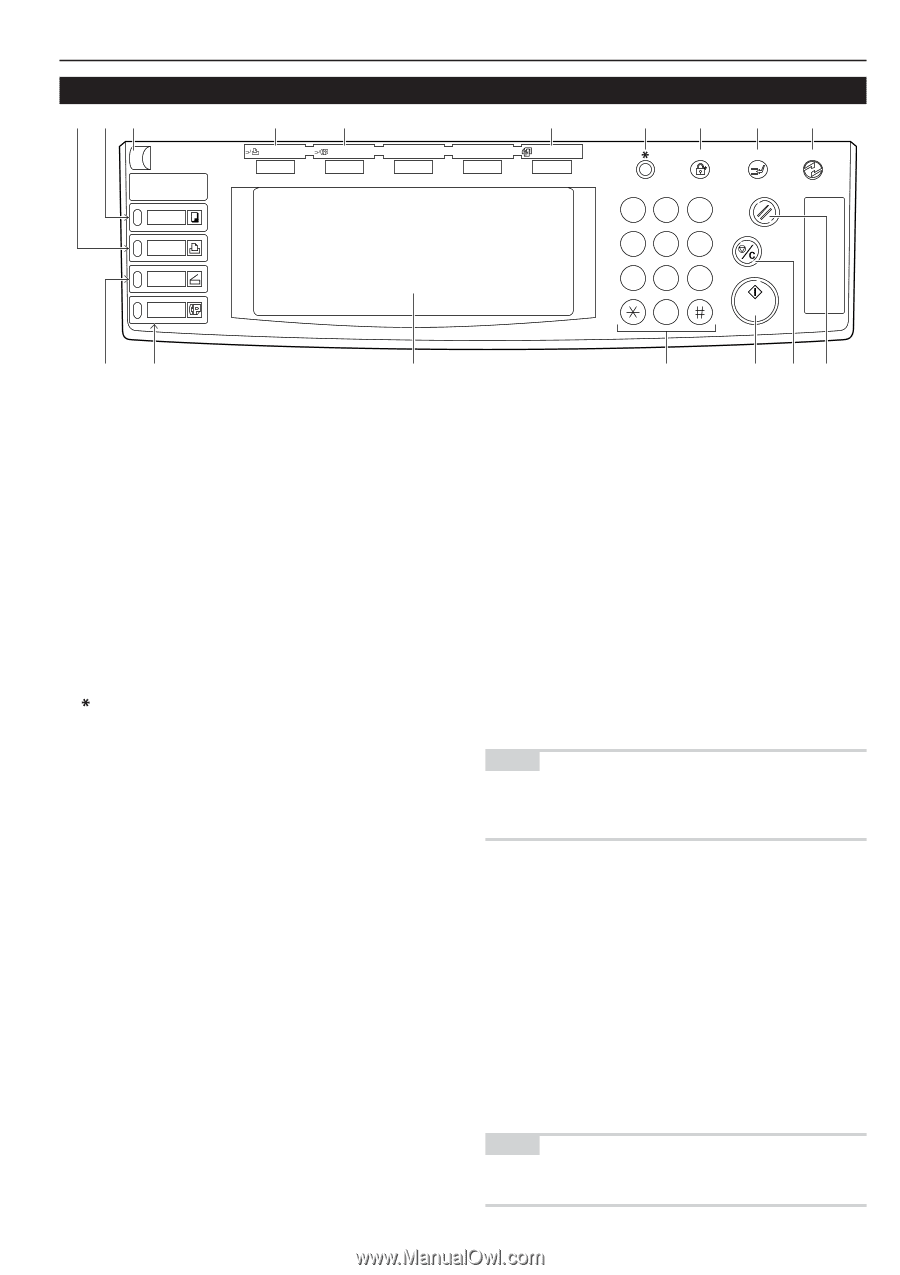
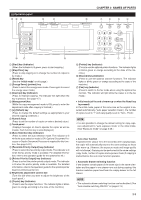
(2) Operation panel ED C B Printer Priority Output A Facsimile Priority Output Copier Printer Scanner Fax CHAPTER 2 NAMES OF PARTS 0 Auto Selection 7 6 5 4 Management Interrupt Energy Saver 1 2 3 Reset 456 789 0 Stop/ Clear Start F G 9 1 [Start] key (Indicator) (When the indicator is lit green, press to start copying.) 2 [Stop/Clear] key (Press to stop copying or to change the number of copies to be made.) 3 [Reset] key (See the "Initial mode" on this page.) 4 [Energy Saver] (preheat) key (Press to select the energy saver mode. Press again to cancel the energy saver mode.) 5 [Interrupt] key (Indicator) (Press to interrupt copying. The indicator will light when the key is pressed. See page 4-7.) 6 [Management] key (While the copy management mode is ON, press to enter the department code after copying is finished.) 7 [ ] (Default) key (Press to change the default settings as appropriate to your desired copying conditions.) 8 Numeric keys (Press to set the number of copies or enter a desired value.) 9 Touch panel (Displays messages on how to operate the copier as well as trouble. Each function key is also displayed.) 0 [Auto Selection] key (Indicator) (Press to select the auto selection mode. The indicator is lit while the auto selection mode is ON. Optional Document Processor or Duplex Document Processor is required for this function. See page 5-22.) A [Facsimile Priority Output] key (Indicator) (Press to select the fax priority output mode. The indicator is lit when the fax priority mode is available. For detailed information, refer to the operation guide for the optional fax kit.) B [Printer Priority Output] key (Indicator) (Press to select the printer priority output mode. The indicator is lit when the printer priority mode is available. For detailed information, refer to the operation guide for the optional printer board or printer/scanner kit.) C Brightness adjustment control dial (Turn this dial when you want to adjust the brightness of the touch panel.) D [Copier] key (Indicator) (Press to use the copier functions. The indicator lights or blinks green or orange according to the state of the machine.) 8 1 23 E [Printer] key (Indicator) (Press to use the optional printer functions. The indicator lights or blinks green or orange according to the state of the machine.) F [Scanner] key (Indicator) (Press to use the optional scanner functions. The indicator lights or blinks green or orange according to the state of the machine.) G [Fax] key (Indicator) (Press to switch to the fax mode when using the optional fax function. The indicator will light while the copier is in the fax mode.) • Initial mode (at the end of warm-up or when the Reset key is pressed) In the initial mode, paper of the same size as the original is selected automatically ("auto paper selection mode"), the number of copies is set to "1" and copy quality is set to "Text + Photo". NOTE • It is also possible to change the default setting for copy exposure adjustment to "auto exposure mode" in the initial mode. (See "Exposure mode" on page 6-25.) • Auto clear function A specified time (about 10 to 270 seconds) after copying stops, the copier will automatically return to the same settings as those after warm up. (However, the exposure mode and image quality will not change.) Copying can be performed at the same settings (copy mode, number of copies and exposure mode) if copying is started before the auto clear function operates. • Automatic drawer switching function If two drawers contain paper of the same size in the same orientation and the paper in one drawer runs out during copying, this function switches paper feed from the empty drawer to the full drawer. NOTE • The automatic drawer switching function can be disabled. (See "Auto casette switching ON/OFF" on page 6-13.) 2-3
-
 1
1 -
2
-
3
-
4
-
5
-
6
-
7
-
8
-
9
-
 10
10 -
 11
11 -
 12
12 -
 13
13 -
 14
14 -
 15
15 -
 16
16 -
 17
17 -
 18
18 -
 19
19 -
 20
20 -
21
-
22
-
23
-
24
-
25
-
26
-
27
-
28
-
29
-
30
-
31
-
32
-
33
-
34
-
35
-
36
-
37
-
38
-
39
-
40
-
41
-
42
-
43
-
44
-
45
-
46
-
47
-
48
-
49
-
50
-
51
-
52
-
53
-
54
-
55
-
56
-
57
-
58
-
59
-
60
-
61
-
62
-
63
-
64
-
65
-
66
-
67
-
68
-
69
-
70
-
71
-
72
-
73
-
74
-
75
-
76
-
77
-
78
-
79
-
80
-
81
-
82
-
83
-
84
-
85
-
86
-
87
-
88
-
89
-
90
-
91
-
92
-
93
-
94
-
95
-
96
-
97
-
98
-
99
-
100
-
101
-
102
-
103
-
104
-
105
-
106
-
107
-
108
-
109
-
110
-
111
-
112
-
113
-
114
-
115
-
116
-
117
-
118
-
119
-
120
-
121
-
122
-
123
-
124
-
125
-
126
-
127
-
128
-
129
-
130
-
131
-
132
-
133
-
134
-
135
-
136
-
137
-
138
-
139
-
140
-
141
-
142
-
143
-
144
-
145
-
146
 |
 |