Kyocera KM-5035 Print/Scan System (U) Operation Guide (Setup Edition) - Page 20
key. The Enter E-mail Destination, key. The Address Book
 |
View all Kyocera KM-5035 manuals
Add to My Manuals
Save this manual to your list of manuals |
Page 20 highlights
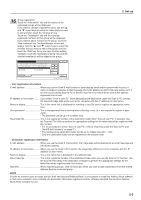
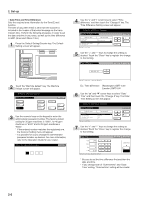
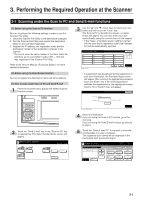
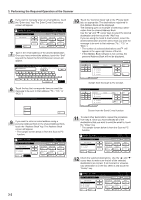
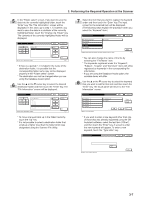
3. Performing the Required Operation at the Scanner 6 If you want to manually enter an email address, touch the "Enter dest." key. The Enter E-mail Destination screen will appear. 7 Type in the email address of the desired destination. Once you have entered the address, touch the "End" key and the Select the Kind of Receiver screen will appear. 10 Touch the "Common book" tab or the "Private book" tab, as appropriate. The destinations registered in that Address Book will be displayed. The following gives an example of selecting a destination from the shared Address Book. Use the "L" and "M" cursor keys to select the desired destination and then touch the "Add" key. If you are using the Send E-mail function, select the desired destination and then select how you want the message to be sent to that address ("To:", "CC:" or "BCC:"). * The number of selected destinations and will appear in the upper right corner of the list. * If the Address Book software is not running, the personal Address Book will not be displayed. 8 Touch the key that corresponds how you want the message to be sent to that address ("To:", "CC:" or "BCC:"). Screen from the Scan to PC function 9 If you want to enter an email address using a personal Address Book or the shared Address Book, touch the "Address Book" key. The Address Book screen will appear. * The sample screen below is from the Scan to PC function. Screen from the Send E-mail function 11 To select other destinations, repeat the procedure from step 6. Once you have selected all of the destinations that you want to send the email to, touch the "Close" key. * The sample screen below is from the Scan to PC function. 12 Check the selected destinations. Use the "L" and "M" cursor keys to make sure that all of the selected destinations are correct. If an incorrect or unnecessary destination is in the list, select it and touch the "Delete" key. 3-2
-
 1
1 -
2
-
3
-
4
-
5
-
6
-
7
-
8
-
9
-
10
-
11
-
12
-
13
-
14
-
 15
15 -
 16
16 -
 17
17 -
 18
18 -
 19
19 -
 20
20 -
 21
21 -
 22
22 -
 23
23 -
 24
24 -
 25
25 -
26
-
27
-
28
-
29
-
30
-
31
-
32
 |
 |
