Kyocera KM-6030 Printing System (V) Operation Guide (Setup Edition) Rev-1
Kyocera KM-6030 Manual
 |
View all Kyocera KM-6030 manuals
Add to My Manuals
Save this manual to your list of manuals |
Kyocera KM-6030 manual content summary:
- Kyocera KM-6030 | Printing System (V) Operation Guide (Setup Edition) Rev-1 - Page 1
Printing System (V) Operation Guide Set-up Edition - Kyocera KM-6030 | Printing System (V) Operation Guide (Setup Edition) Rev-1 - Page 2
- Kyocera KM-6030 | Printing System (V) Operation Guide (Setup Edition) Rev-1 - Page 3
set-up procedures explained there. The Functions Edition of the Operation Guide explains how to perform printing, method of various settings, and method of operating from a computer. Using the Operation Guide (On-Line Manual) The Operation Guide (On-Line Manual) is included in the supplied CD-ROM as - Kyocera KM-6030 | Printing System (V) Operation Guide (Setup Edition) Rev-1 - Page 4
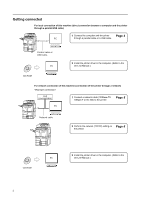
2 Install the printer driver in the computer. (Refer to the On-Line Manual.) For network connection of this machine (connection of the printer through a network) 1 Connect a network cable (100Base-TX, 10Base-T or the like) to the printer. Page 5 2 Perform the network (TCP/IP - Kyocera KM-6030 | Printing System (V) Operation Guide (Setup Edition) Rev-1 - Page 5
1 Preparations ...1 Names of parts ...1 Main body ...1 Operation panel ...2 Accessories ...3 Items to be prepared by user ...3 2 Set-up ...4 Connecting the printer cable ...4 Connecting the network cable ...5 Installing the software ...6 Setting the network (TCP/IP) ...6 3 Canceling printing 10 iii - Kyocera KM-6030 | Printing System (V) Operation Guide (Setup Edition) Rev-1 - Page 6
iv - Kyocera KM-6030 | Printing System (V) Operation Guide (Setup Edition) Rev-1 - Page 7
to The Functions Edition of the Operation Guide. 2 USB interface connector - USB interface based on USB2.0. Use a USB cable to connect to a USB port of a computer. 3 Network interface connector - Use a 10Base-T/100Base-TX network cable to connect to a network. 4 Parallel interface connector - Use - Kyocera KM-6030 | Printing System (V) Operation Guide (Setup Edition) Rev-1 - Page 8
3 Touch panel - Displays the status of the printer and various keys for operation. 4 Keypad - Use these keys when you want to enter a desired value Menu Cancel GO 5 6 7 5 [Printer Menu] - Press this key to perform printer initial setting. 6 [Cancel] - Press this key to cancel printing or to - Kyocera KM-6030 | Printing System (V) Operation Guide (Setup Edition) Rev-1 - Page 9
Accessories • CD-ROM: 2 pcs. • Operation Guide (this document) Preparations Items to be prepared by user • For parallel connection of the printer: Parallel cable (based on IEEE1284, shorter than 1.5 m) • For USB connection of the printer: USB2.0 compatible cable (based on High- - Kyocera KM-6030 | Printing System (V) Operation Guide (Setup Edition) Rev-1 - Page 10
off the power of the computer to be connected. 2 Connect the printer cable to the parallel interface connector or the USB interface connector located on the rear right of this machine. 3 Connect the other side of the printer cable to the parallel interface or the USB interface of the computer. 4 - Kyocera KM-6030 | Printing System (V) Operation Guide (Setup Edition) Rev-1 - Page 11
cable to the network interface connector located on the rear right of this machine. 3 Connect the other side of the network cable to the hub (concentrator). 4 Turn the main power switch of this machine ON ( | ). 5 Perform the network setting. For details, refer to Setting the network (TCP/IP) on - Kyocera KM-6030 | Printing System (V) Operation Guide (Setup Edition) Rev-1 - Page 12
. Check with your network administrator BEFORE performing this setting. • If you are using a DHCP or BOOTP server to automatically configure the IP address, you will not need to change the IP address because DHCP or BOOTP server configuration is already enabled as the factory default setting. • To - Kyocera KM-6030 | Printing System (V) Operation Guide (Setup Edition) Rev-1 - Page 13
On On On Off 6 Press [On] located under TCP/IP. Parallel Network USB Printer menu TCP/IP Set-up Change # B ack 7 Press [S] or [T] to select DHCP and press [Change #]. TCP/IP Off On Printer menu - Interface - Network Setting Item DHCP BOOTP IP Address Subnet Mask Gateway Value Off Off - Kyocera KM-6030 | Printing System (V) Operation Guide (Setup Edition) Rev-1 - Page 14
key. B ack Close If you press [Back], the entered address is cleared and the previous address is set again. 10 141 110 204 (with #key) Interface - Network - TCP/IP 15 Press [S] or [T] to select Subnet Mask and press [Change #]. B ack Close 16 Set the address using the same procedure as IP - Kyocera KM-6030 | Printing System (V) Operation Guide (Setup Edition) Rev-1 - Page 15
]. B ack Close 20 Press [Close]. Interface - Network Setting Item DHCP BOOTP IP Address Subnet Mask Gateway Value Off Off 10. 141. 110. 204 255. 255. 255. 0 10. 130. 112. 108 Change # ting Item s Page Value On On On Off Network USB Close Change # 21 Press [Close]. The display returns to - Kyocera KM-6030 | Printing System (V) Operation Guide (Setup Edition) Rev-1 - Page 16
printing and clear the data, perform the following procedure. Press [Cancel]. rinting. Count/Set A4 Plain APS 1 sided Output Left tray Cancel In . Page 16 A4 User name: user1 Job name: 3 Select the interface through which printing to be canceled is performed. Select interface to cancel - Kyocera KM-6030 | Printing System (V) Operation Guide (Setup Edition) Rev-1 - Page 17
4 Printing is canceled. Canceling data. Off line Orig. Page 16 A4 User name: user1 Job name: Canceling printing Cancel 11 - Kyocera KM-6030 | Printing System (V) Operation Guide (Setup Edition) Rev-1 - Page 18
Canceling printing 12 - Kyocera KM-6030 | Printing System (V) Operation Guide (Setup Edition) Rev-1 - Page 19
- Kyocera KM-6030 | Printing System (V) Operation Guide (Setup Edition) Rev-1 - Page 20
Revision 1.0 2005.2 303JT56010 2005 KYOCERA MITA Corporation All rights reserved.
-
 1
1 -
 2
2 -
 3
3 -
 4
4 -
 5
5 -
 6
6 -
 7
7 -
8
-
9
-
10
-
11
-
12
-
13
-
14
-
15
-
16
-
17
-
18
-
19
-
20
 |
 |

Printing System (V)
Operation Guide
Set-up Edition