Kyocera KM-8030 KX Driver User Guide Version 5.90 - Page 35
Collate, Non-Collating
 |
View all Kyocera KM-8030 manuals
Add to My Manuals
Save this manual to your list of manuals |
Page 35 highlights
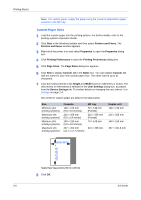
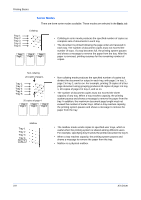
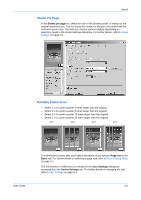
Printing Basics Collate 1 Open the Properties dialog box. 1 2 From the Destination list, select a face-down destination, such as Finisher (face- down) or Top Tray (face-down). 2 3 Select the Collate check box. 3 4 Select the number of complete sets in the Number of copies box. When printing using the collate option, specify the number of copies not to exceed the number of trays. The document page length must not exceed the tray capacity (for example, 200 sheets). 4 5 Click OK to return to the Print dialog box, and click OK to begin printing. The specified number of copies is produced in separate trays. 5 Non-Collating Clearing the Collate check box produces page 1 in tray 1 and page 2 in tray 2. 1 Open the Properties dialog box. 1 2 From the Destination list, select Finisher (face-down) or Top Tray (face-down). 2 3 Clear the Collate check box. 3 4 Click OK to return to the application's Print dialog box and begin printing. The specified number of copies of each page is delivered to each tray. 4 User Guide 3-10
-
 1
1 -
2
-
3
-
4
-
5
-
6
-
7
-
8
-
9
-
10
-
11
-
12
-
13
-
14
-
15
-
16
-
17
-
18
-
19
-
20
-
21
-
22
-
23
-
24
-
25
-
26
-
27
-
28
-
29
-
 30
30 -
 31
31 -
 32
32 -
 33
33 -
 34
34 -
 35
35 -
 36
36 -
 37
37 -
 38
38 -
 39
39 -
 40
40 -
41
-
42
-
43
-
44
-
45
-
46
-
47
-
48
-
49
-
50
-
51
-
52
-
53
-
54
-
55
-
56
-
57
-
58
-
59
-
60
-
61
-
62
-
63
-
64
-
65
-
66
-
67
-
68
-
69
-
70
-
71
-
72
-
73
-
74
-
75
-
76
-
77
-
78
-
79
-
80
-
81
-
82
-
83
-
84
-
85
-
86
-
87
-
88
-
89
-
90
-
91
-
92
-
93
-
94
-
95
-
96
-
97
-
98
-
99
-
100
-
101
-
102
-
103
-
104
-
105
 |
 |