Kyocera KM-8030 KX Driver User Guide Version 5.90 - Page 70
Print Jobs in Custom Boxes, Quick Copy, Properties, Print, Document Box, Start, Job storage e-MPS
 |
View all Kyocera KM-8030 manuals
Add to My Manuals
Save this manual to your list of manuals |
Page 70 highlights
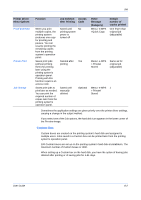
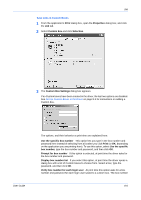
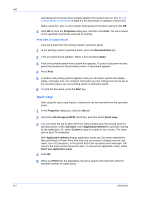
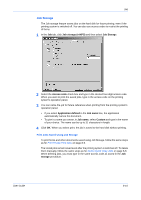
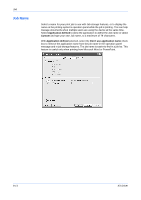
Job and password must have been already added to the Custom box list. See Set Up Custom Boxes in the Driver on page 8-3 for instructions on adding a Custom box. Make a selection, type in a box number and password if needed, and then click OK.5 4 Click OK to close the Properties dialog box, and then click Print. The job is saved to the specified Custom box and held for printing. 6 Print Jobs in Custom Boxes Jobs are printed from the printing system's operation panel. 1 At the printing system's operation panel, press the Document Box key. 1 2 A list of custom boxes appears. Select a box and press Open. 2 3 A list of documents saved in the custom box appears. To select a document to print, press the checkbox in the left hand column. A checkmark appears. 3 4 Press Print. 4 5 A window with printing options appears. Here you can select options like duplex, staple, and paper size. For complete information on print settings that can be set at the operation panel, see your printing system's Operation Guide. 5 6 To print the document, press the Start key. 6 Quick Copy After using the quick copy feature, a document can be reprinted from the operation panel. 1 In the Properties dialog box, click the Job tab. 1 2 Select the Job storage (e-MPS) check box, and then select Quick copy. 2 3 You can name the job for later reference when printing from the printing system's operation panel. Under Job name, select Application defined for automatic naming by the application. Or, select Custom to type in a name of your choice. The name can be up to 79 characters. 3 With Application defined (display application name and Job name) selected for Microsoft Word or Power Point jobs only, you can choose to display only the Job name, up to 32 characters, in the job list and at the operation panel message. Job name is the same as the document name. To remove the application name, select Don't use application name. 4 Click OK. 4 5 When you Print from the application, the job is saved to the hard disk while the specified number of copies prints. 5 8-7 KX Driver
-
 1
1 -
2
-
3
-
4
-
5
-
6
-
7
-
8
-
9
-
10
-
11
-
12
-
13
-
14
-
15
-
16
-
17
-
18
-
19
-
20
-
21
-
22
-
23
-
24
-
25
-
26
-
27
-
28
-
29
-
30
-
31
-
32
-
33
-
34
-
35
-
36
-
37
-
38
-
39
-
40
-
41
-
42
-
43
-
44
-
45
-
46
-
47
-
48
-
49
-
50
-
51
-
52
-
53
-
54
-
55
-
56
-
57
-
58
-
59
-
60
-
61
-
62
-
63
-
64
-
 65
65 -
 66
66 -
 67
67 -
 68
68 -
 69
69 -
 70
70 -
 71
71 -
 72
72 -
 73
73 -
 74
74 -
 75
75 -
76
-
77
-
78
-
79
-
80
-
81
-
82
-
83
-
84
-
85
-
86
-
87
-
88
-
89
-
90
-
91
-
92
-
93
-
94
-
95
-
96
-
97
-
98
-
99
-
100
-
101
-
102
-
103
-
104
-
105
 |
 |