Kyocera KM-8030 KX Driver User Guide Version 5.90 - Page 8
Vista - Custom Installation, Add Port Wizard in Vista, continued from Windows XP - USB - kx driver
 |
View all Kyocera KM-8030 manuals
Add to My Manuals
Save this manual to your list of manuals |
Page 8 highlights
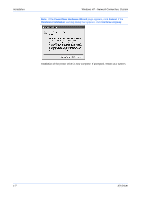
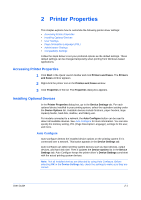
Installation Vista - Custom Installation Vista - Custom Installation 1 In the Installation Method page, select a custom installation then click Next. 1 2 In the Custom Installation page, ensure that the KX Driver is selected as the product and then click Next. 1 3 The Discover Printing System page appears. 2 To find a printing system already turned on and connected to the network, click Discover. and go to step 4 on page 1-3. -OR- To manually select your printing system and port select Custom select and then click Next. 4 The Printer Port page appears. If the port you want to use appears in the Port name list, select it and click Next, then go to step 4 on page 1-3. 3 To create a new port, click Add Port and then click Next. The Add Port Wizard page appears. Add Port Wizard in Vista 1 At the Welcome page, ensure that the printing device is on and connected to the network, then click Next. 1 2 Type the printer name or IP address and then click Next. 2 3 After the port has been created, the Completing the Add Standard TCP/P Printer Port Wizard page shown below appears. Click Finish to close the Add Port Wizard page and return to the installation wizard. 3 Vista Custom Installation, continued from page 1-3 4 The Printing System page appears. From the list, select the Printing System to install, and click Next. 4 5 In Printer Settings you can create a custom name to the printing system. This name appears in Windows Printers and Faxes and in the printer lists in applications. You can also choose to share this printer with others or set this printer as the default printer. Make your selections and then click Next. 5 6 In the Confirm Settings page, click Install if the settings are correct. Click Cancel to correct the settings. 6 7 The Printer Installed Successfully page appears. Click Finish to exit the Printer Installation Wizard and return to the CD-ROM main menu. 7 The installation of the printer is now complete. If prompted, restart your system. Windows XP - USB, Custom 1 Ensure that your printer and computer are connected using the Universal Serial Bus (USB) cable. 1 1-3 KX Driver
-
 1
1 -
2
-
 3
3 -
 4
4 -
 5
5 -
 6
6 -
 7
7 -
 8
8 -
 9
9 -
 10
10 -
 11
11 -
 12
12 -
 13
13 -
14
-
15
-
16
-
17
-
18
-
19
-
20
-
21
-
22
-
23
-
24
-
25
-
26
-
27
-
28
-
29
-
30
-
31
-
32
-
33
-
34
-
35
-
36
-
37
-
38
-
39
-
40
-
41
-
42
-
43
-
44
-
45
-
46
-
47
-
48
-
49
-
50
-
51
-
52
-
53
-
54
-
55
-
56
-
57
-
58
-
59
-
60
-
61
-
62
-
63
-
64
-
65
-
66
-
67
-
68
-
69
-
70
-
71
-
72
-
73
-
74
-
75
-
76
-
77
-
78
-
79
-
80
-
81
-
82
-
83
-
84
-
85
-
86
-
87
-
88
-
89
-
90
-
91
-
92
-
93
-
94
-
95
-
96
-
97
-
98
-
99
-
100
-
101
-
102
-
103
-
104
-
105
 |
 |