Kyocera KM-C830D KX Driver User Guide Version 5.90 - Page 10
Installing Optional Components, Standard TCP/IP Port - windows 7 drivers
 |
View all Kyocera KM-C830D manuals
Add to My Manuals
Save this manual to your list of manuals |
Page 10 highlights
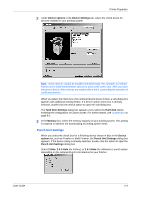
Installation Windows XP - Network Connection, Custom 2 In the Connection Type page, select Network connection and then click Next. 2 3 In the Network Port Type page select a port type. If you select Standard TCP/IP port, the installer automatically creates a new port if needed. 3 4 In the Printing System page, select the model to install, and click Next. 4 5 In Custom Installation select the software packages you want to install, and clear those not intended for installation. Click Next. 5 6 In Printer Settings, you can assign a name for the printing system. This name appears in Windows Printers and Faxes and in the printer lists in applications. You can also choose to share this printer with others or set this printer as the default printer. Make your selections and then click Next. 6 7 In the Standard TCP/IP Port dialog box, you can select Discover Printing System or Host name or IP address. 7 The Discover Printing System searches the network for the printer. After it is found select the printer and then click Next. To use Host name or IP address, type the IP address or host name and then click Next. 8 In the Confirm Settings page, click Install if the settings are correct. Click Cancel to correct the settings. 8 9 After the installation is complete, the Printer Installed Successfully page appears.9 The installation of the printer is now complete. If prompted, restart your system. 10 Installing Optional Components You can expand the functions of your printer driver by installing optional components that compliment the ways in which you use your printer. Available components may include Common Profiles and Plug-ins. A plug-in is a small computer program that interacts with a larger program to provide additional functionality. An example is Security Watermark, which is available for Kyocera printer drivers. Installing the plug-in adds Security Watermark functionality to the printer driver, adds a Security Watermark icon to the Advanced tab, and adds the dialog boxes that are used to set up a Security Watermark. 1 In the CD Main Menu select Advanced Tools. 1 2 On the Advanced Tools page, select Optional Printer Components. 2 3 The Optional Components Wizard dialog box appears. Click Next to install optional components or Cancel to close the wizard. 3 4 The Select Printer page appears. From the list, select the optional components you want to install and click Next. 4 5 The Select Components page appears. Select the components to install, and click Next. 5 Other pages, such as Select Common Profiles and Select Plug-In Modules may appear, depending on what selections are made here. 1-5 KX Driver
-
 1
1 -
2
-
3
-
4
-
 5
5 -
 6
6 -
 7
7 -
 8
8 -
 9
9 -
 10
10 -
 11
11 -
 12
12 -
 13
13 -
 14
14 -
 15
15 -
16
-
17
-
18
-
19
-
20
-
21
-
22
-
23
-
24
-
25
-
26
-
27
-
28
-
29
-
30
-
31
-
32
-
33
-
34
-
35
-
36
-
37
-
38
-
39
-
40
-
41
-
42
-
43
-
44
-
45
-
46
-
47
-
48
-
49
-
50
-
51
-
52
-
53
-
54
-
55
-
56
-
57
-
58
-
59
-
60
-
61
-
62
-
63
-
64
-
65
-
66
-
67
-
68
-
69
-
70
-
71
-
72
-
73
-
74
-
75
-
76
-
77
-
78
-
79
-
80
-
81
-
82
-
83
-
84
-
85
-
86
-
87
-
88
-
89
-
90
-
91
-
92
-
93
-
94
-
95
-
96
-
97
-
98
-
99
-
100
-
101
-
102
-
103
-
104
-
105
 |
 |