Kyocera KM-C830D KX Driver User Guide Version 5.90 - Page 13
Printer Properties, Accessing Printer Properties, Installing Optional Devices, Auto Con
 |
View all Kyocera KM-C830D manuals
Add to My Manuals
Save this manual to your list of manuals |
Page 13 highlights
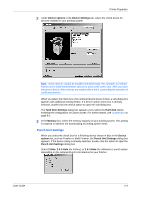
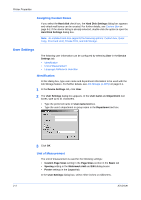
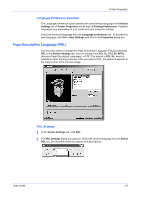
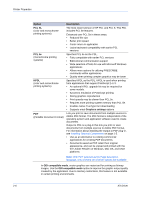
2 Printer Properties Printer Properties This chapter explains how to customize the following printer driver settings: • Accessing Printer Properties • Installing Optional Devices • User Settings • Page Description Language (PDL) • Administrator Settings • Compatibility Settings Follow the steps below to set your preferred options as the default settings. These default settings can be changed temporarily when printing from Windows-based applications. Accessing Printer Properties 1 Click Start in the Quick Launch toolbar and click Printers and Faxes. The Printers and Faxes window appears. 1 2 Right-click the printer icon in the Printers and Faxes window. 2 3 Click Properties in the list. The Properties dialog box appears. 3 Installing Optional Devices In the Printer Properties dialog box, go to the Device Settings tab. For each optional device installed in your printing system, select the equivalent setting under the Device Options list. Available devices include finishers, paper feeders, large capacity feeder, hard disk, mailbox, and folding unit. For models connected to a network, the Auto Configure button can be used to detect all available devices. See Auto Configure for more information. You can also specify the memory setting, PDL (Page Description Language), settings for the user, and more. Auto Configure Auto Configure detects the installed device options on the printing system if it is connected over a network. This button appears in the Device Settings tab. Auto Configure can detect printing system devices such as input devices, output devices, and hard disk size. Then it updates the Device options list in the Device Settings tab. Auto Configure keeps the printer driver's Device Settings consistent with the actual printing system devices. Note: Not all installed devices are detected by using Auto Configure. Before selecting OK in the Device Settings tab, check the settings to make sure they are correct. User Guide 2-1
-
 1
1 -
2
-
3
-
4
-
5
-
6
-
7
-
 8
8 -
 9
9 -
 10
10 -
 11
11 -
 12
12 -
 13
13 -
 14
14 -
 15
15 -
 16
16 -
 17
17 -
 18
18 -
19
-
20
-
21
-
22
-
23
-
24
-
25
-
26
-
27
-
28
-
29
-
30
-
31
-
32
-
33
-
34
-
35
-
36
-
37
-
38
-
39
-
40
-
41
-
42
-
43
-
44
-
45
-
46
-
47
-
48
-
49
-
50
-
51
-
52
-
53
-
54
-
55
-
56
-
57
-
58
-
59
-
60
-
61
-
62
-
63
-
64
-
65
-
66
-
67
-
68
-
69
-
70
-
71
-
72
-
73
-
74
-
75
-
76
-
77
-
78
-
79
-
80
-
81
-
82
-
83
-
84
-
85
-
86
-
87
-
88
-
89
-
90
-
91
-
92
-
93
-
94
-
95
-
96
-
97
-
98
-
99
-
100
-
101
-
102
-
103
-
104
-
105
 |
 |