Kyocera KM-C830D KX Driver User Guide Version 5.90 - Page 29
Printing on Paper of Non-Standard Sizes, Properties, Print Size, Media type
 |
View all Kyocera KM-C830D manuals
Add to My Manuals
Save this manual to your list of manuals |
Page 29 highlights
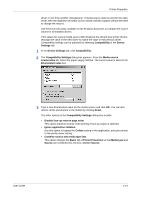
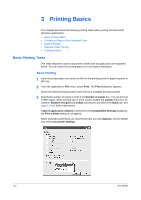
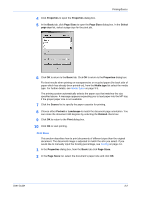
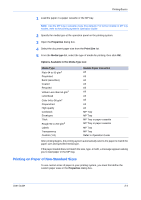
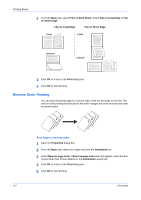
Printing Basics 1 Load the paper in a paper cassette or the MP tray. 1 Note: Use the MP tray in cassette mode (the default). For further details on MP tray modes, refer to the printing system's Operation Guide. 2 Specify the media type at the operation panel on the printing system. 2 3 Open the Properties dialog box. 3 4 Select the document paper size from the Print Size list. 4 5 From the Media type list, select the type of media for printing, then click OK. 5 Options Available in the Media Type List Media Type Plain 64 to 90 g/m2 Preprinted Bond (securities) Coated Recycled Vellum Less than 64 g/m2 Letterhead Color 64 to 90 g/m2 Prepunched High quality Cardstock Envelopes Thick Rough 90 to 200 g/m2 Labels Transparency Custom (1-8) Usable Paper Cassettes All All All All All All All All All All MP Tray MP Tray MP Tray or paper cassette MP Tray or paper cassette MP Tray MP Tray Refer to Operation Guide After printing begins, the printing system automatically selects the paper to match the paper size and specified media type. If the paper loaded does not match the size, type, or both, a message appears asking you to load paper in the MP tray. Printing on Paper of Non-Standard Sizes To use custom sizes of paper in your printing system, you must first define the custom paper sizes in the Properties dialog box. User Guide 3-4
-
 1
1 -
2
-
3
-
4
-
5
-
6
-
7
-
8
-
9
-
10
-
11
-
12
-
13
-
14
-
15
-
16
-
17
-
18
-
19
-
20
-
21
-
22
-
23
-
 24
24 -
 25
25 -
 26
26 -
 27
27 -
 28
28 -
 29
29 -
 30
30 -
 31
31 -
 32
32 -
 33
33 -
 34
34 -
35
-
36
-
37
-
38
-
39
-
40
-
41
-
42
-
43
-
44
-
45
-
46
-
47
-
48
-
49
-
50
-
51
-
52
-
53
-
54
-
55
-
56
-
57
-
58
-
59
-
60
-
61
-
62
-
63
-
64
-
65
-
66
-
67
-
68
-
69
-
70
-
71
-
72
-
73
-
74
-
75
-
76
-
77
-
78
-
79
-
80
-
81
-
82
-
83
-
84
-
85
-
86
-
87
-
88
-
89
-
90
-
91
-
92
-
93
-
94
-
95
-
96
-
97
-
98
-
99
-
100
-
101
-
102
-
103
-
104
-
105
 |
 |