Kyocera KM-C830D KX Driver User Guide Version 5.90 - Page 30
Custom Paper Sizes, Printers and Faxes
 |
View all Kyocera KM-C830D manuals
Add to My Manuals
Save this manual to your list of manuals |
Page 30 highlights
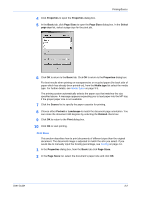
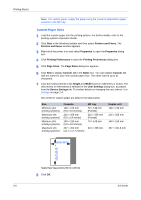
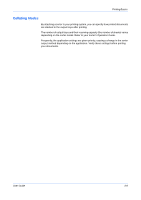
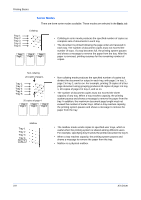
Printing Basics Note: For custom paper, supply the paper using the universal (adjustable) paper cassette or the MP tray. Custom Paper Sizes 1 Load the custom paper into the printing system. For further details, refer to the printing system's Operation Guide. 1 2 Click Start in the Windows taskbar and then select Printers and Faxes. The Printers and Faxes window appears. 2 3 Right-click the printer icon and select Properties to open the Properties dialog box. 3 4 Click Printing Preferences to open the Printing Preferences dialog box. 4 5 Click Page Sizes. The Page Sizes dialog box appears. 5 6 Click New to display Custom_01 in the Name box. You can replace Custom_01 with the name for your new custom paper size. The name can be up to 31 characters. 6 7 Type the measurements in the Height and Width boxes in millimeters or inches. The unit (inches or millimeters) is selected in the User Settings dialog box, accessed from the Device Settings tab. For further details on changing the unit, refer to User Settings on page 2-4. 7 Size limits for custom paper are listed in the table below. 8 Size Minimum (A4 printing systems) Maximum (A4 printing systems) Minimum (A3 printing systems) Maximum (A3 printing systems) Cassette 148 × 210 mm (5.8 x 8.3 inches) 216 × 356 mm (8.5 x 14 inches) 148 × 210 mm (5.8 x 8.3 inches) 297 × 450 mm (11.7 x 17.7 inches) MP tray 70 × 148 mm (Portrait) 216 × 356 mm (Portrait) 70 × 148 mm 310 × 458 mm Duplex unit 148 × 216 mm 216 × 356 mm 148 × 210 mm 297 × 431.8 mm Width = 150 mm Height = 200 mm Sample Paper Measurements (150 mm x 200 mm) 8 Click OK. 3-5 9 KX Driver
-
 1
1 -
2
-
3
-
4
-
5
-
6
-
7
-
8
-
9
-
10
-
11
-
12
-
13
-
14
-
15
-
16
-
17
-
18
-
19
-
20
-
21
-
22
-
23
-
24
-
 25
25 -
 26
26 -
 27
27 -
 28
28 -
 29
29 -
 30
30 -
 31
31 -
 32
32 -
 33
33 -
 34
34 -
 35
35 -
36
-
37
-
38
-
39
-
40
-
41
-
42
-
43
-
44
-
45
-
46
-
47
-
48
-
49
-
50
-
51
-
52
-
53
-
54
-
55
-
56
-
57
-
58
-
59
-
60
-
61
-
62
-
63
-
64
-
65
-
66
-
67
-
68
-
69
-
70
-
71
-
72
-
73
-
74
-
75
-
76
-
77
-
78
-
79
-
80
-
81
-
82
-
83
-
84
-
85
-
86
-
87
-
88
-
89
-
90
-
91
-
92
-
93
-
94
-
95
-
96
-
97
-
98
-
99
-
100
-
101
-
102
-
103
-
104
-
105
 |
 |