Kyocera KM-C830D KX Driver User Guide Version 5.90 - Page 44
Positioning Options for Finishing Edge, Custom Finishing Edge Settings
 |
View all Kyocera KM-C830D manuals
Add to My Manuals
Save this manual to your list of manuals |
Page 44 highlights
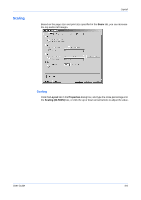
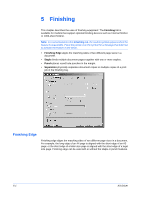
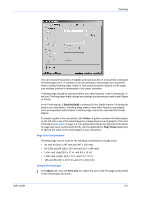
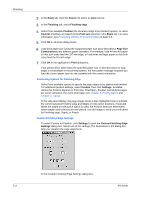
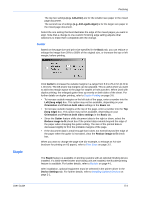
Finishing 2 In the Basic tab, from the Source list select an Auto source. 2 3 In the Finishing tab, select Finishing edge. 3 4 Select from available Position (the document edge to be finished) options, or select Custom. Positions are based on the Print size selection in the Basic tab. For more information, see Positioning Options for Finishing Edge on page 5-3. 4 5 Click OK in all driver dialog boxes. 5 6 Load each paper size (using the supported paper size pairs described in Page Size Combinations) into different paper cassettes. For example, load A4 and A3 paper so that both sizes feed the 297 mm edge; or load letter and legal paper so that both sizes feed the 8.5 inch edge. 6 7 Click OK in the application's Print dialog box. 7 If the printer driver determines the specified paper size or direction (short or long edge) is not available in the printing system, the front panel message requests you load the correct paper size into the cassette with the correct orientation. Positioning Options for Finishing Edge Select from available options to specify the page edges to be aligned and finished. For additional position settings, select Custom, then click Settings. Available options for Position depend on Print size, Orientation, Booklet, and Multiple pages per sheet selections. For more information see Chapter 3, Printing Basics and Chapter 4, Layout. In the side panel display, the page image shows a blue highlighted strip to indicate the current selected finishing edge and Staple or hole punch positions, if selected. When the staple or hole punch option is used, the Position selection determines where staples and hole punches are placed. Use this image to verify your selections for Finishing edge, Staple, or Punch. Custom Finishing Edge Settings To select Custom for Position, click Settings to open the Custom Finishing Edge Settings dialog box. Select one of the settings. The illustrations in the dialog box help you visualize the page alignments. In the Custom Finishing Edge Settings dialog box: 5-3 KX Driver
-
 1
1 -
2
-
3
-
4
-
5
-
6
-
7
-
8
-
9
-
10
-
11
-
12
-
13
-
14
-
15
-
16
-
17
-
18
-
19
-
20
-
21
-
22
-
23
-
24
-
25
-
26
-
27
-
28
-
29
-
30
-
31
-
32
-
33
-
34
-
35
-
36
-
37
-
38
-
 39
39 -
 40
40 -
 41
41 -
 42
42 -
 43
43 -
 44
44 -
 45
45 -
 46
46 -
 47
47 -
 48
48 -
 49
49 -
50
-
51
-
52
-
53
-
54
-
55
-
56
-
57
-
58
-
59
-
60
-
61
-
62
-
63
-
64
-
65
-
66
-
67
-
68
-
69
-
70
-
71
-
72
-
73
-
74
-
75
-
76
-
77
-
78
-
79
-
80
-
81
-
82
-
83
-
84
-
85
-
86
-
87
-
88
-
89
-
90
-
91
-
92
-
93
-
94
-
95
-
96
-
97
-
98
-
99
-
100
-
101
-
102
-
103
-
104
-
105
 |
 |