Kyocera KM-C830D KX Driver User Guide Version 5.90 - Page 6
Installation - supplies
 |
View all Kyocera KM-C830D manuals
Add to My Manuals
Save this manual to your list of manuals |
Page 6 highlights
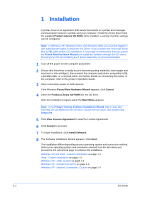
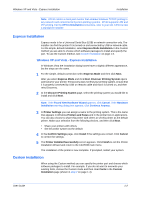
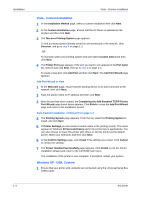
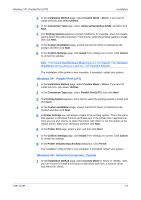
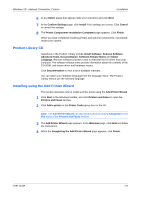
Installation 1 Installation A printer driver is an application that sends documents to a printer and manages communication between a printer and your computer. Install the printer driver from the supplied Product Library CD-ROM. Once installed, a variety of printer settings can be configured. Note: In Windows XP, Windows Vista, and Windows 2000, you must be logged in with administrator rights to install the KX Driver. If you connect the Universal Serial Bus (USB) cable before CD installation, it is strongly recommended that you cancel the Found New Hardware Wizard and install the software through the CD menu. Browsing the CD and installing each driver separately is not recommended. 1 Turn off the power for the computer and printer. 1 2 Ensure that the printer is ready to print (remove packing materials, insert paper and any toner or ink cartridges), then connect the computer and printer using either USB, a parallel cable, or a network cable. For further details on connecting the printer to the computer, refer to the printer's Operation Guide. 2 3 Once connected, power on both devices. 3 If the Windows Found New Hardware Wizard appears, click Cancel. 4 Insert the Product Library CD-ROM into the CD drive. 4 After the installation program starts the Main Menu appears. Note: If the Product Library Software Installation Wizard fails to start after inserting the CD-ROM into the CD drive, explore the CD drive, and double-click Setup.exe. 5 Click View License Agreement to read the License Agreement. 5 6 Click Accept to proceed. 6 7 To begin installation, click Install Software. 7 8 The Software Installation Wizard appears. Click Next. 8 The installation differs depending on your operating system and connection method. Select your operating system and connection method from the list below and proceed to the referenced page to continue the installation. Windows XP and Vista - Express Installation on page 1-2 Vista - Custom Installation on page 1-3 Windows XP - USB, Custom on page 1-3 Windows XP - Parallel Port (LPT) on page 1-4 Windows XP - Network Connection, Custom on page 1-4 1-1 KX Driver
-
 1
1 -
 2
2 -
 3
3 -
 4
4 -
 5
5 -
 6
6 -
 7
7 -
 8
8 -
 9
9 -
 10
10 -
 11
11 -
 12
12 -
13
-
14
-
15
-
16
-
17
-
18
-
19
-
20
-
21
-
22
-
23
-
24
-
25
-
26
-
27
-
28
-
29
-
30
-
31
-
32
-
33
-
34
-
35
-
36
-
37
-
38
-
39
-
40
-
41
-
42
-
43
-
44
-
45
-
46
-
47
-
48
-
49
-
50
-
51
-
52
-
53
-
54
-
55
-
56
-
57
-
58
-
59
-
60
-
61
-
62
-
63
-
64
-
65
-
66
-
67
-
68
-
69
-
70
-
71
-
72
-
73
-
74
-
75
-
76
-
77
-
78
-
79
-
80
-
81
-
82
-
83
-
84
-
85
-
86
-
87
-
88
-
89
-
90
-
91
-
92
-
93
-
94
-
95
-
96
-
97
-
98
-
99
-
100
-
101
-
102
-
103
-
104
-
105
 |
 |