Kyocera KM-C830D KX Driver User Guide Version 5.90 - Page 66
Register a Custom Box, Set Up Custom Boxes in the Driver, Document Box, Edit Box, Change, Password
 |
View all Kyocera KM-C830D manuals
Add to My Manuals
Save this manual to your list of manuals |
Page 66 highlights
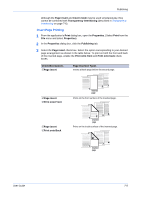
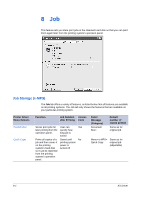
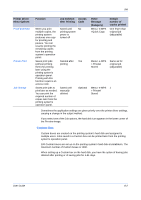
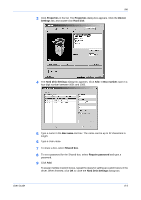
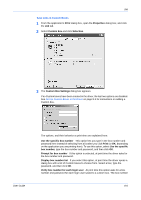
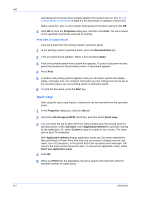
Job Register a Custom Box Before you can send a document to a Custom box, you must register a Custom box at the printing system's operation panel. 1 At the printing system's operation panel, press the Document Box key. 1 2 A list of Custom boxes that are already registered, if any, appears on the operation panel. Press the Edit Box key and then on the next screen press the Add key. 2 3 To assign the box number, press the Box Number Change key. Use the + and - keys to enter the box number and then press OK. 3 4 To give the box a name, press the Box Name Change key. Enter a name using the alphanumeric keypad and then press Ok. 4 5 Press the Box Password Change key, then press the Password key and enter the password using the alphanumeric keypad, and then press OK. 5 6 Next, press Confirm Password and reenter the password and then press OK. 6 7 Press OK again to finish entering the password. 7 8 If you would like to restrict the size of Custom boxes that can be created, press the Usage Restriction Change key and then use the + and - keys to enter a number, and then press OK. 8 9 If you would like to set a time limit on how long the hard disk saves print jobs in this box, press the Auto File Deletion Change key. Use the + and - keys to set the number of days to save jobs, and then press OK. 9 10 When you have completed the Custom box settings, press the Register key. 10 Set Up Custom Boxes in the Driver Use this procedure to set up Custom boxes in your printer driver (on your computer) that match the custom boxes registered at the printing system's operation panel. 1 Click Start in the Windows task bar, and click Printers and Faxes to open the Printers and Faxes window. 1 2 Right-click the icon for your printing system in the Printers and Faxes window. A list appears. 2 8-3 KX Driver
-
 1
1 -
2
-
3
-
4
-
5
-
6
-
7
-
8
-
9
-
10
-
11
-
12
-
13
-
14
-
15
-
16
-
17
-
18
-
19
-
20
-
21
-
22
-
23
-
24
-
25
-
26
-
27
-
28
-
29
-
30
-
31
-
32
-
33
-
34
-
35
-
36
-
37
-
38
-
39
-
40
-
41
-
42
-
43
-
44
-
45
-
46
-
47
-
48
-
49
-
50
-
51
-
52
-
53
-
54
-
55
-
56
-
57
-
58
-
59
-
60
-
 61
61 -
 62
62 -
 63
63 -
 64
64 -
 65
65 -
 66
66 -
 67
67 -
 68
68 -
 69
69 -
 70
70 -
 71
71 -
72
-
73
-
74
-
75
-
76
-
77
-
78
-
79
-
80
-
81
-
82
-
83
-
84
-
85
-
86
-
87
-
88
-
89
-
90
-
91
-
92
-
93
-
94
-
95
-
96
-
97
-
98
-
99
-
100
-
101
-
102
-
103
-
104
-
105
 |
 |