Kyocera KM-C830D KX Driver User Guide Version 5.90 - Page 68
Import and Export a Custom Box List, Hard Disk Settings
 |
View all Kyocera KM-C830D manuals
Add to My Manuals
Save this manual to your list of manuals |
Page 68 highlights
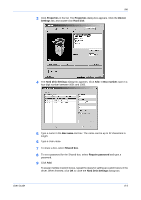
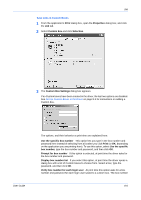
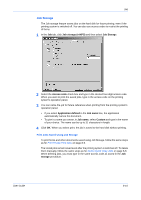
Job To delete a Custom box that you created, select the Custom box from the Box Number list and click Delete. Import and Export a Custom Box List This section explains how to import and export Custom box lists. You can save the list of Custom boxes created in the previous section onto your personal computer or network. Once saved, the list can be imported into other printer drivers. Export 1 Click Start in the Windows task bar, and click Printers and Faxes to open the Printers and Faxes window. 1 2 Right-click the icon for your printer in the Printers and Faxes window. A list appears.2 3 Click Properties in the list. The Properties dialog box appears. Click the Device Settings tab, and double-click Hard disk. 3 4 The Hard Disk Settings dialog box appears. Click Export. 4 5 The Export Custom Box List dialog box appears. Select a save location from the Look in list. 5 6 Type a File name and click Save. 6 7 Click OK to close the Properties dialog box. 7 Import 1 Click Start in the Windows task bar, and click Printers and Faxes to open the Printers and Faxes window. 1 2 Right-click the icon for your printing system in the Printers and Faxes window. A list appears. 2 3 Click Properties in the list. The Properties dialog box appears. Click the Device Settings tab, and double-click Hard disk. 3 4 The Hard Disk Settings dialog box appears. In Box number, type in a four-digit number between 0001 and 1000 and click Import. 4 5 The Import Custom Box List dialog box appears. Select the Custom box data file to import and click Open. 5 6 The Custom box list is opened and displayed in the Defined Custom Boxes area. Click OK to save the list. The imported list replaces all the Custom boxes that were already in the list. 6 8-5 KX Driver
-
 1
1 -
2
-
3
-
4
-
5
-
6
-
7
-
8
-
9
-
10
-
11
-
12
-
13
-
14
-
15
-
16
-
17
-
18
-
19
-
20
-
21
-
22
-
23
-
24
-
25
-
26
-
27
-
28
-
29
-
30
-
31
-
32
-
33
-
34
-
35
-
36
-
37
-
38
-
39
-
40
-
41
-
42
-
43
-
44
-
45
-
46
-
47
-
48
-
49
-
50
-
51
-
52
-
53
-
54
-
55
-
56
-
57
-
58
-
59
-
60
-
61
-
62
-
 63
63 -
 64
64 -
 65
65 -
 66
66 -
 67
67 -
 68
68 -
 69
69 -
 70
70 -
 71
71 -
 72
72 -
 73
73 -
74
-
75
-
76
-
77
-
78
-
79
-
80
-
81
-
82
-
83
-
84
-
85
-
86
-
87
-
88
-
89
-
90
-
91
-
92
-
93
-
94
-
95
-
96
-
97
-
98
-
99
-
100
-
101
-
102
-
103
-
104
-
105
 |
 |