Kyocera KM-C830D KX Driver User Guide Version 5.90 - Page 91
Enable Client Profile
 |
View all Kyocera KM-C830D manuals
Add to My Manuals
Save this manual to your list of manuals |
Page 91 highlights
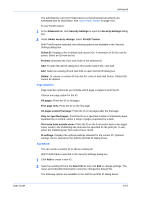
Advanced Once changes have been made and OK or Cancel is clicked, PrintID tracker is locked again. To lock PrintID tracker: 1 In the Device Settings tab, click Administrator to open the Administrator Settings dialog box. 1 2 Select Lock PrintID Tracker. 2 3 Enter a 4-16 character password. Reenter the password in the Confirm password dialog box to confirm. 3 4 Click OK in all dialog boxes. 4 To unlock PrintID tracker: 1 In the Device Settings tab, click Administrator to open the Administrator Settings dialog box. 1 2 Clear Lock PrintID Tracker. 2 3 Type the established password. 3 4 Click OK in all dialog boxes. 4 To temporarily unlock PrintID tracker and change ID settings: 1 In the Advanced tab, click Security Settings to open the Security Settings dialog box. 1 2 Click Unlock. 2 3 Type the established password. 3 4 Add or edit an ID. 4 5 Click OK in all dialog boxes. 5 The selected ID is printed, and PrintID tracker remains locked. Enable Client Profile In a client/server environment, you can use profiles saved in the server or use client profiles created and saved in your driver. This feature is available in the Advanced tab only in a client/server environment. • Clear the Enable client profile check box to select profiles from the server to apply to your print jobs. Server profiles are read-only. • Select the Enable client profile check box to create and save custom profiles in your (client) driver. User Guide 9-17
-
 1
1 -
2
-
3
-
4
-
5
-
6
-
7
-
8
-
9
-
10
-
11
-
12
-
13
-
14
-
15
-
16
-
17
-
18
-
19
-
20
-
21
-
22
-
23
-
24
-
25
-
26
-
27
-
28
-
29
-
30
-
31
-
32
-
33
-
34
-
35
-
36
-
37
-
38
-
39
-
40
-
41
-
42
-
43
-
44
-
45
-
46
-
47
-
48
-
49
-
50
-
51
-
52
-
53
-
54
-
55
-
56
-
57
-
58
-
59
-
60
-
61
-
62
-
63
-
64
-
65
-
66
-
67
-
68
-
69
-
70
-
71
-
72
-
73
-
74
-
75
-
76
-
77
-
78
-
79
-
80
-
81
-
82
-
83
-
84
-
85
-
 86
86 -
 87
87 -
 88
88 -
 89
89 -
 90
90 -
 91
91 -
 92
92 -
 93
93 -
 94
94 -
 95
95 -
 96
96 -
97
-
98
-
99
-
100
-
101
-
102
-
103
-
104
-
105
 |
 |