Kyocera TASKalfa 2550ci 2550ci Printer Driver User Guide - Page 69
Color Adjustment, Selecting Custom Color Adjustment, Adjusting HSL (Hue, Saturation, Lightness)
 |
View all Kyocera TASKalfa 2550ci manuals
Add to My Manuals
Save this manual to your list of manuals |
Page 69 highlights
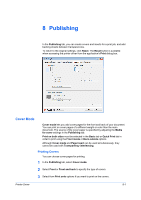
Imaging 10 Click Close. Windows XP 1 Click Start, click Printers and Faxes. 2 Right-click the desired color printer. 3 Select Properties. 4 Select the Color Management tab and click Add. 5 In the Add Profile Association dialog box, select a color profile from the list and click Add. 6 In the Color Management tab, select Manual. 7 Select the desired color profile from the list and click Set as Default. 8 Click Apply. Color Adjustment Color Adjustment lets you customize the two color spaces in the driver and save up to three custom groups. Color space changes can be made to hue, saturation, and lightness (HSL) or to color balance levels. Note: If different custom settings are selected in Color Adjustment and Color Optimizer (Advanced tab), the latest change takes precedence and is applied to the print job. In a client-server environment, settings a user makes in the client computer are saved for future use. Selecting Custom Color Adjustment If a custom color setting has already been defined, you can select and apply it to a print job. 1 In Imaging > Color mode, select Full color. 2 In the Adjustment list, select Custom 1, Custom 2, or Custom 3. 3 Click OK. Adjusting HSL (Hue, Saturation, Lightness) HSL controls adjust the full spectrum, brightness, contrast, and vividness of the color. 1 In Imaging > Color mode, select Full color. Printer Driver 7-9
-
 1
1 -
2
-
3
-
4
-
5
-
6
-
7
-
8
-
9
-
10
-
11
-
12
-
13
-
14
-
15
-
16
-
17
-
18
-
19
-
20
-
21
-
22
-
23
-
24
-
25
-
26
-
27
-
28
-
29
-
30
-
31
-
32
-
33
-
34
-
35
-
36
-
37
-
38
-
39
-
40
-
41
-
42
-
43
-
44
-
45
-
46
-
47
-
48
-
49
-
50
-
51
-
52
-
53
-
54
-
55
-
56
-
57
-
58
-
59
-
60
-
61
-
62
-
63
-
 64
64 -
 65
65 -
 66
66 -
 67
67 -
 68
68 -
 69
69 -
 70
70 -
 71
71 -
 72
72 -
 73
73 -
 74
74 -
75
-
76
-
77
-
78
-
79
-
80
-
81
-
82
-
83
-
84
-
85
-
86
-
87
-
88
-
89
-
90
-
91
-
92
-
93
-
94
-
95
-
96
-
97
-
98
-
99
-
100
-
101
-
102
-
103
-
104
-
105
-
106
 |
 |